It's finally starting to feel like Fall, here in the desert.
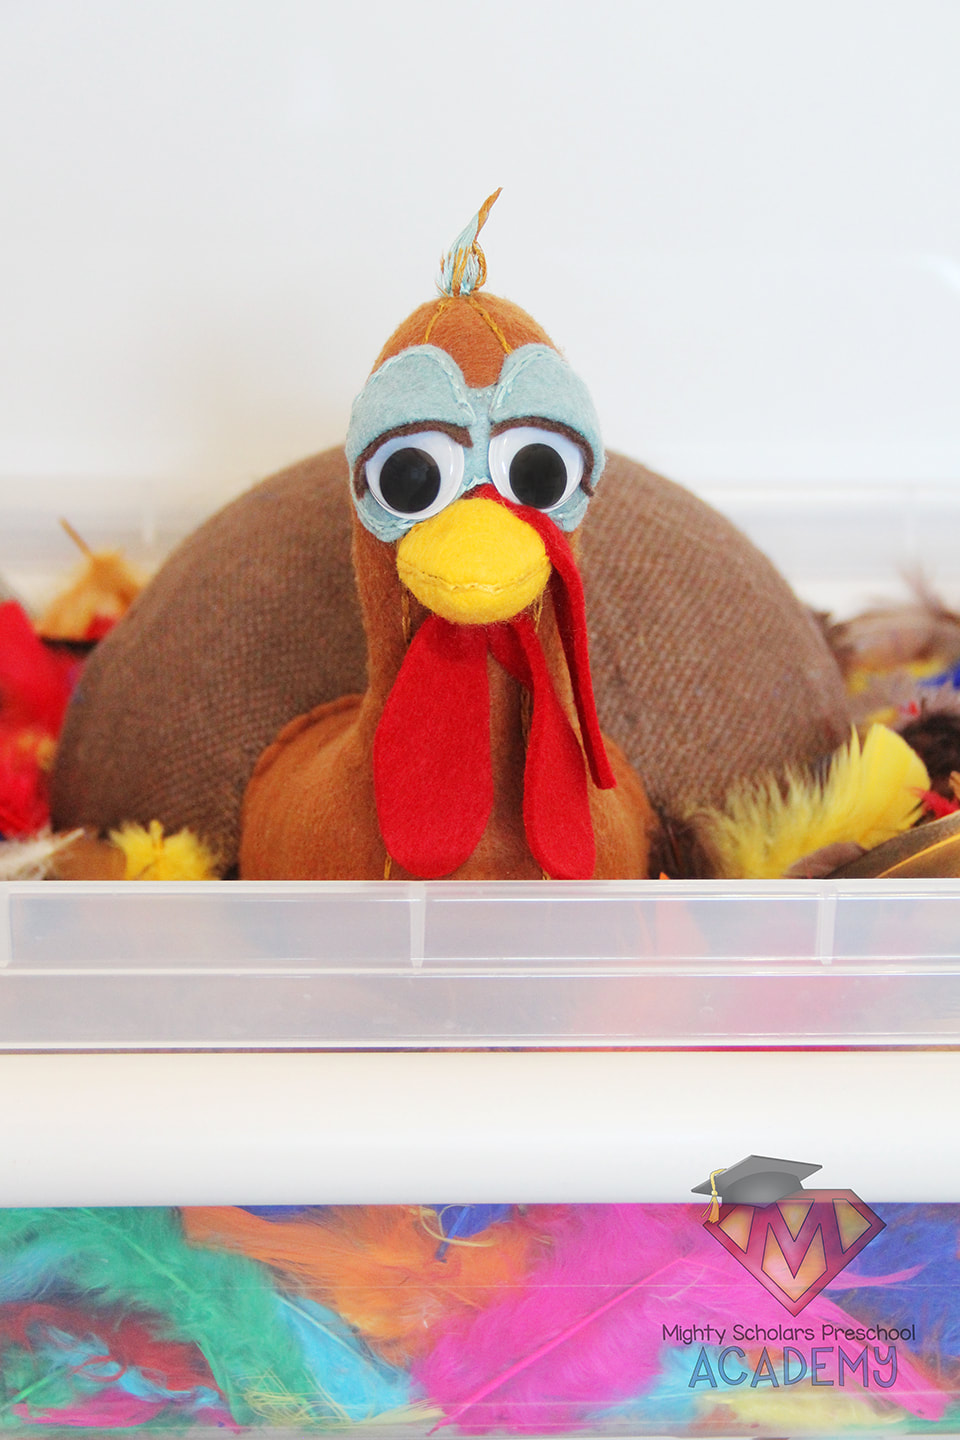
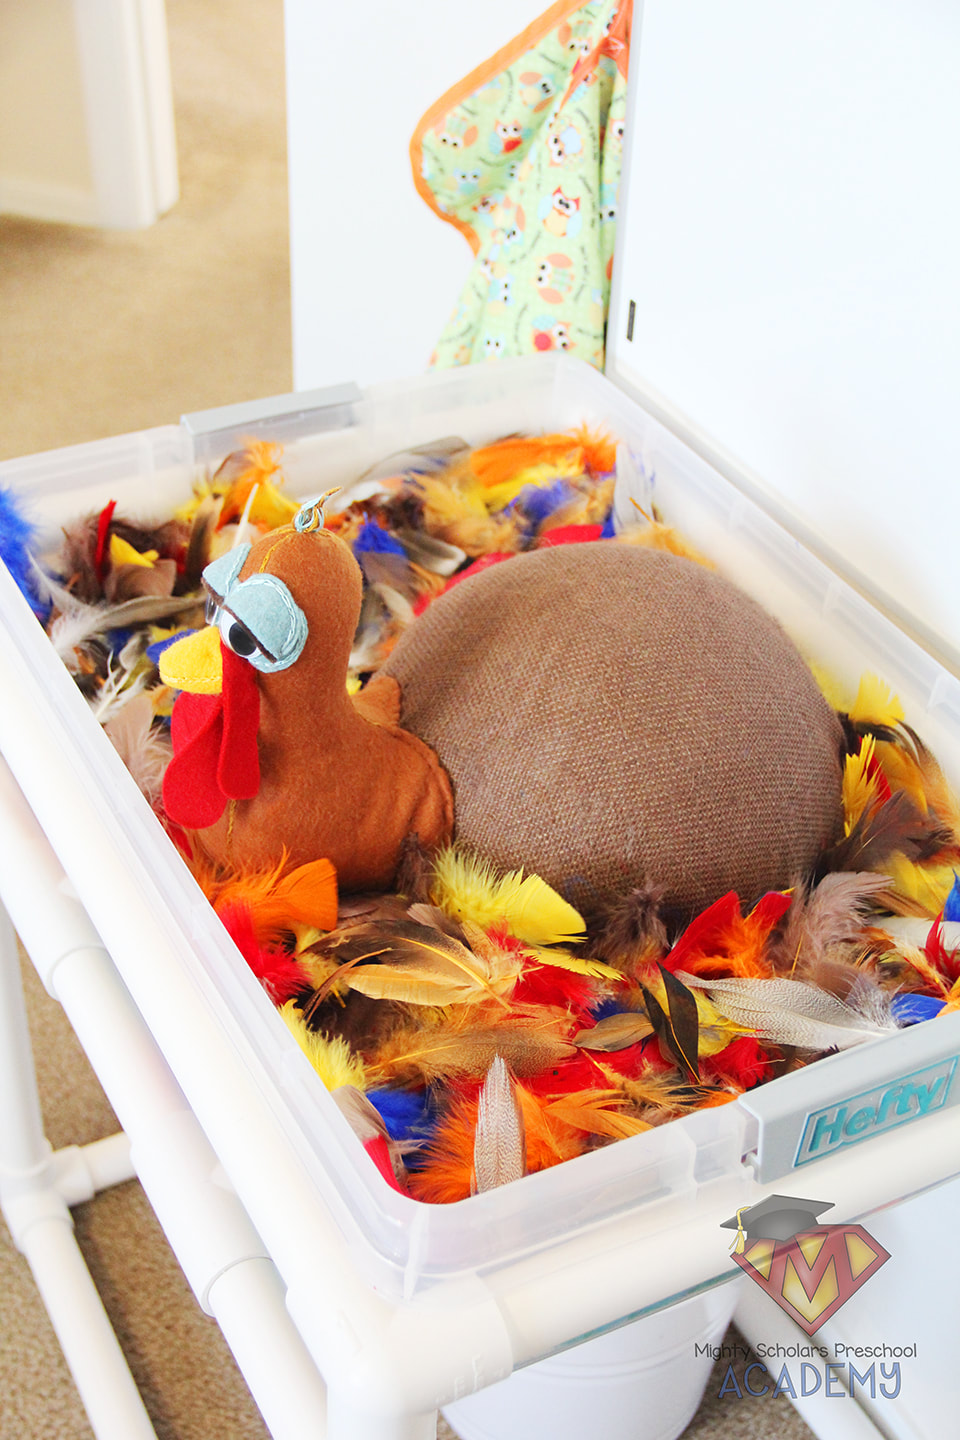
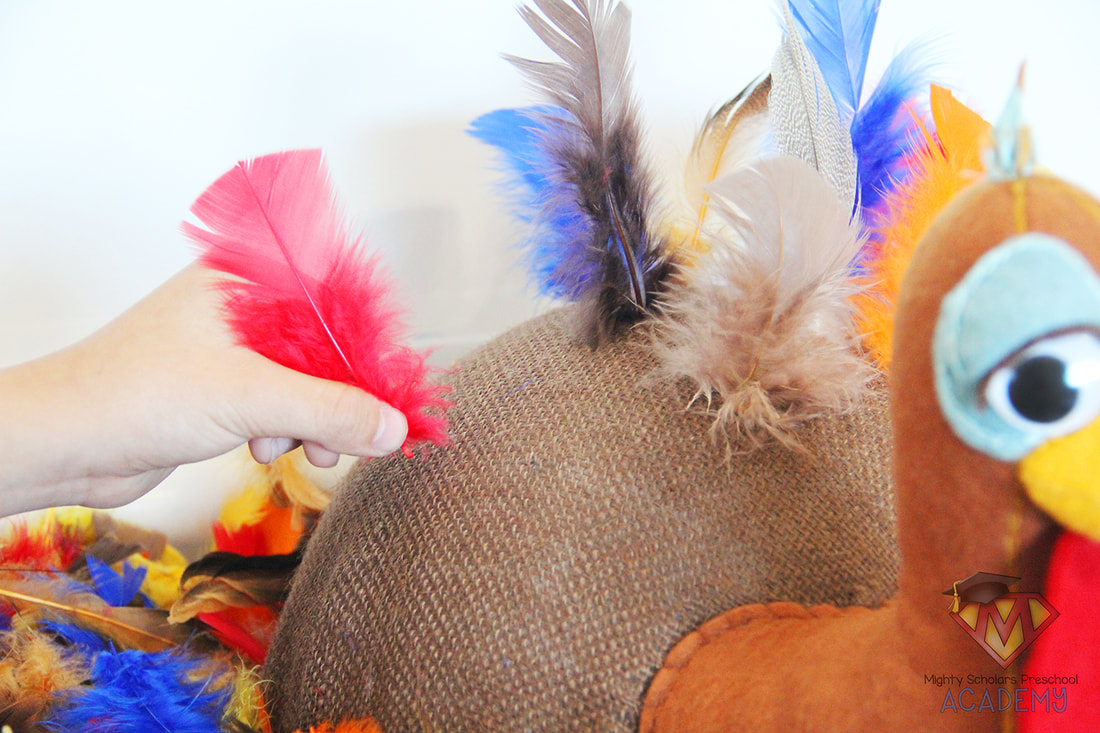
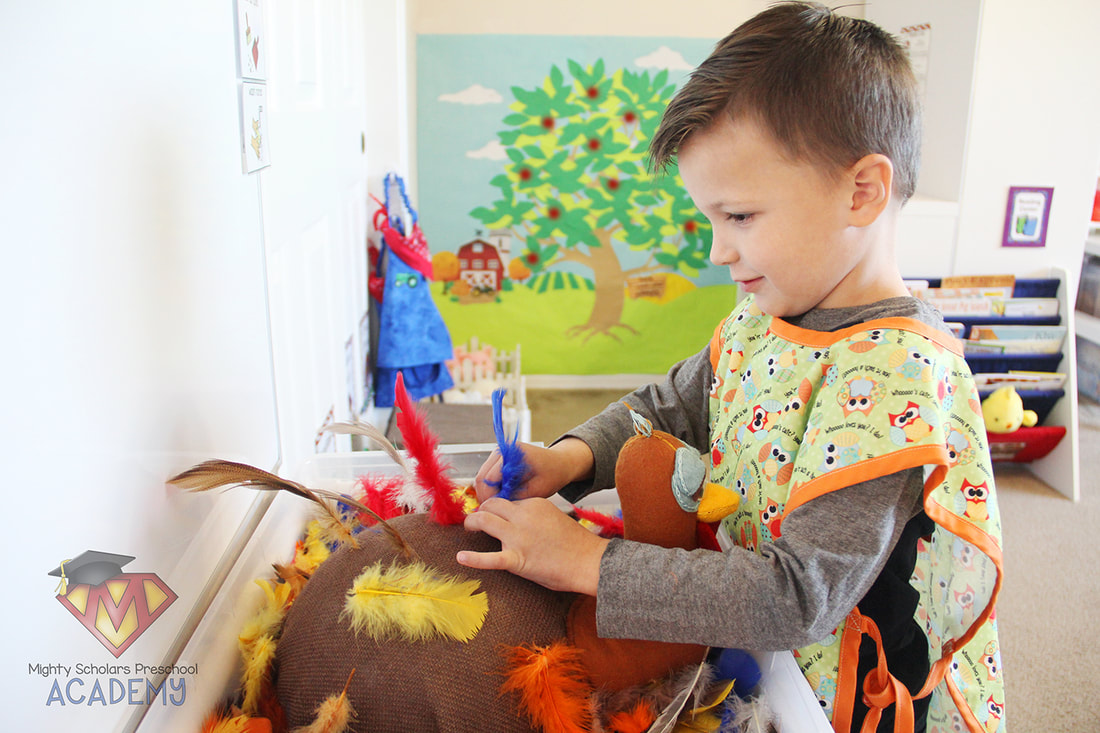
With Fall comes the holidays and a very welcome change in the weather. To bring in the feeling of Fall, our classroom has been changed into a farm. Included in our Farm/Harvest theme is a new sensory table. As I've mentioned in past posts, I try not to repeat a sensory table and filler throughout the school year. I want my students to have an entirely new experience with each one. To fit in with our Farm/Harvest and the Thanksgiving holiday, our sensory table has been filled with soft, colorful craft feathers and a bare turkey.
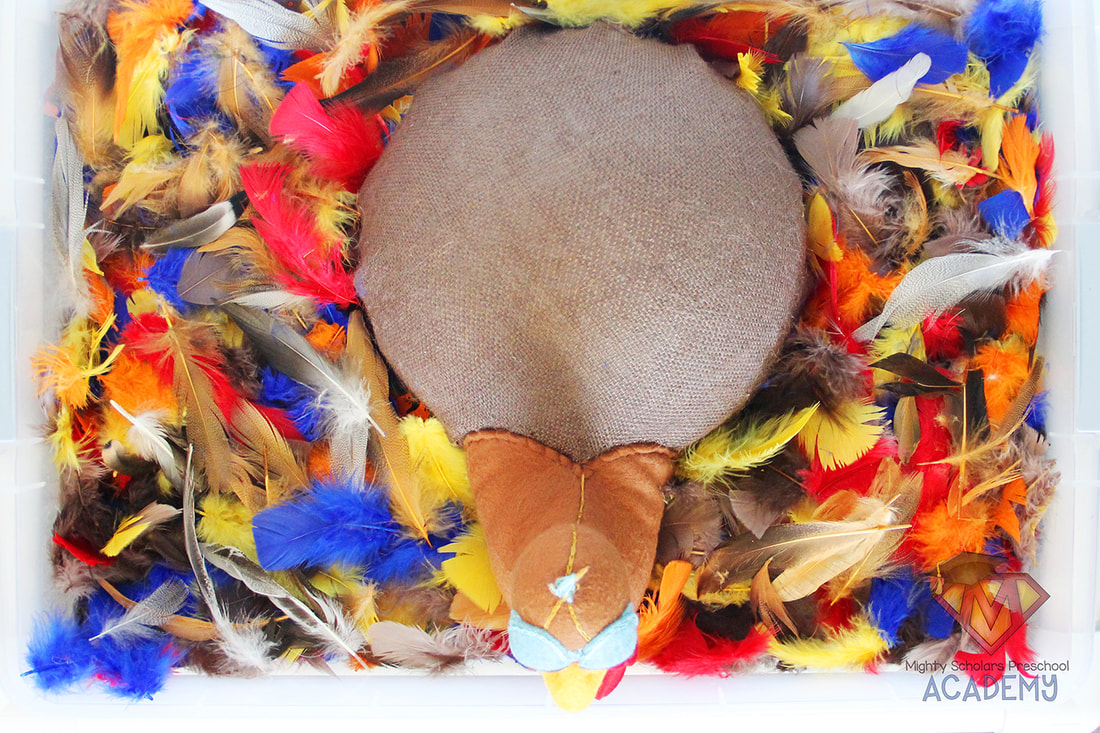
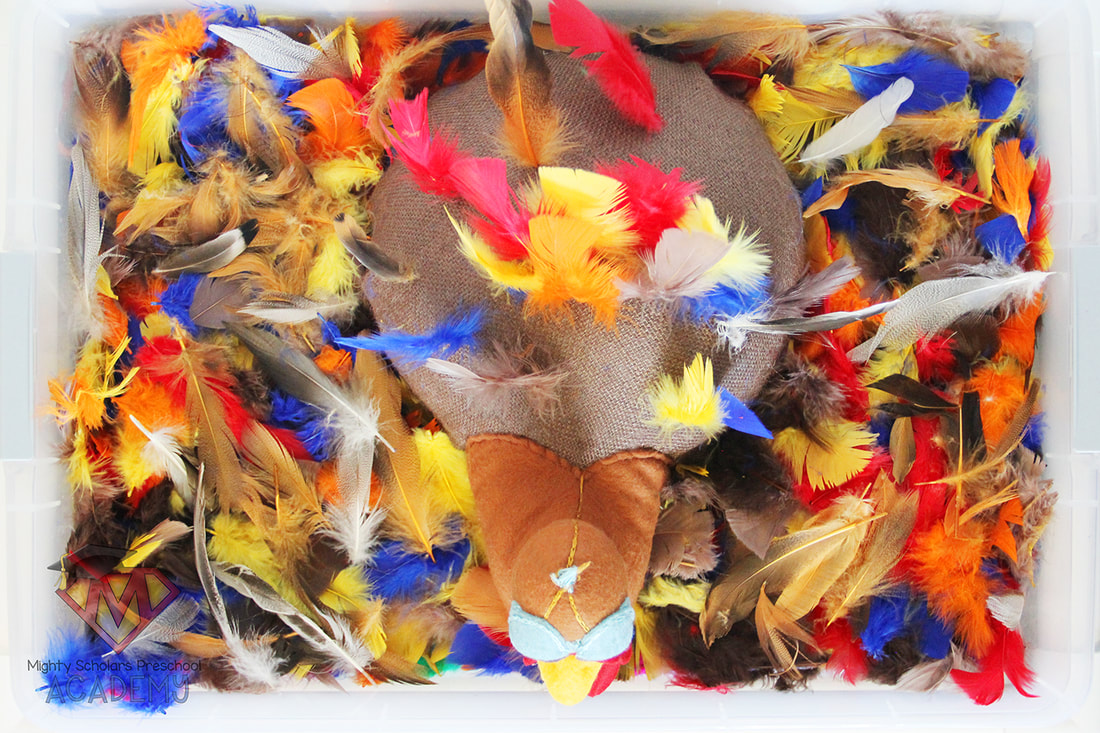
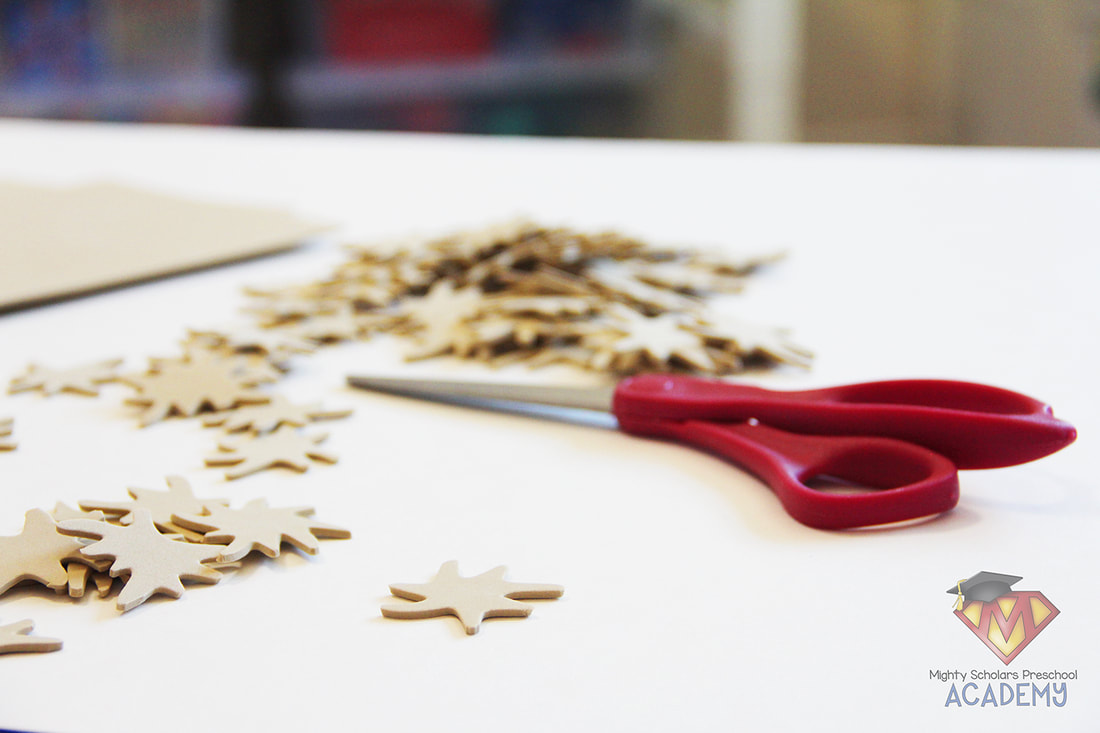
The goal is to really work those fine-motor muscles.
Although the invitation to play is open and doesn't require my scholars to do so, the main goal of this sensory table is to practice fine-motor skills. To give the turkey it's feathers, students need to use their pincer grip to pinch the feather base and push it into the burlap covered foam back. This requires a good pinch, with those important finger muscles.
Feathers give a very different sensorial experience
that children are very curious about.
Feathers, whether dyed or natural, are a fascinating, natural sensory table filler. Most feathers sold in craft stores have a soft fluffy plumaceous section, that children love to touch. While a few of my students are only wanting to touch the feathers, some like to explore feathers closer, curious about the way the barbules grab ahold of each other to form the feathers shape.
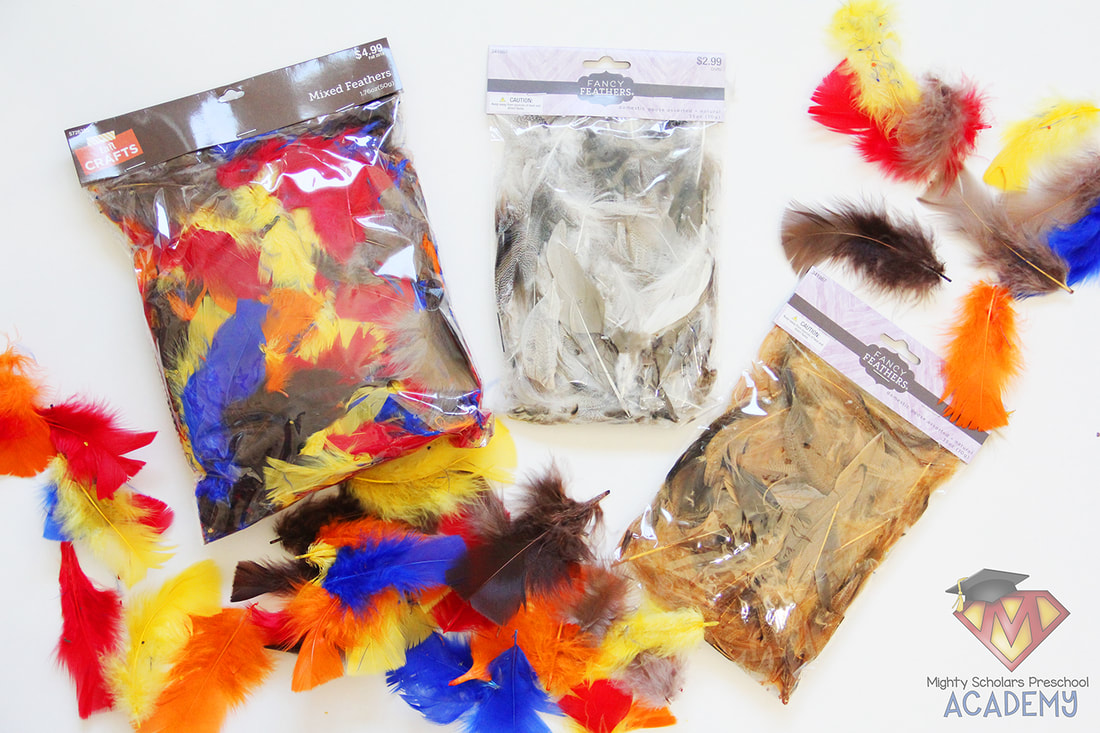
When using feathers as a sensory table filler, I like to also purchase a couple of different smaller packages of completely naturally fancy feathers. These feathers usually have spots or are two-toned. I want my students to be able to examine un-dyed feathers as well. The amount of feathers needed to fill your table will vary, depending on the size of your sensory table container. I used two large bags of craft feathers and two smaller bags of fancy feathers, to fill my 16x24 sensory table.
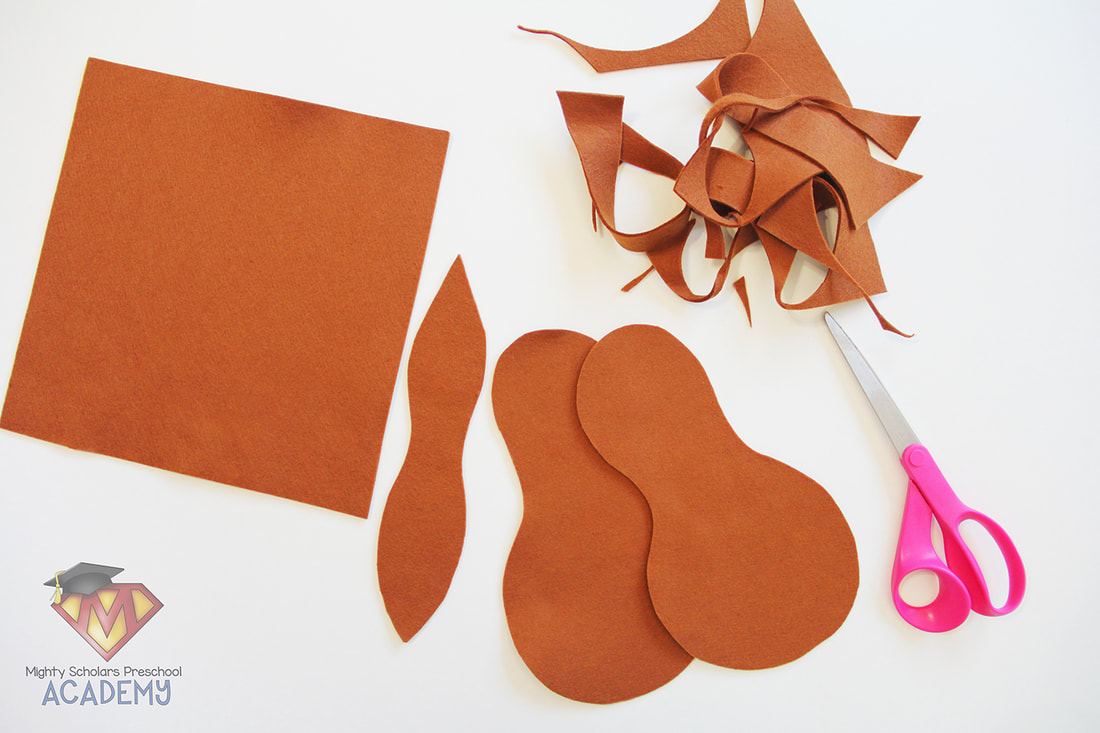
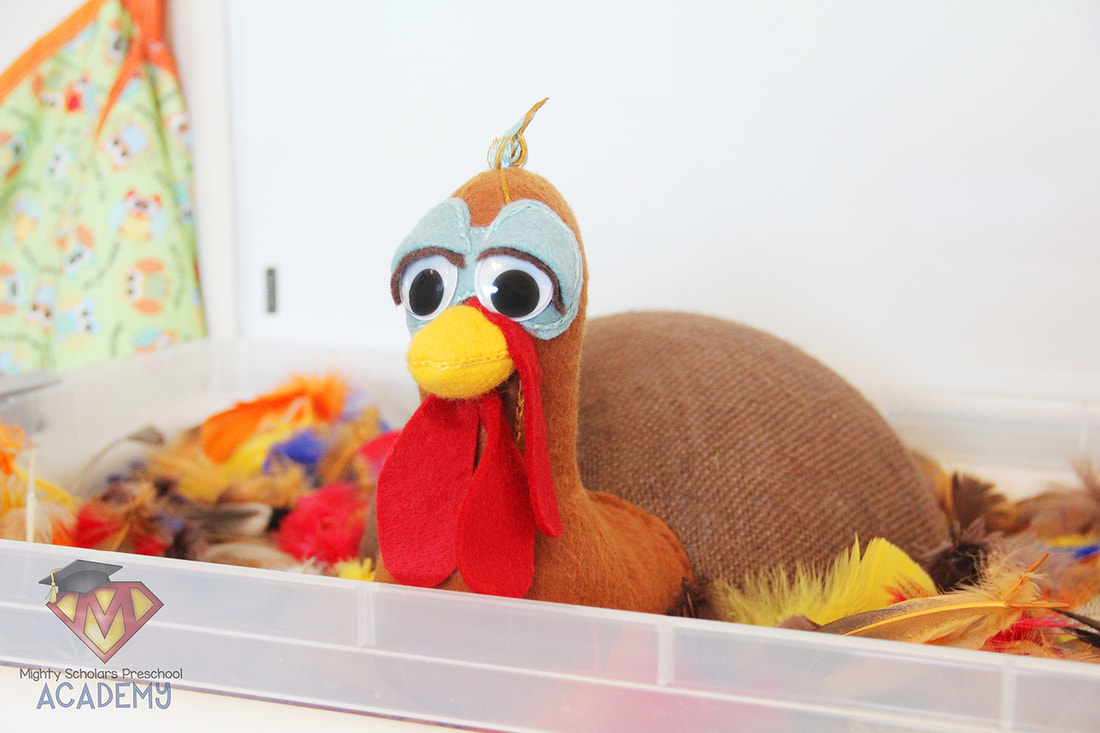
The turkey doesn't need to be elaborate.
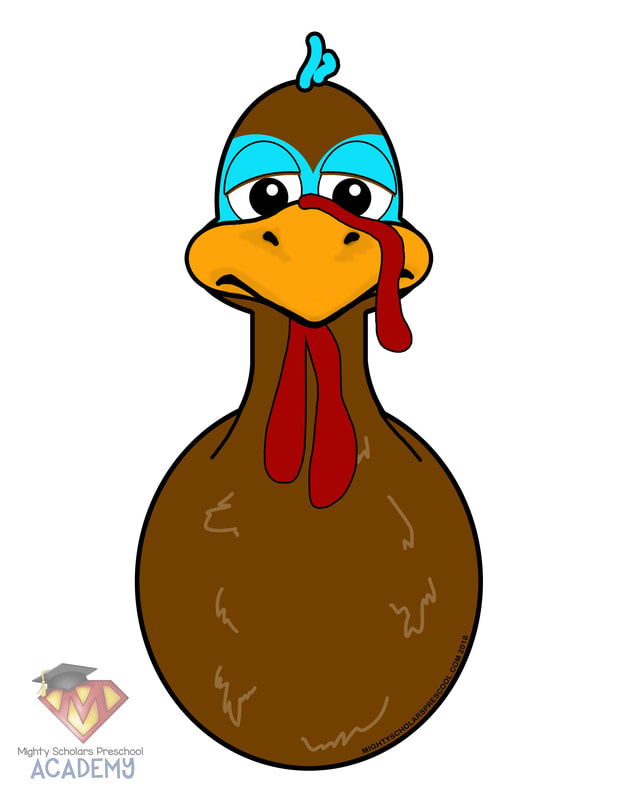
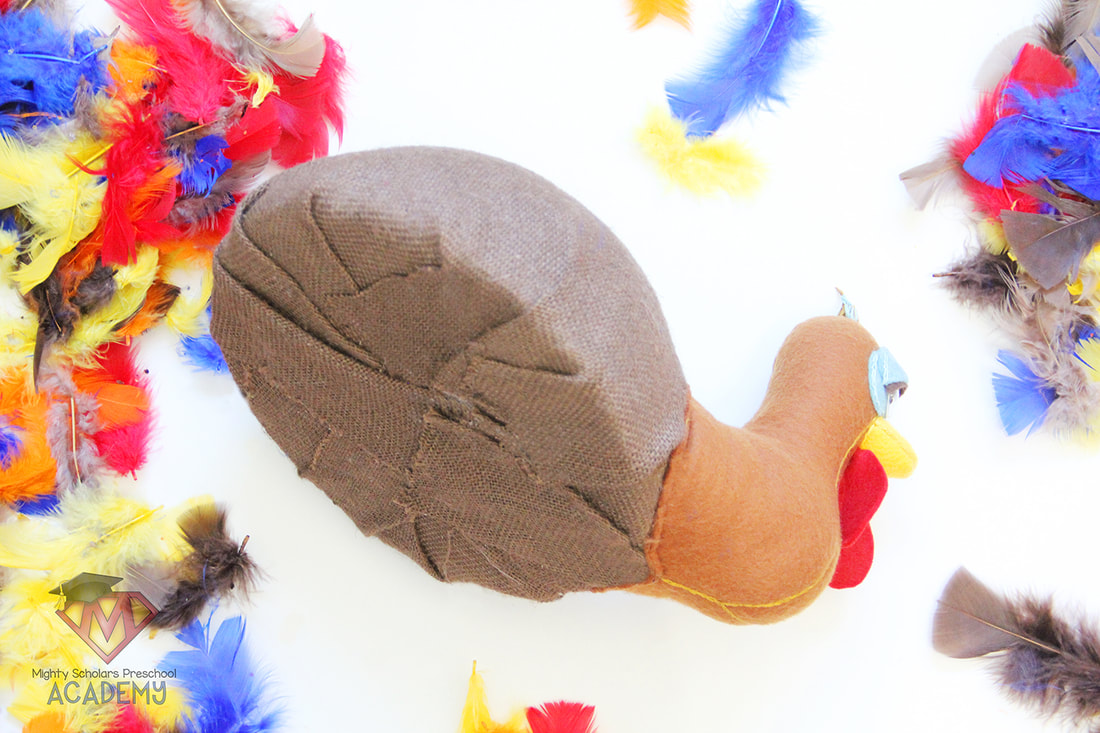
While I like to spend extra time making my classroom themed supplies more detailed, it's certainly not needed! I have attached a turkey image that can be printed, laminated and attached to your turkey body, giving the same experience without the elaborate work. The turkey image file can be found at the end of this blog post.
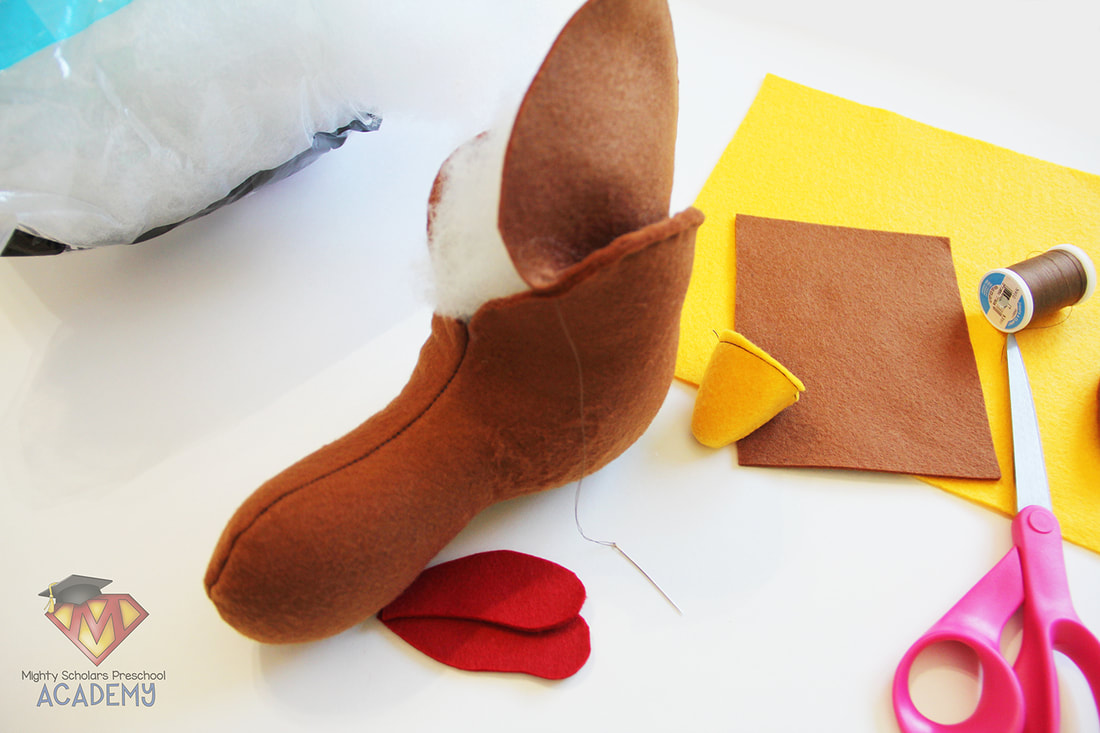
My turkey neck and head was made from felt, stuffed with polyfill and extra large googly eyes. I hand sewed it to the styrofoam body, with large stitches, so it can be removed if the body needs to be replaced in the future.
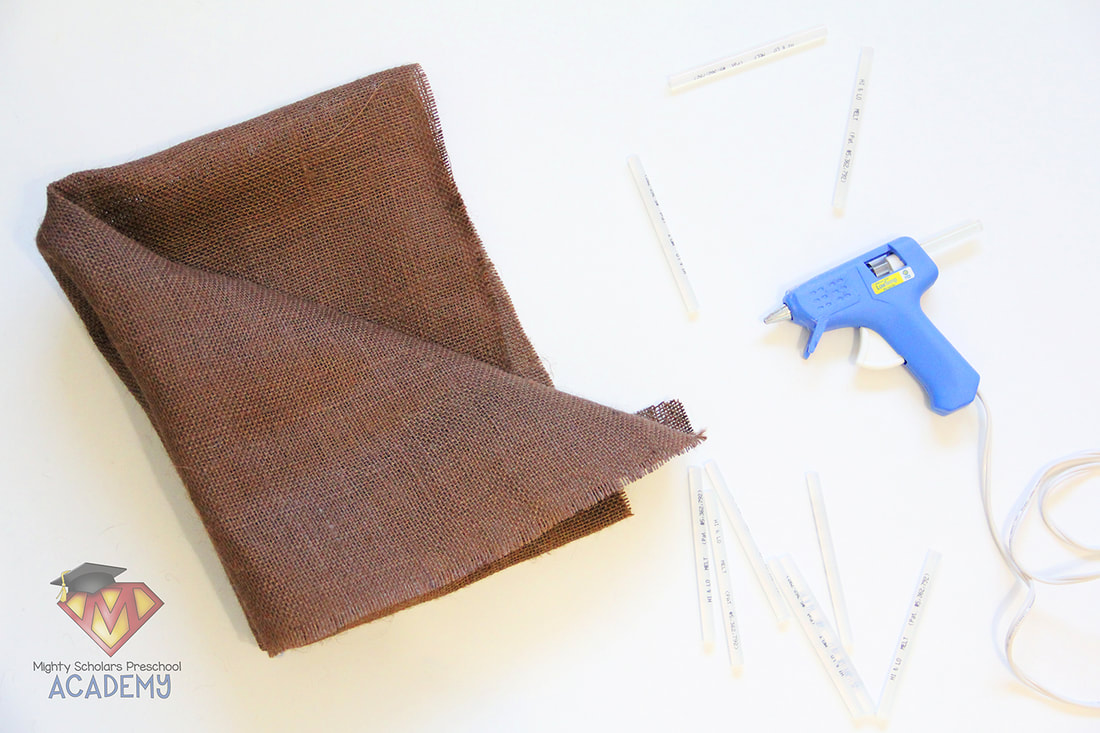
Brown burlap covers the styrofoam body.
The base of the body is a large, half styrofoam sphere. I hot glued one layer of brown burlap for the turkey skin, making sure the ends were tucked and glued flat on the bottom. Its important to pull the burlap snuggly and glue the burlap securely on the bottom, since pulling the feathers out of the turkey back can also pull up on the burlap. Don't add hot glue to the top of the sphere, or it may make it difficult, or even impossible to poke feathers through and into the foam.
The turkey image can be downloaded below:
Please note, as a participant in the Amazon Services LLC Associates Program, I may earn a small commission on qualified recommended links.
The Amazon Services LLC Associates Program is an affiliate advertising program designed to provide a means for sites to earn advertising fees by advertising and linking to Amazon.com.
Here are my Amazon Picks to complete the
Fine-Motor Turkey Feather Sensory Table: 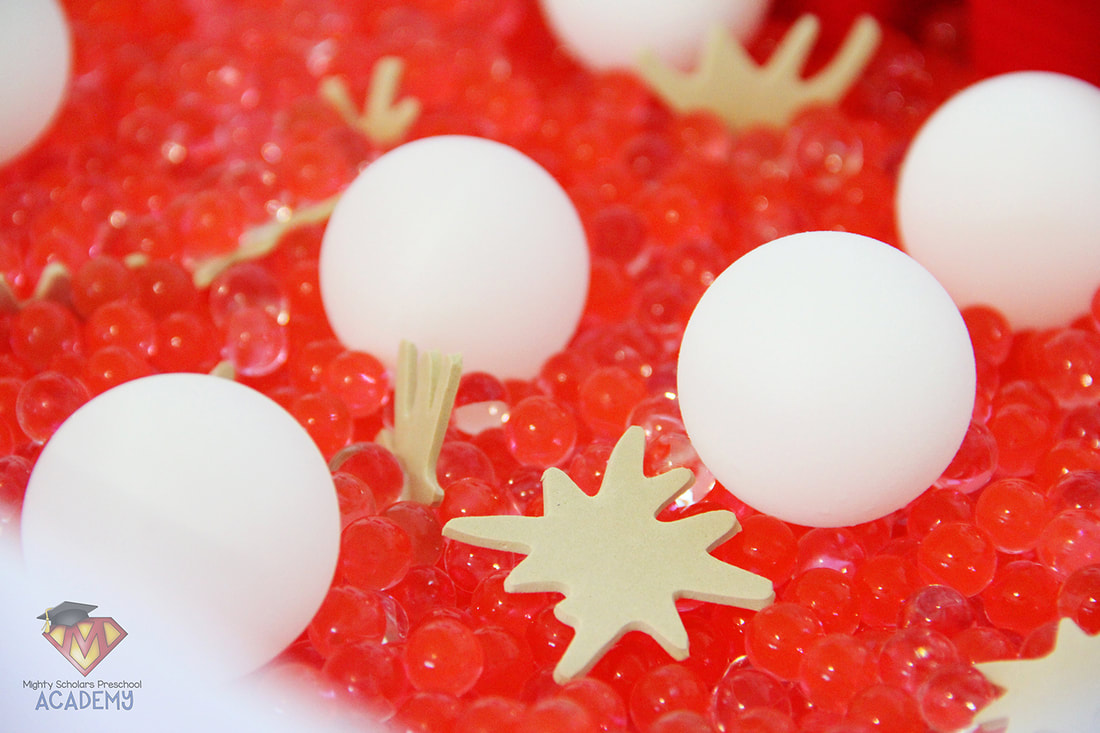
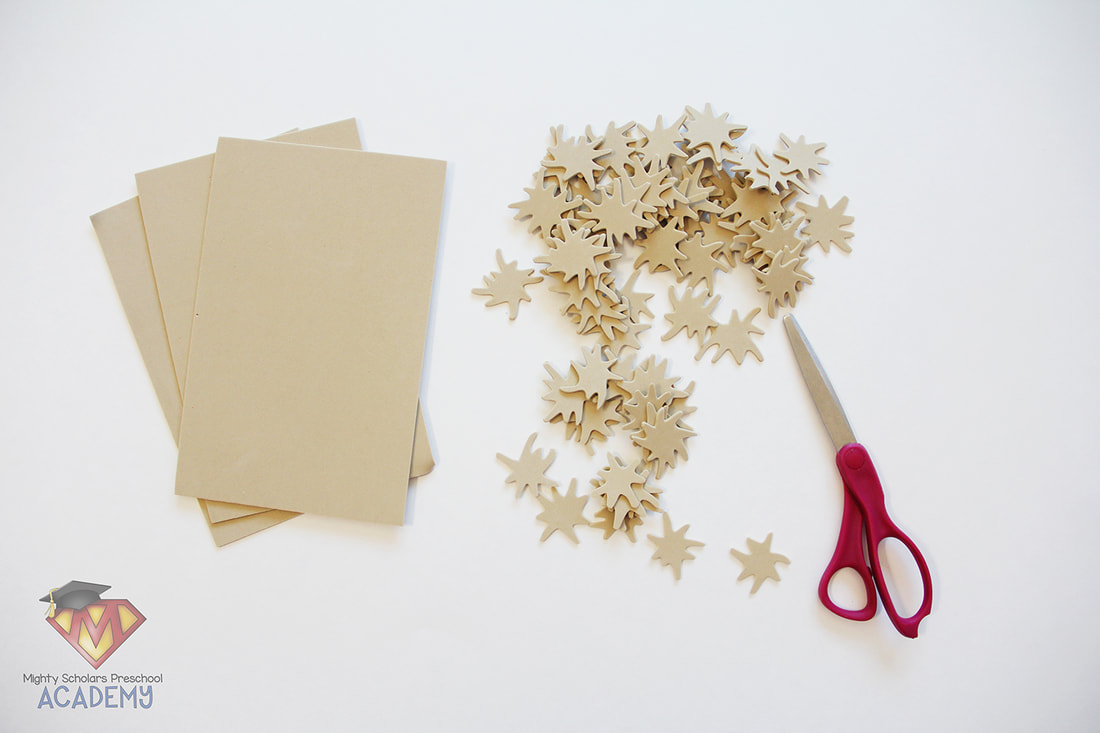
That red liquid that flows through all the intricate veins in our bodies.
What is blood? Very young children know that blood is the red liquid that flows out from beneath their skin, if they get cut or scraped. However, the details of blood can be hard to explain to preschool-aged children. During the week of lessons on our hearts, I take the time to discuss the details of blood: what it is, why we have it, what it does, and what its made of.
Another reason to keep our bones strong and healthy.
In the previous lessons on our bodies, I taught all about our bones and bone marrow - the blood maker. When introducing the lesson on blood, I review the previous portion on bone marrow. Bone marrow makes our red blood cells, white blood cells and blood platelets. If we aren't keeping our bones healthy, they won't be able to make healthy blood to carry the oxygen, food and water to the rest of our body.
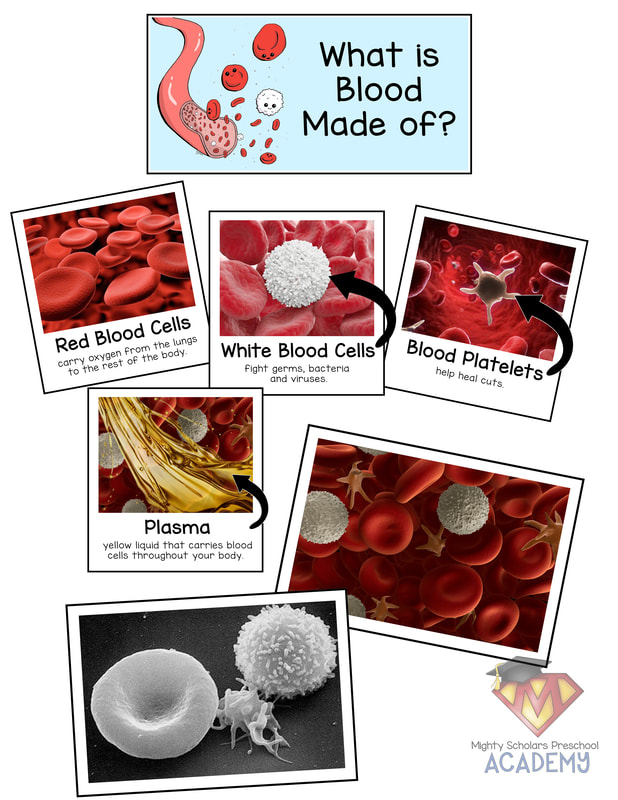
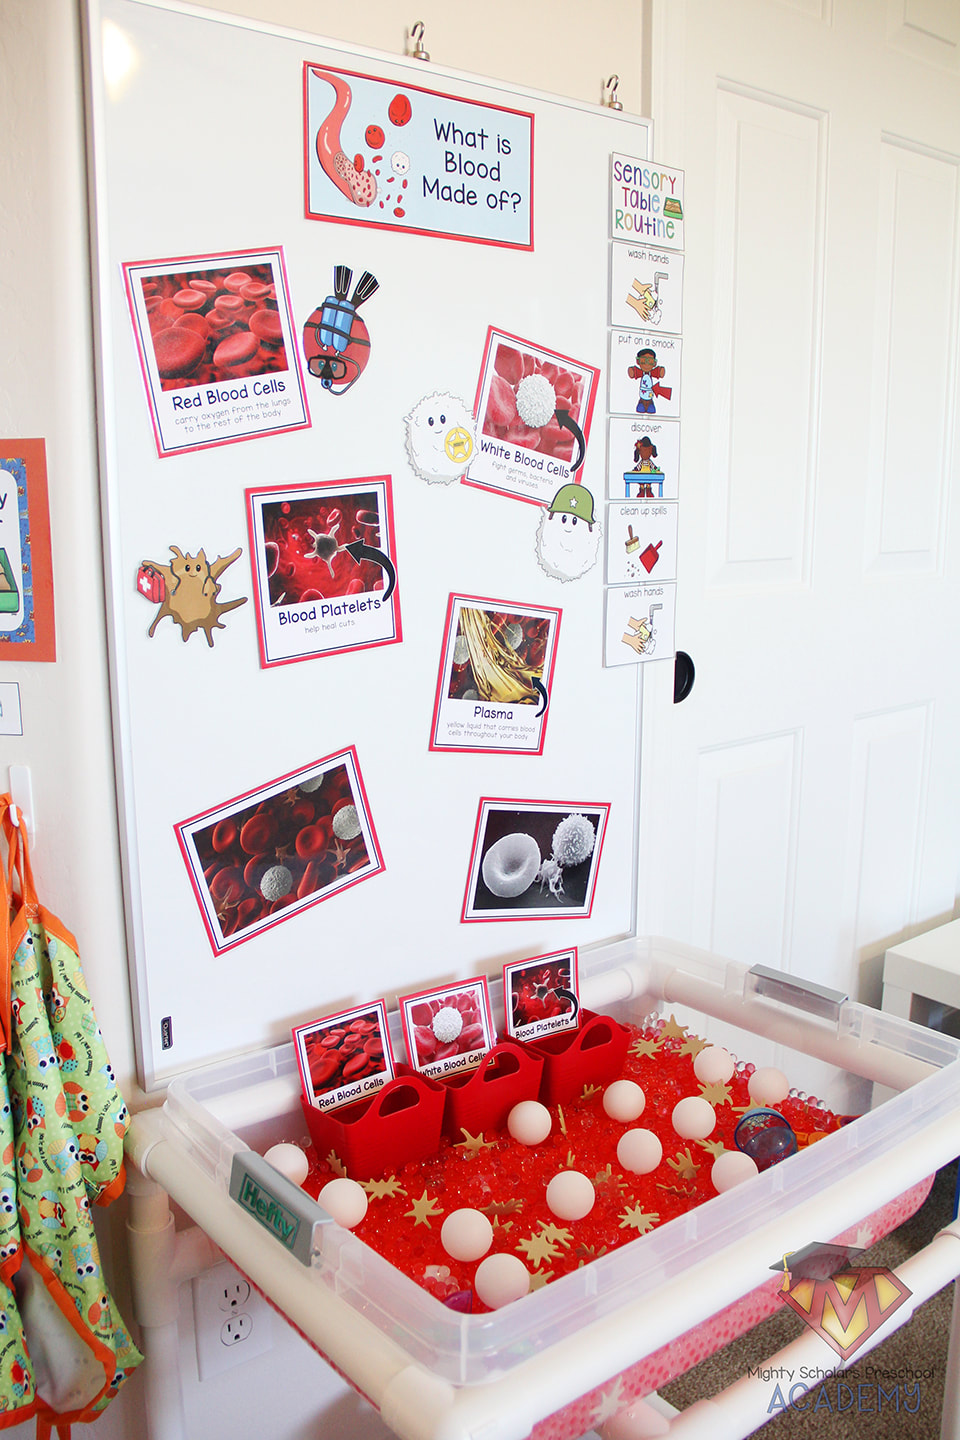
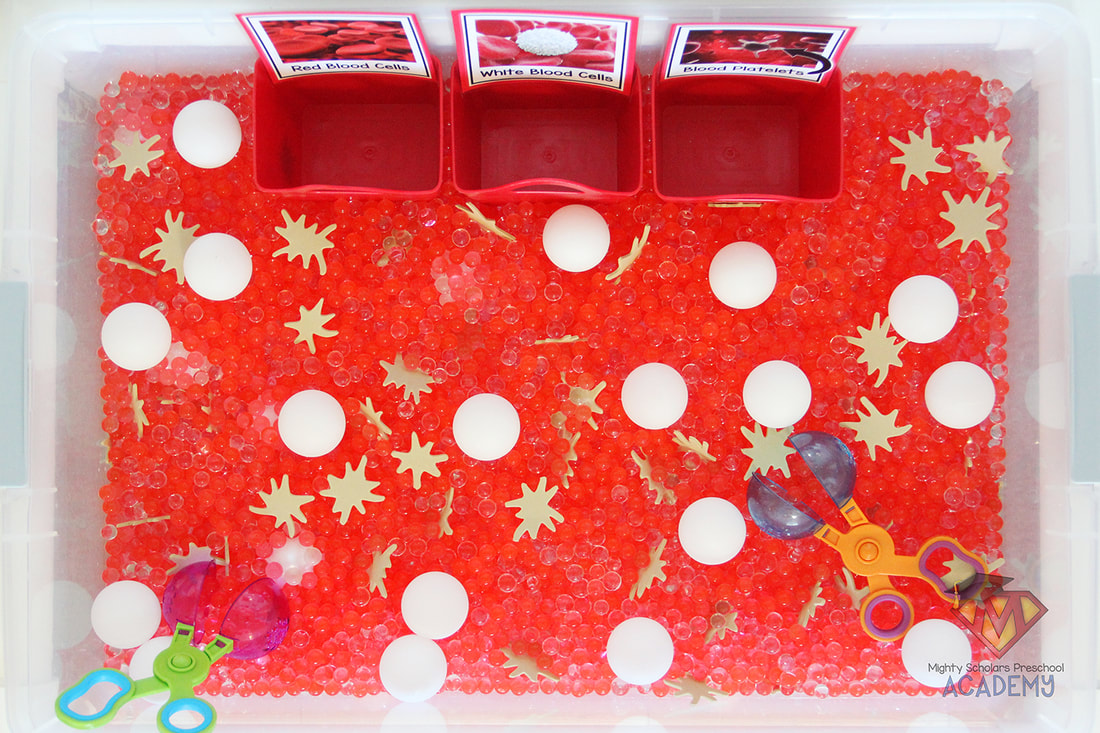
Each of the four components of blood have a picture card.
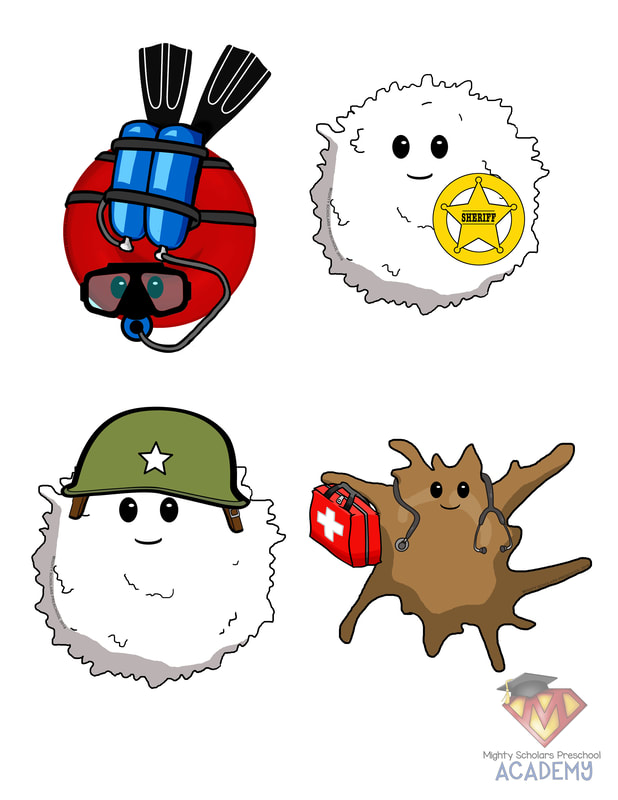
During the lesson on what makes up our blood, I place out a picture card for each component, as we talk about them individually. Cells and platelets have an additional character picture that I place next to the card, to help my students remember the job of the component. After the lesson, I attach the lesson cards and character pictures up on the whiteboard above the sensory table. At the end of the lesson, I also show a picture card with a copy of an actual microscopic image of a red blood cell, white blood cell and a blood platelet.
Red blood cells make up the largest part of blood and give our blood the red color. A red blood cell looks like a squished or flattened ball. Red blood cells carry oxygen from the lungs to every part of our body, from head to toe. Without oxygen, our body wouldn't be able to keep working or survive. The character picture is a red blood cell with scuba diving gear (carrying an oxygen tank through our bodies). White blood cells are larger than red, and the amount that flows around in our bodies can change. I make sure to tell my students that white blood cells have two roles: a few serve and protect, keeping us safe from everyday germs; but if we get sick, our body makes a lot of white blood cell soldiers. Those white blood cell soldiers join those that fight off the everyday germs and storm through our body to fight off the enemy (a.k.a. sickness). There are two character pictures for white blood cells. The first cell has a sheriff badge and the second cell has an army helmet. Blood platelets are much smaller than cells and have an irregular shape. Microscopic images of platelets show tentacle like arms, protruding from random locations around the cell. Platelets help the healing process of cuts and scrapes by sticking together, forming a clot (natures bandaid). The character picture for the platelet has a medical bag and stethoscope. I have attached the PDF files for the cards and characters, as a freebie download, at the bottom of this blog post. 
This is a hands-on sensory experience that solidifies the lesson to memory.
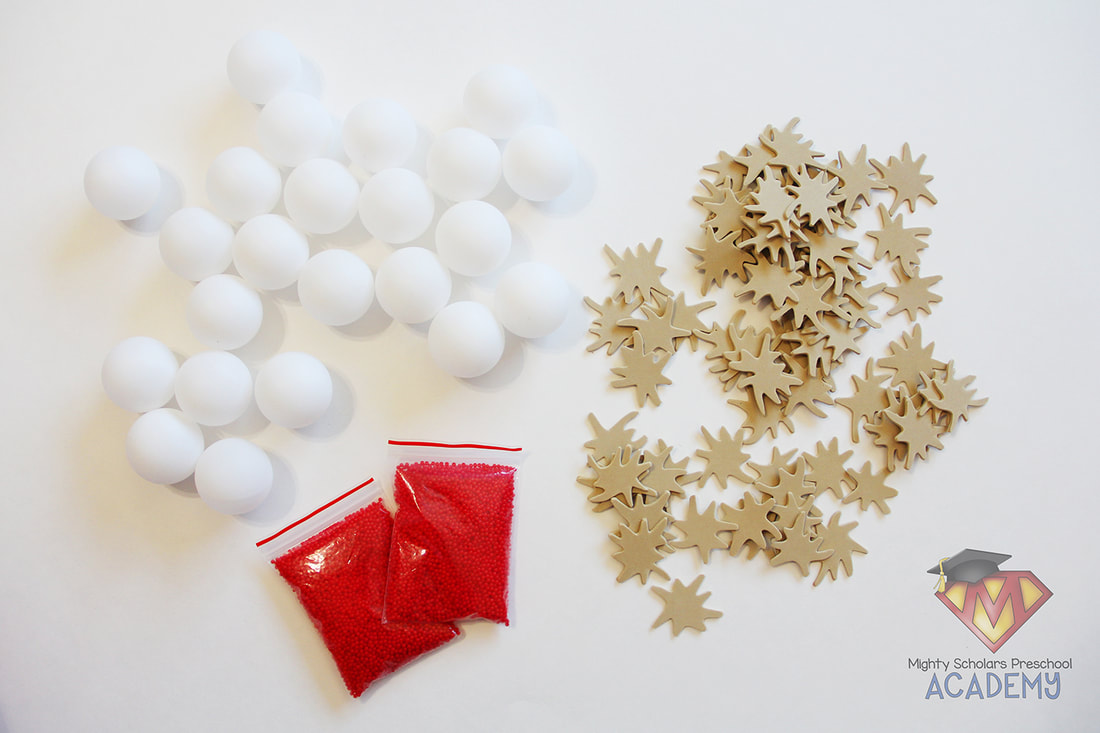
As followup to our mini lesson on what our blood is made of, I have a sensory table set up to continue with a hands-on experience that helps to solidify the lesson to memory. Since its one that involves waterbeads, I only keep this sensory table out for one week. Waterbeads can be kept relatively clean and germ free by having your scholars wash their hands thoroughly before discovering. I teach a specific routine at the beginning of the year, that my scholars follow no matter the sensory table set-up:
1. wash hands 2. put on a smock 3. discover 4. clean up spills 5. wash hands Before expanding the waterbeads, I add a tablespoon or more of white distilled vinegar (depending on the amount of waterbeads I choose to expand). Then, I add the directed amount of water. When the waterbeads have expanded to size, I immediately drain and rinse them. Distilled vinegar helps to ward off germs and mold. As an extra preventative, I rinse the waterbeads at the end of each day. I've had waterbeads last several weeks using these prevention steps. However, I do notice that my students tend to be less careful or routine conscious, after a certain period of time, so I typically keep this type of sensory table out for only a week. 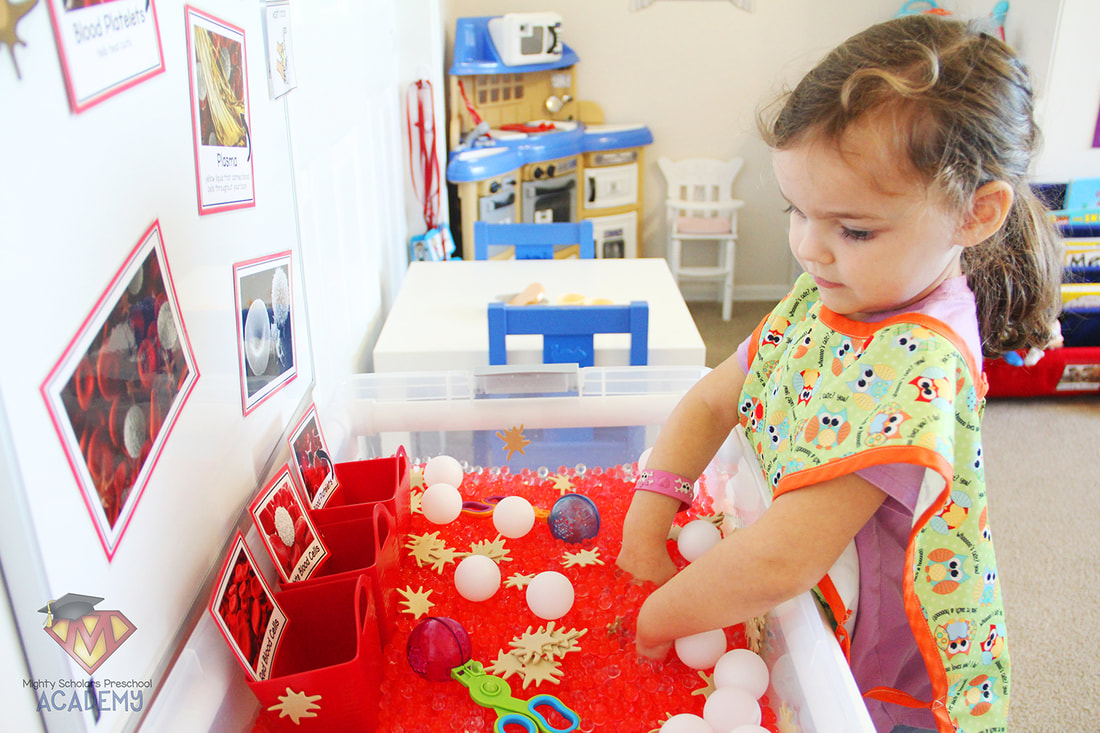
Hands-on visuals that resemble what has been taught,
can make a big impact on comprehension of the lesson.
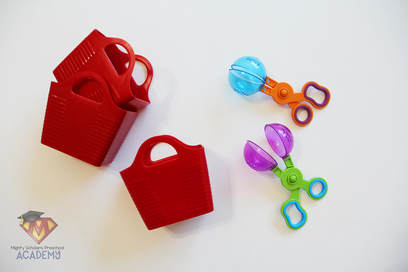
The red blood cells are the waterbeads, the white blood cells are pingpong balls, the platelets are cut pieces of tan colored craft foam and the plasma is water. For fine motor tools I add bubble tongs and small rectangular plastic collection pails. The collection pails are labeled for collecting the three different cells.
The cards and character PDF files
can be downloaded by clicking the link below:
Please note, as a participant in the Amazon Services LLC Associates Program, I may earn a small commission on qualified recommended links.
The Amazon Services LLC Associates Program is an affiliate advertising program designed to provide a means for sites to earn advertising fees by advertising and linking to Amazon.com.
My Amazon Picks to complete the 'What Is Blood Made Of?' sensory table are:

While we may all have unique features on the outside,
we have identical component parts in the inside.
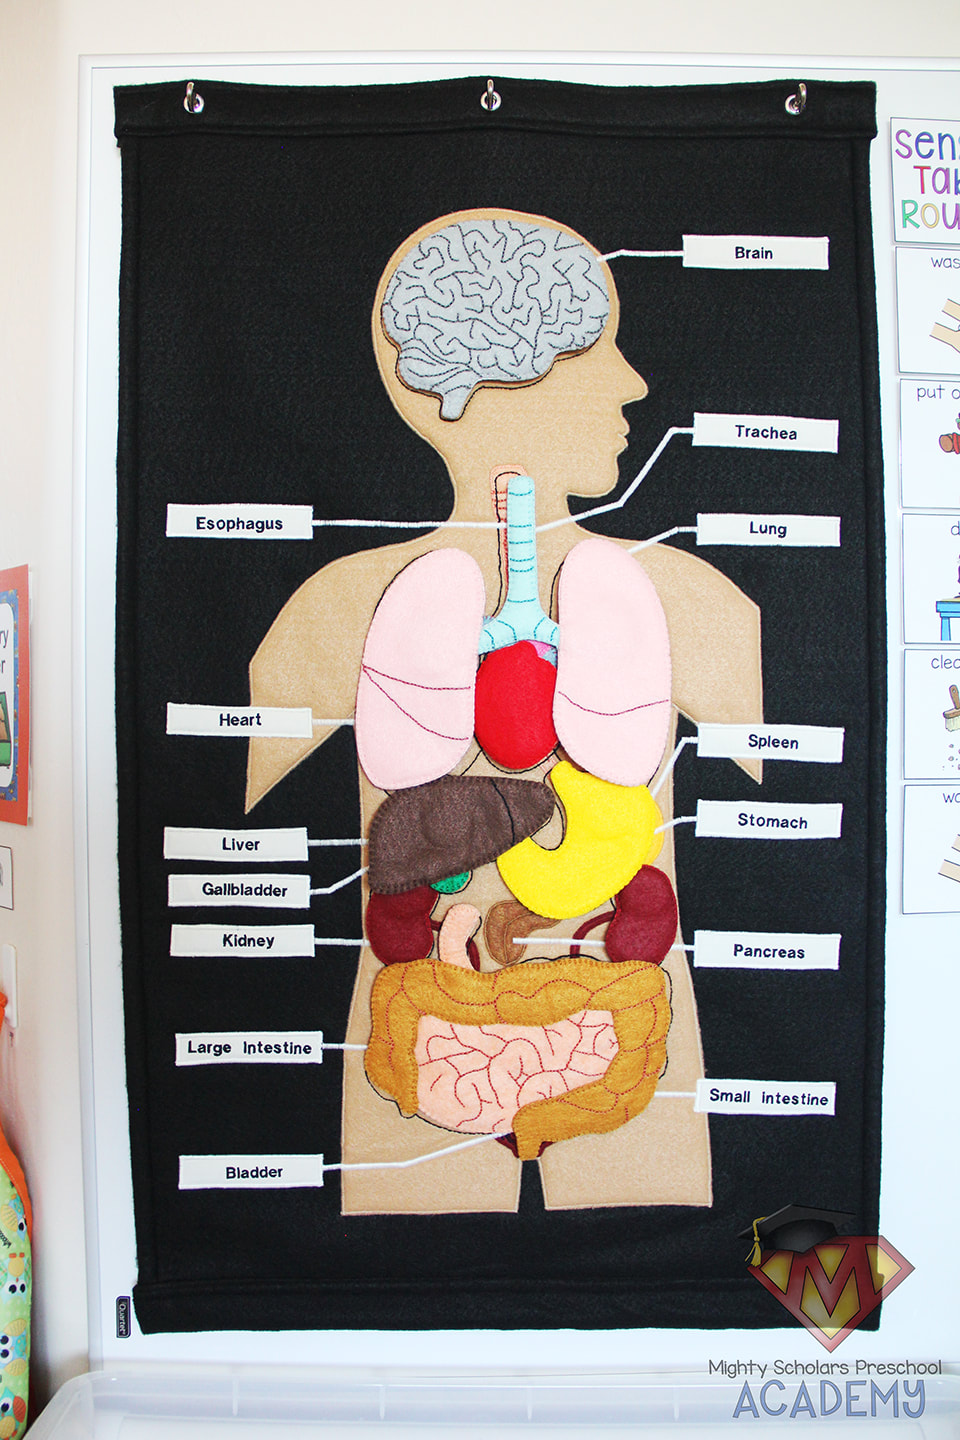
So far this school year, we've covered external body parts, skin, muscles and bones. As we venture deeper, our year-long human body unit takes us to our organs. While organs aren't actually dry, soft and fuzzy, this sensory table is sure to be engaging and very educational.
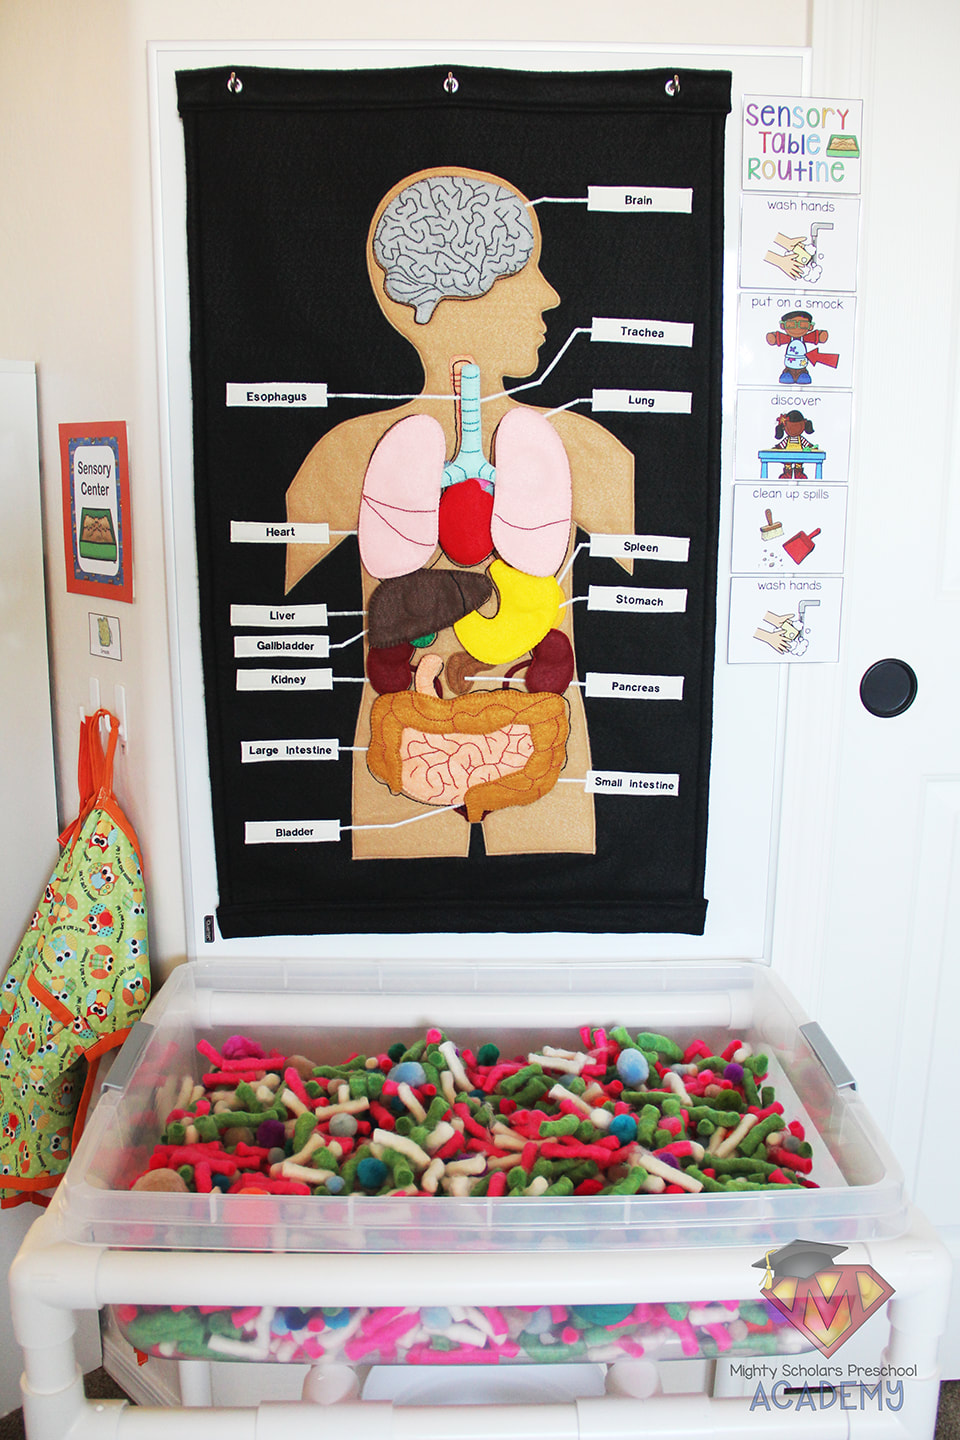
We have incredible, intricate, internal organ systems,
that can be difficult to understand at a very young age.
For several years, I had my eye on a felt board by Educational Insights. When I got around to purchasing it for my classroom, I was heartbroken that it was discontinued. I have yet to find another that had the same simple, labeled set-up. So, after months of searching, I decided to make my own that was as similar as I could get it to the one I lost due to procrastination.
However, I wanted to simplify it slightly, since I mainly focus on the five vital organs. To make it more preschool friendly, I permanently stitched a few of the organs and all of the labels to the felt board backing. I also permanently attached the trachea to the lungs, and the small to the large intestines. Regular felt board pieces are quite flimsy, so I wanted to make my organs more durable by adding more layers. The only problem I ran into was the weight kept them from staying in place, on a vertical felt board. For those of you who use felt boards in the classroom, you know that velcro would destroy the felt, with the amount of handling pieces go through. I'm one who feels that if I'm going to put a lot of effort into making something, it's going to have to last a long time. So I had to search for another solution. To solve the problem, I sewed in large, flat earth magnet discs, in-between the two center layers. I also stitched the same type of earth magnets in between the large felt body and the black felt board. The magnets aren't bulky, and help to keep the organs secure, but also easily removable by small hands.
Out of the five vital organs, we focus a lot on our heart.
Down to the details, I made my organ felt board as similar, yet preschool friendly, as I could. I like to focus on the heart during the second week of our lessons on our organs, so the heart is the only interactive felt board piece, beyond matching. Although it's very simplified, it shows the ventricles, under a front flap.
Alternatives for my human organ felt board can found online, or simply printed.
There are many options available on Etsy, such as HERE and HERE. However, you would need to make it yourself, using their pattern. If you were looking for pre-made, the price tag can be very high, due to the amount of time it takes to hand sew something of this magnitude. I was able to find a pre-made set online, similar to mine, but its on the small side and would need labels: HERE.
If felt isn't the route you want to take, printing out human organ images, laminating them and adding a magnetic strip to the back can work just as well. It would also be just as engaging as the one I made. 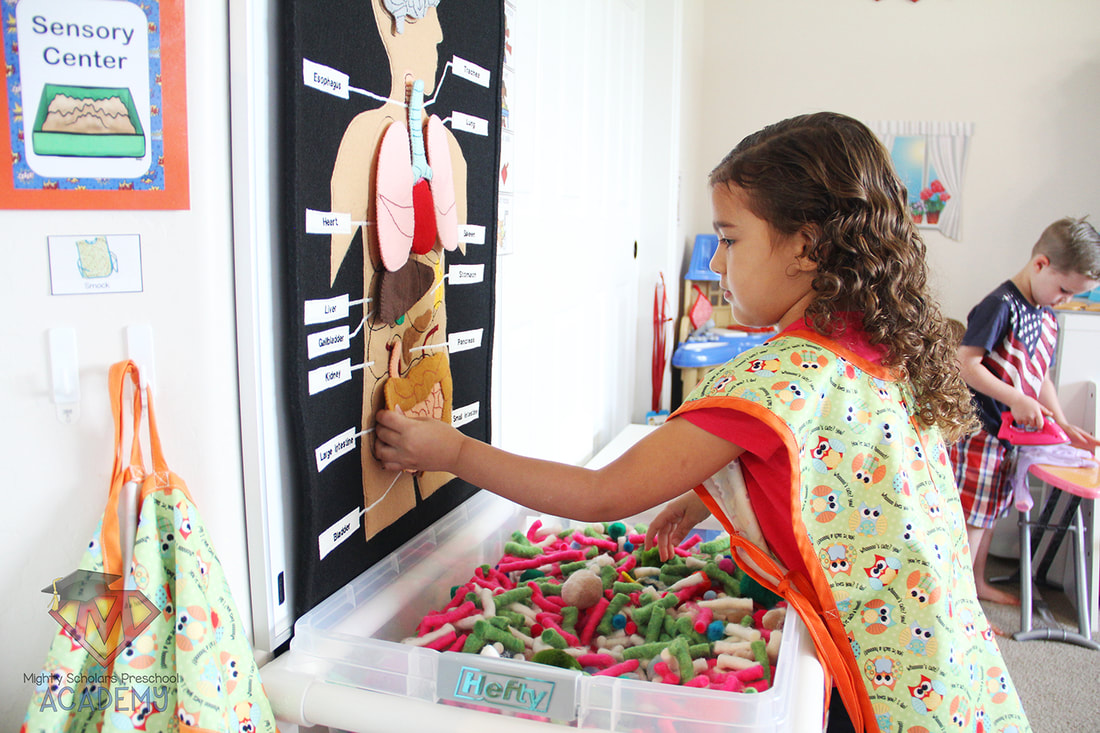
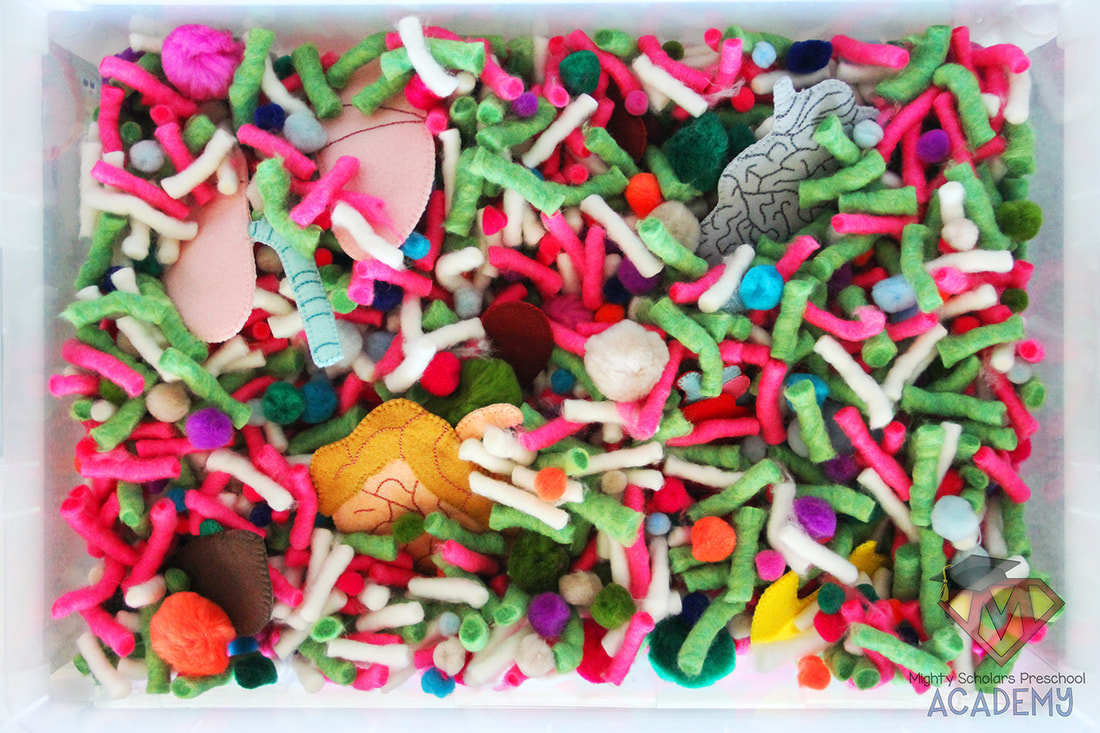
The organ sensory table is very soft and calming.
As I mentioned in previous posts, I try to make my sensory tables very different experiences. This one is the softest and most fluffy of all the tables we'll have out this school year. My scholars like to simply run their hands through the filler. It has an incredible calming effect.
There are two types of filler for this table. I used chunky, bulky yarn, in three colors, cut into varied lengths. The second component is pom-poms in various sizes and colors. I tried to find colors of yarn and pom-poms that were similar to the muted colors of the organs. This sensory table will only be out for one week. Its one of the very few that have a short time frame. Next week will be the sensory table on blood, since we focus a lot on our heart. Make sure to check back for that one! 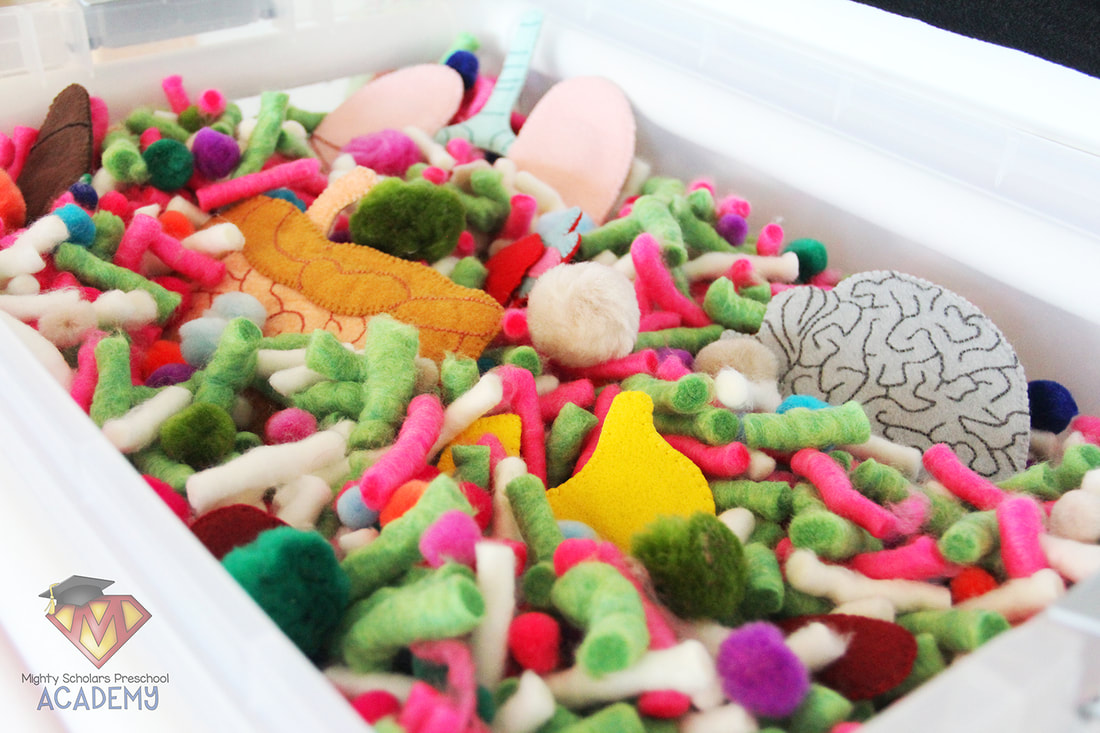
Please note, as a participant in the Amazon Services LLC Associates Program, I may earn a small commission on qualified recommended links.
The Amazon Services LLC Associates Program is an affiliate advertising program designed to provide a means for sites to earn advertising fees by advertising and linking to Amazon.com.
These are my Amazon Picks for the Organ Sensory Table:
"Children have a great urge to learn about dinosaurs." - Jack Horner
Its almost a universal rule that children love dinosaurs. Some children even have an intense interest and can remember incredible names and details of each dinosaur. Some children are even able to identify them through images of the skeletons left behind. That intense interest in dinosaurs can be a fantastic confidence booster for children and improve cognitive development, according to Kelli Chen, a John Hopkins Pediatric Psychiatric Occupational Therapist. While most adults lose interest in the ancient creatures, it can be developmentally beneficial to help foster your child's interest.
One of my fondest memories as a child, was my first visit to the Dinosaur National Monument in Vernal, Utah. The wall-like cliff side, of excavated dinosaur bones was an incredible sight to behold. There are so many different species found in that same area. Some may say it is a goldmine of sorts. Not to date myself, but when I had my first visit, there were paleontologists still carefully working away on the other side of the fence, unearthing ancient history. I was around age six and still loved everything about dinosaurs. That trip solidified my intense interest, for life. Rocks and fossils are one of my favorite things to teach children, so our dinosaur theme has a special place in my heart. 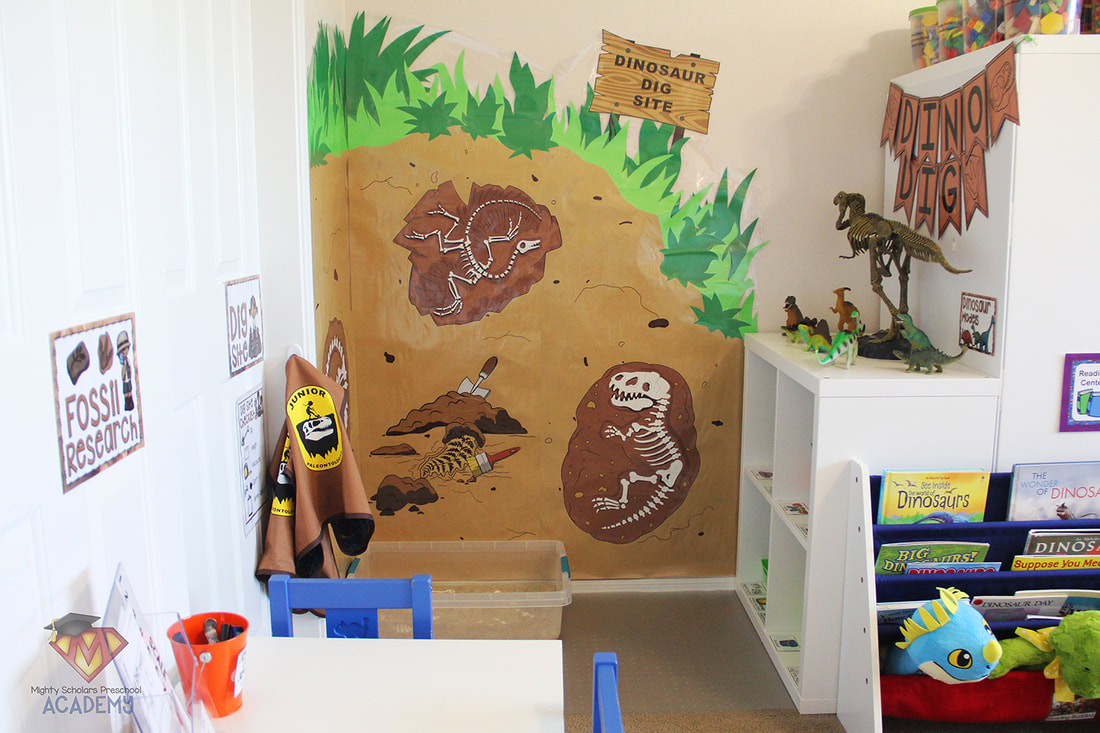
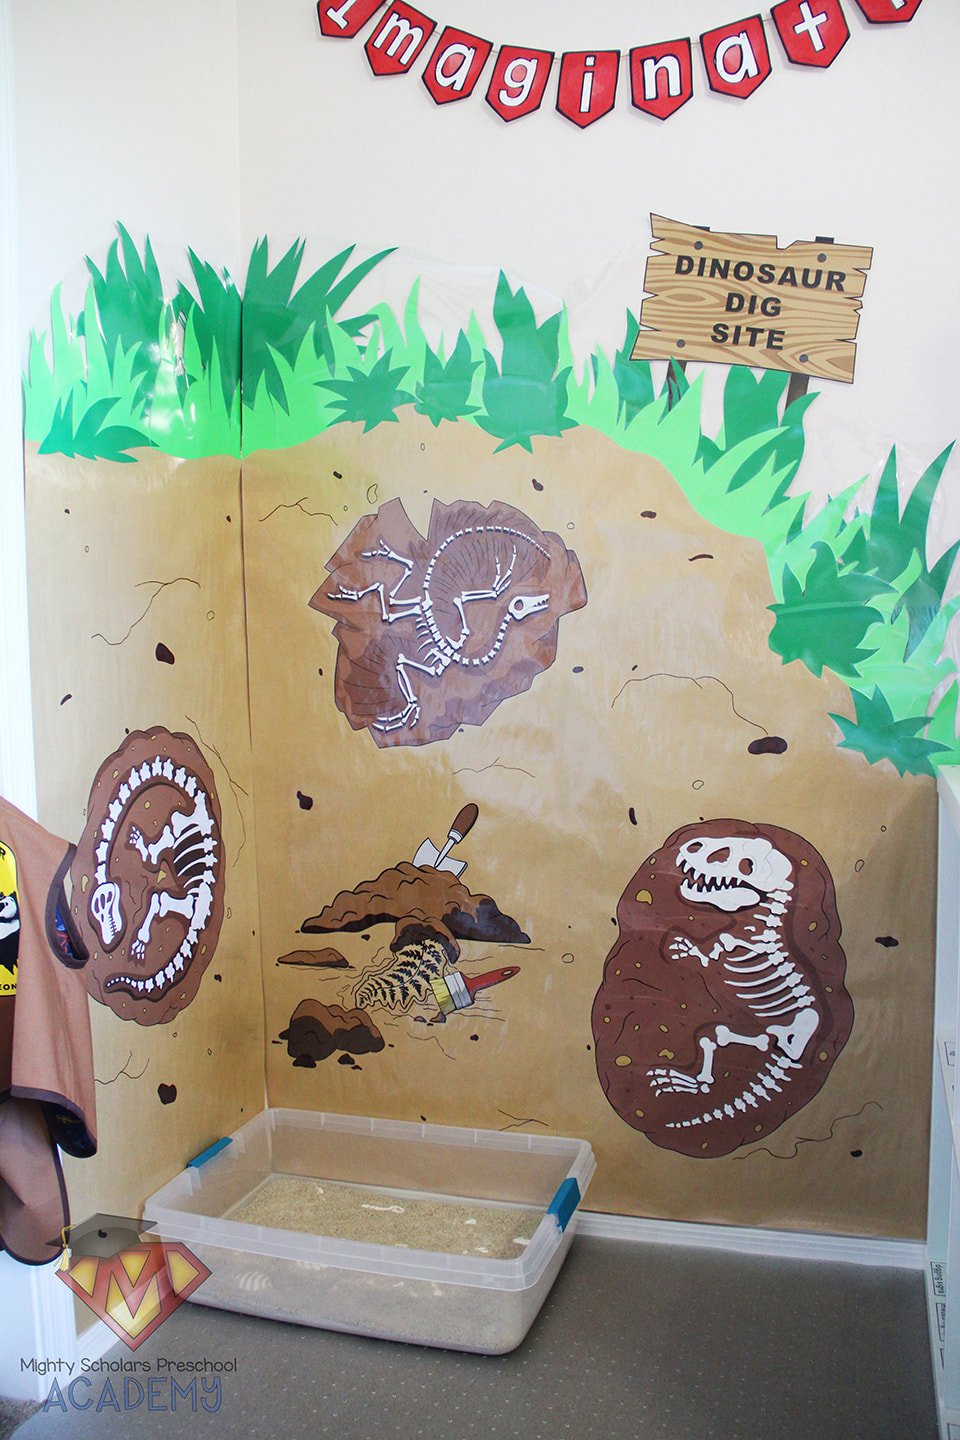
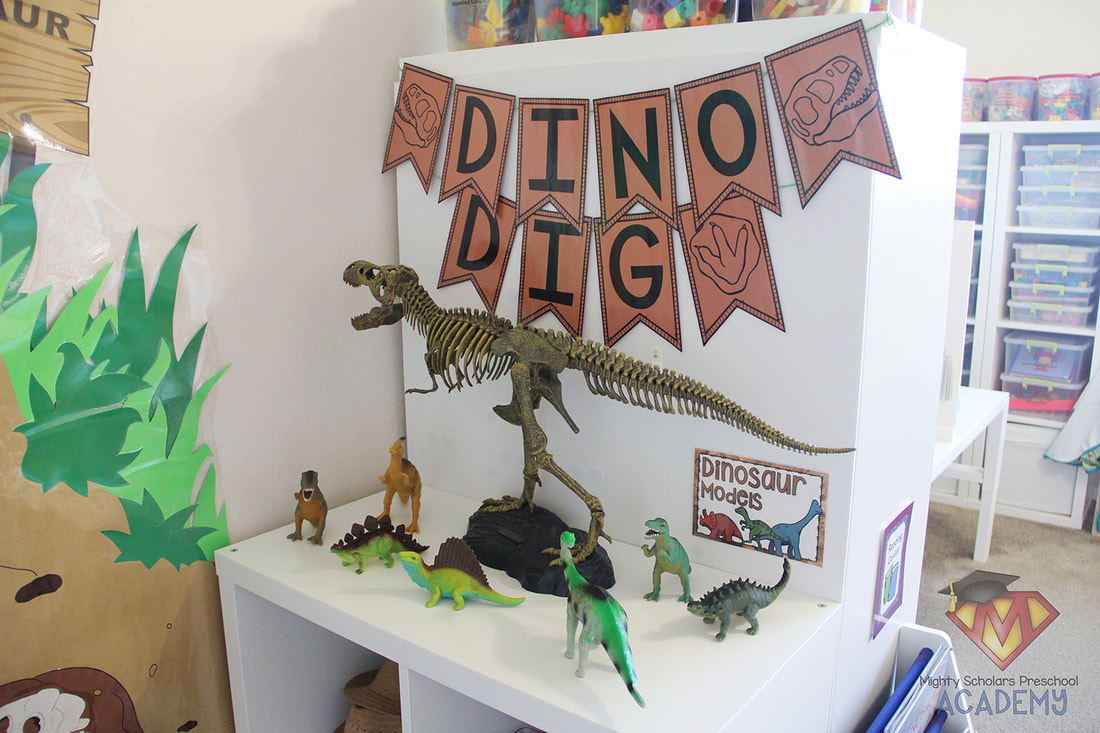
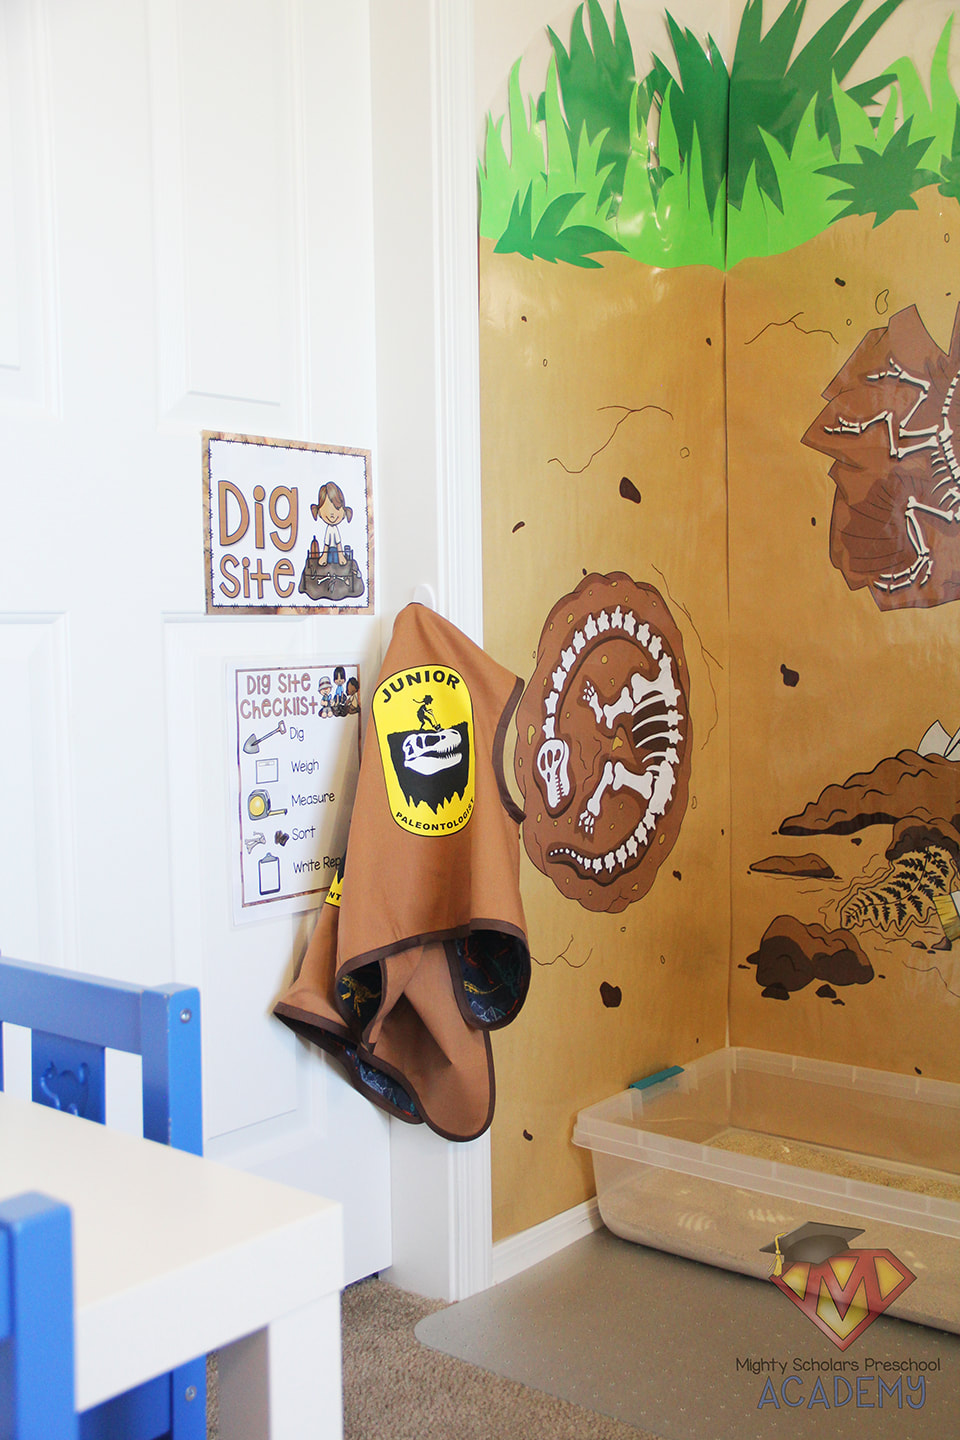
The mural or wall decor will be one of the first things that students see as they enter the classroom, creating an atmosphere for their imaginations to thrive.
While some teachers like to create a volcano mural with flowing lava, I chose to make my own creation of the "Vernal wall", bringing the mural into the present and helping to set the stage for my Junior Paleontologists.
To make the mural, I used brown banner paper as the base. The 'Dinosaur Dig Site' sign, dinosaur bones, fossil plant and excavation tools, are blown up clipart images, cut and glued into position. I cut the greenery from green 12x12 scrapbook cardstock paper. Once everything was glued into place I drew in some extra details with brown and black permanent markers. Since I like to reuse as much as I can, I had the panels laminated and attached them to the wall with Command Picture Hanging Strips. My murals and signs are stored in labeled art tubes, to keep them from becoming bent or torn.
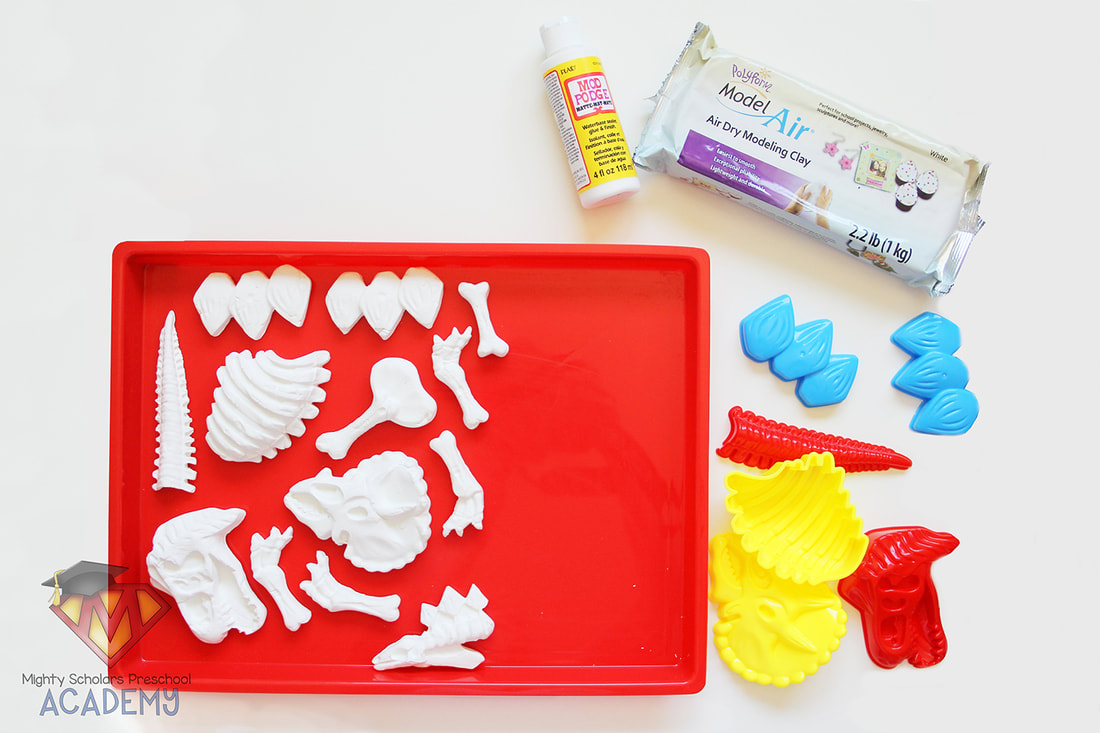
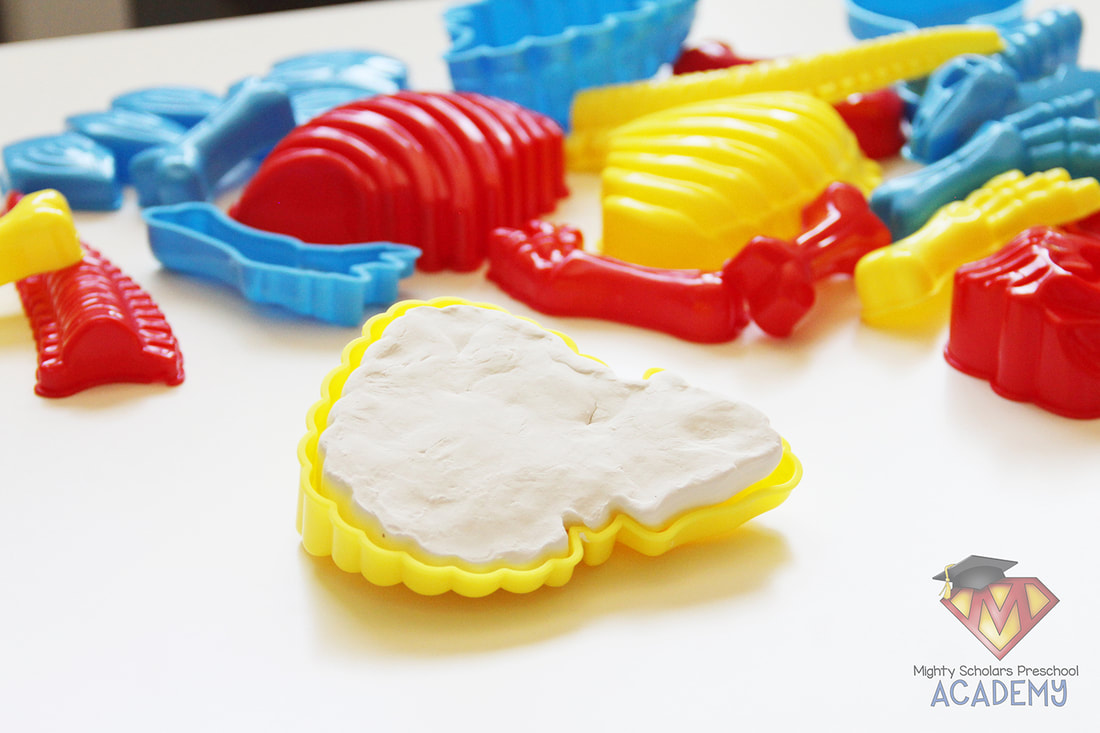
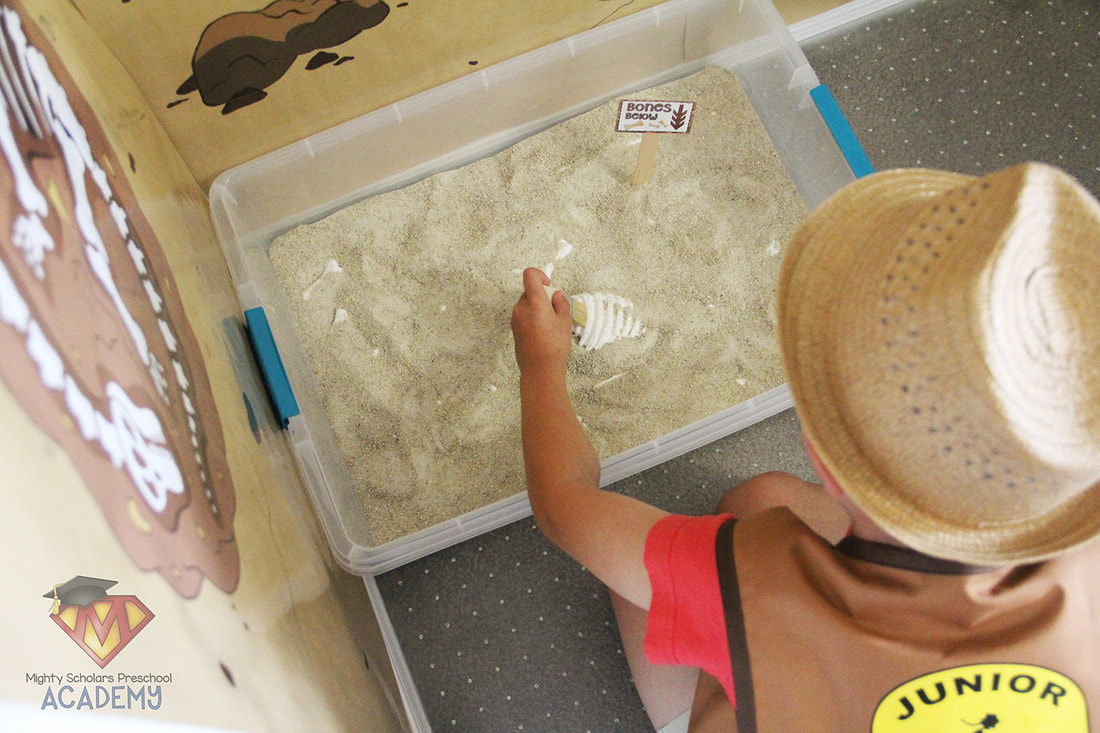
The dinosaur skeletons are large enough to feel like
the real deal, to preschoolers.
This years dinosaur bones were made using three different large sand mold sets and Polyform Air Dry Sculpey Clay. I've had great success with the Sculpey Oven Baked Clay, made into math manipulatives and used in the classroom. I'm hopeful the new dinosaur bones will last through several uses, over the next few years. To make sure they hold up better, I sealed them with a Mod Podge matte sealer. To make one of each dinosaur set, I used two bricks of clay. Make sure you make them a few weeks in advance, so they have the opportunity to dry completely through and the Mod Podge has been able to provide a solid seal.
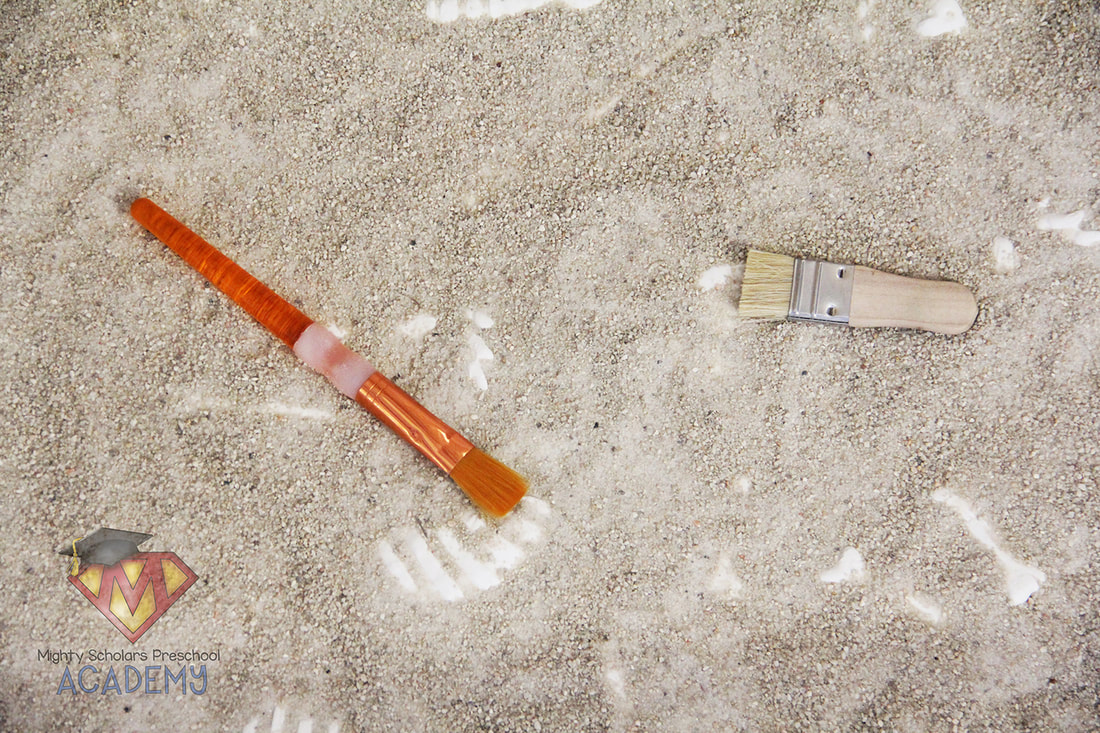
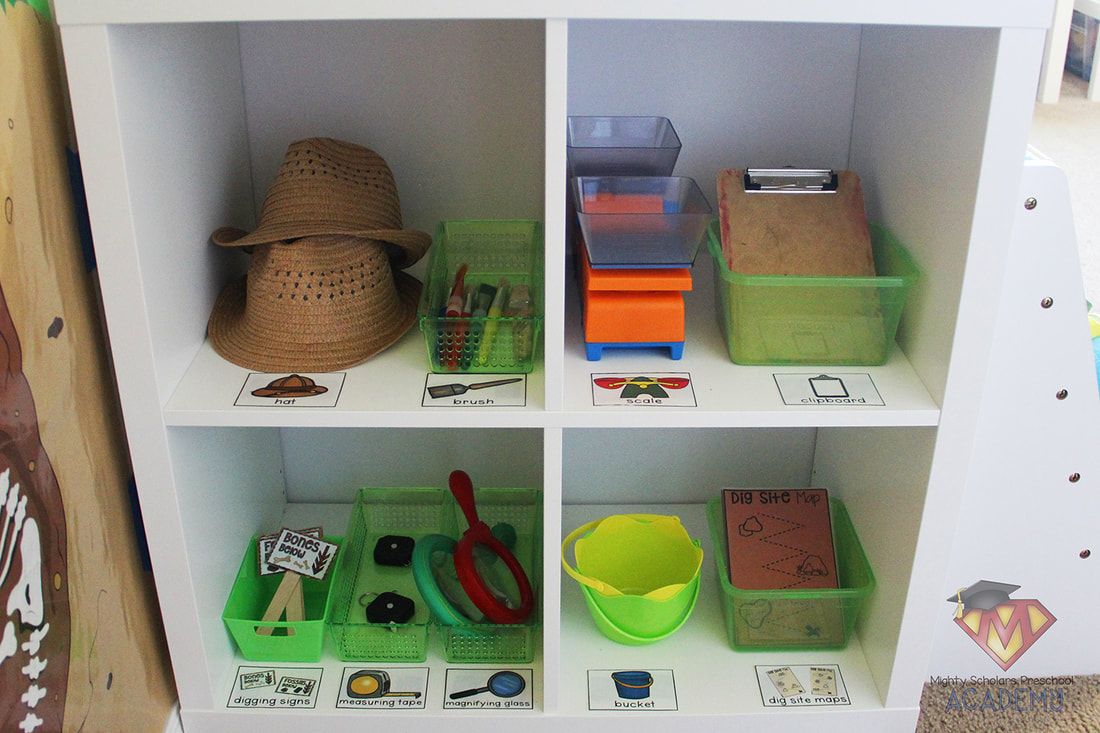
Excavation brushes in various handle lengths,
can help with motor skill development.
My scholars were very eager as I modeled how a paleontologist uses tools to carefully search through dirt and sand, for fragile fossils. The brushes I provide are in two lengths: regular long handled paint brushes and short handled craft brushes. The longer handled brushes can be easily held by the entire hand, while the short handled craft brushes give less grip area and help with more fine motor.
It is extremely important to model the entire process of preparation, excavation, research and clean-up. I review by modeling the process again, at the beginning of the second week.
The Dinosaur Dig Dramatic Play labels and various activities,
are from the incredible Pocket of Preschool curriculum, found here on Teachers Pay Teachers.
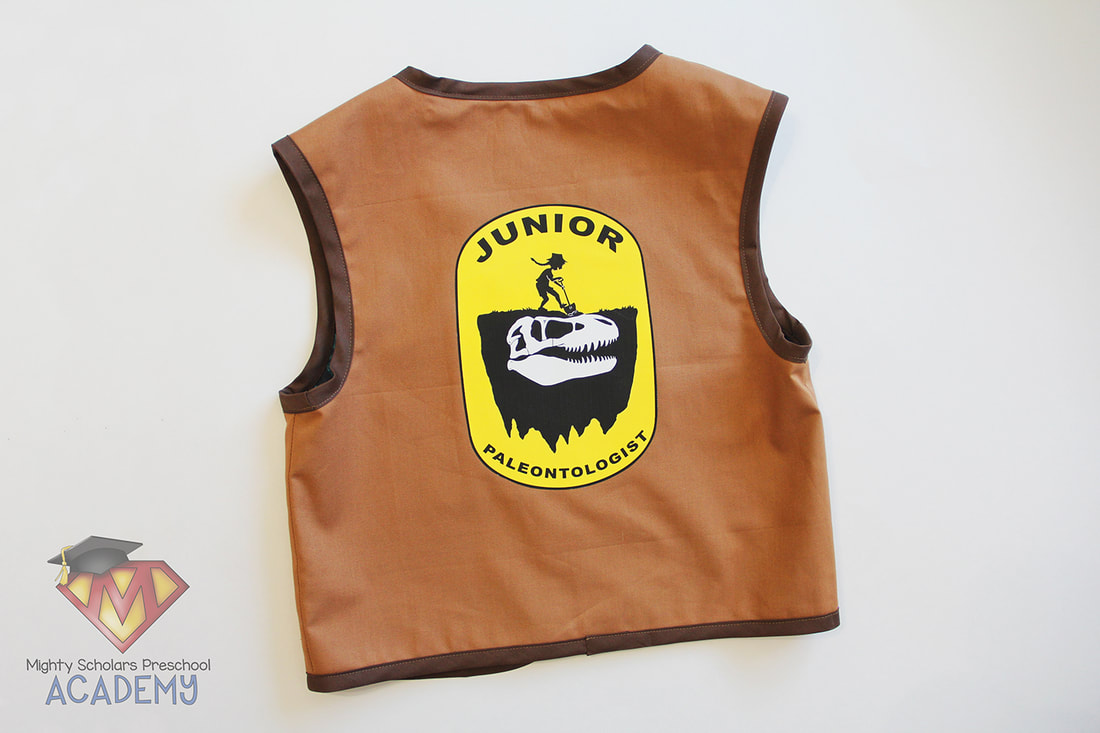
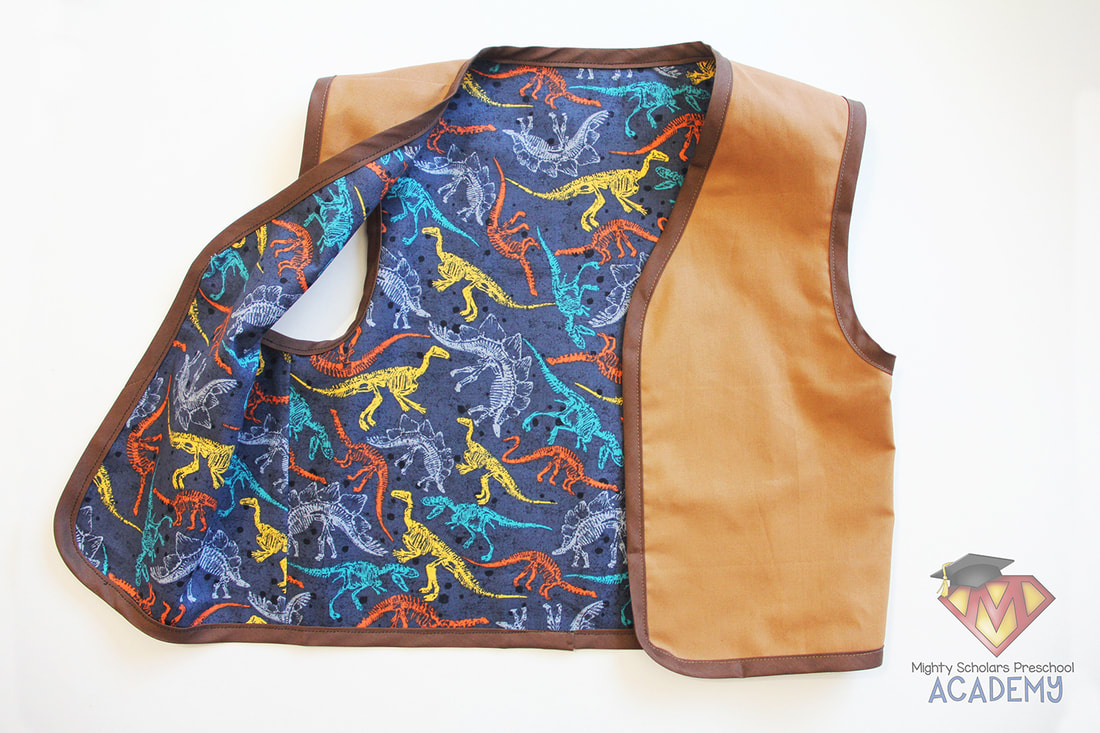
The paleontology vests back decal adds the perfect touch to help my scholars feel like real paleontologists on a dig.
The dress-up props help students take on the part, so I made simple sewn vests with fat quarter pieces of fabric, that were sewn together using double-fold bias tape around the edges. The vest back decal is a simple clipart image, printed in black and yellow, on iron-on transfer paper. I have attached the vest back decal as a FREEBIE, at the bottom of this blog post.
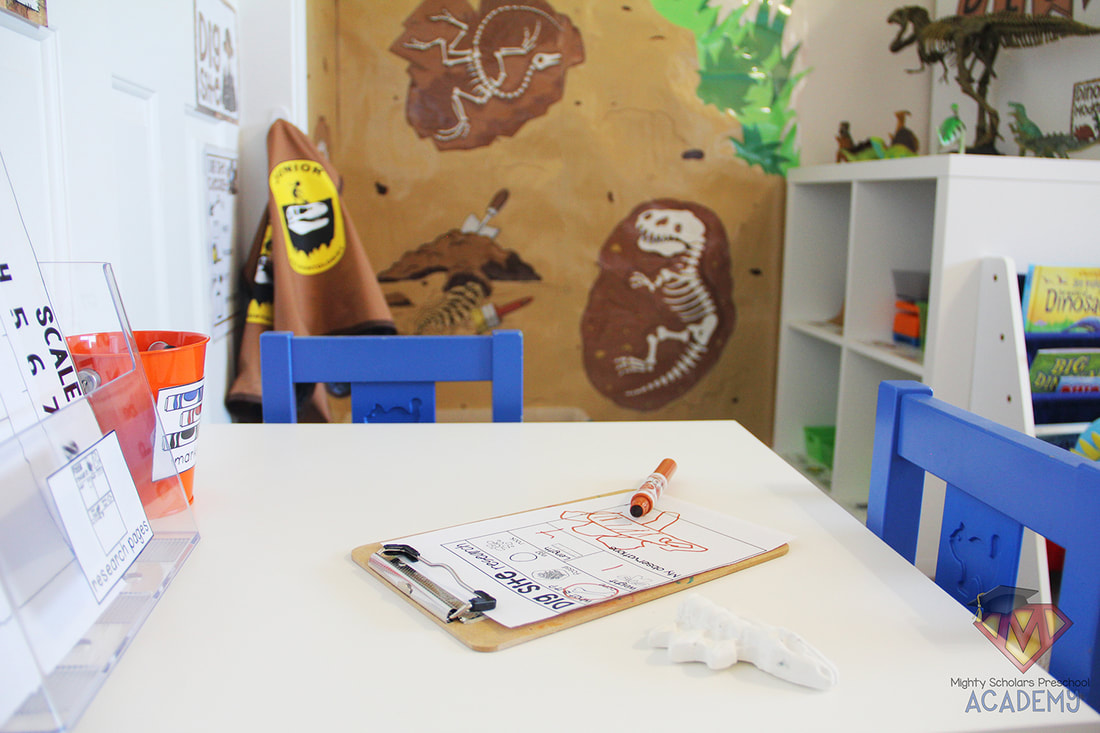
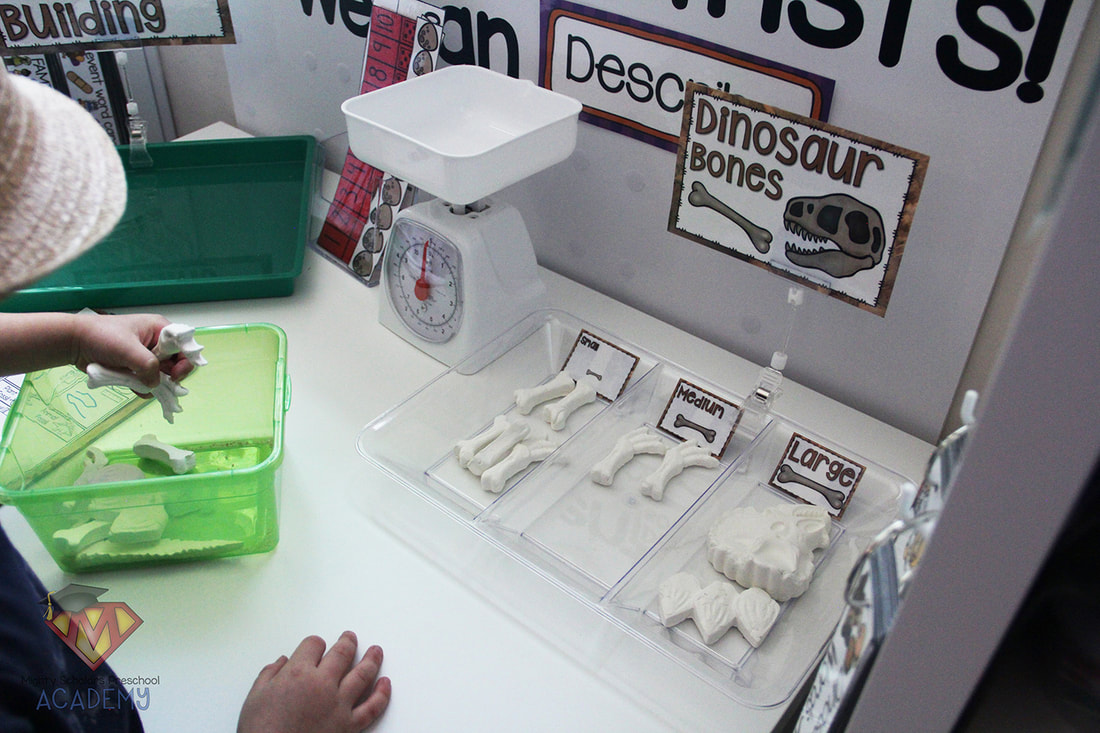
Fossil research touched all the other subjects.
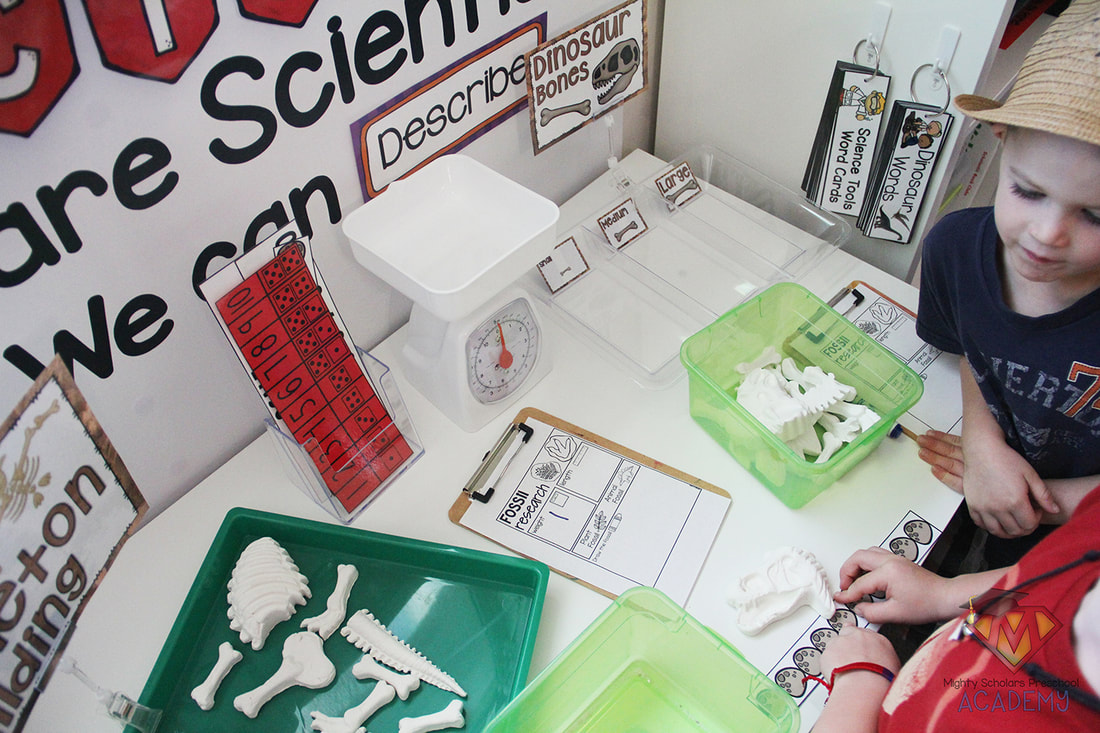
When my Junior Paleontologists dug up their fossils, they carefully researched their fossils through measurement, weight, sorting and even attempting to reconstruct the dinosaur skeleton, before drawing their findings. The scale is made by Learning Resources and can even hold the largest of fossils from our dig.
Dinosaur activities are placed in every center around the classroom, including STEM. These activities and more can be found in the Pocket of Preschool Dinosaur Dig Dramatic Play, and the Dinosaur Math and Literacy Pack. 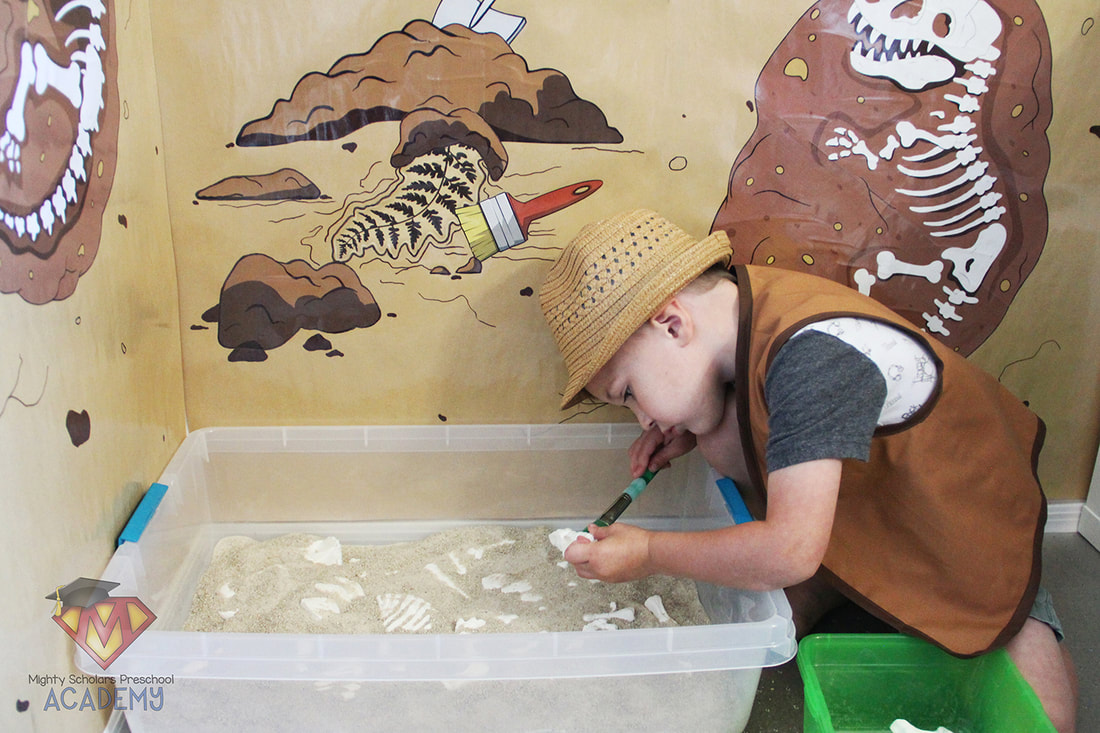
Reading together as a class, to introduce the theme, can help students get excited and become more engaged in the activities.
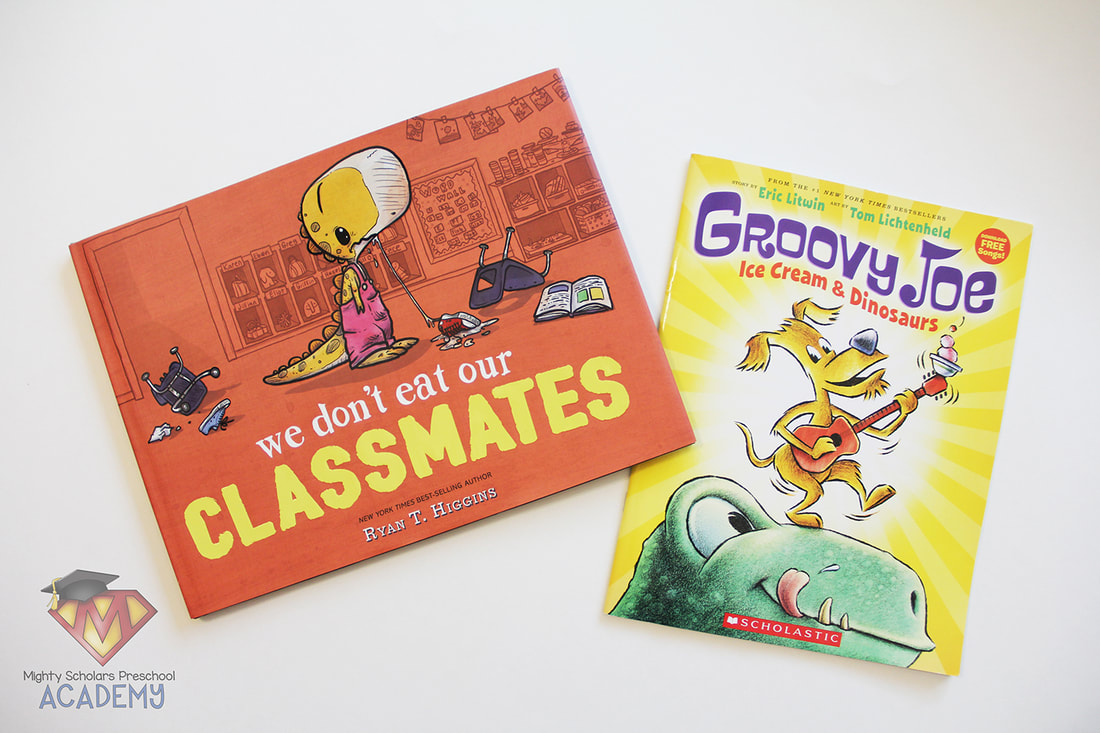
Two of my favorite books to read during our dinosaur theme is the recently published picture book 'We Don't Eat Our Classmates', by Ryan T. Higgins and 'Groovy Joe: Ice Cream and Dinosaurs', by Eric Litwin. I have many of the books written and illustrated by Ryan T. Higgins, because they teach important life lessons to young and old alike. The illustrations alone are incredibly entertaining. If 'Pete the Cat' is a favorite in your classroom, you'll enjoy 'Groovy Joe'. The songs are just as catchy and my students like to sing a long.
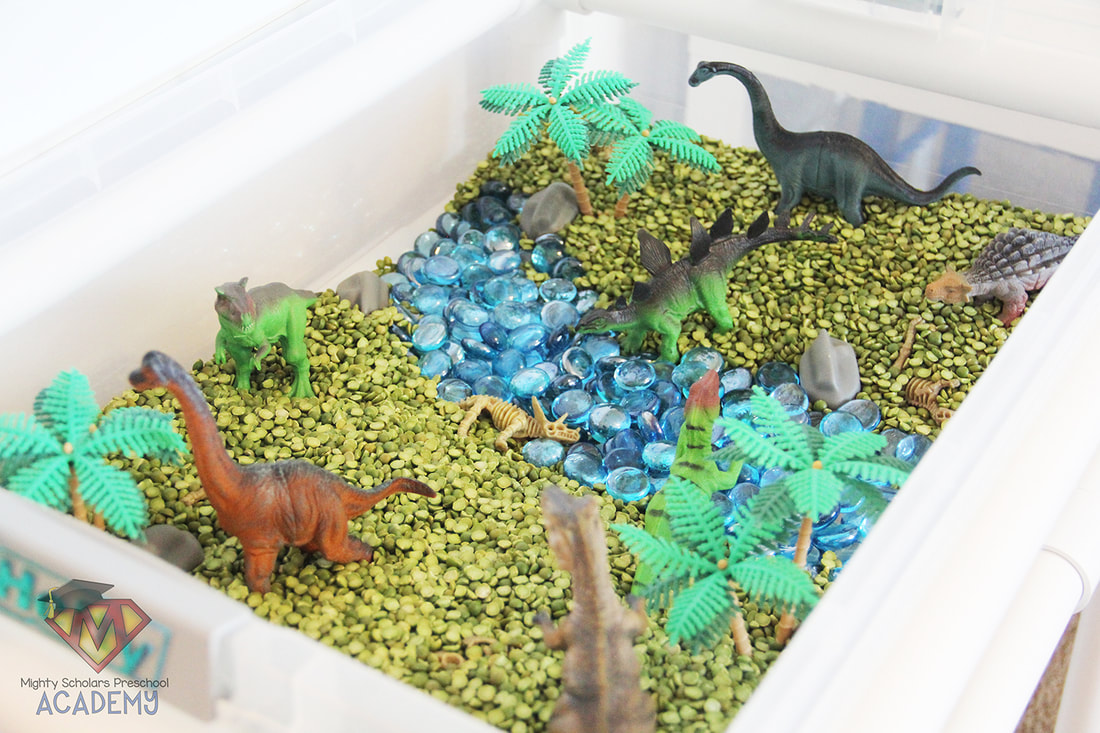
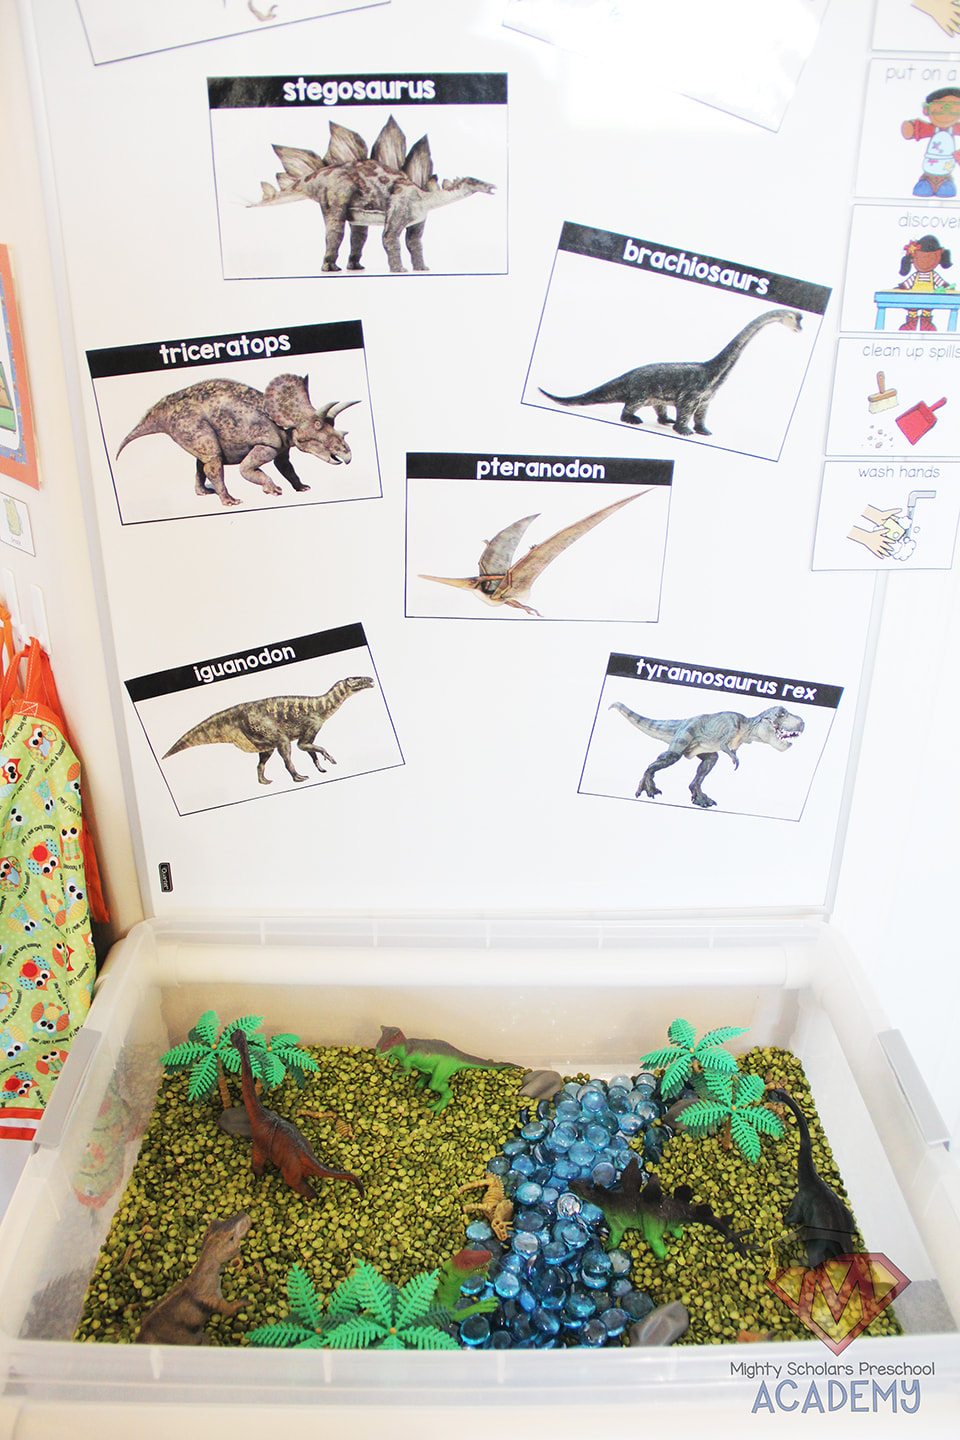
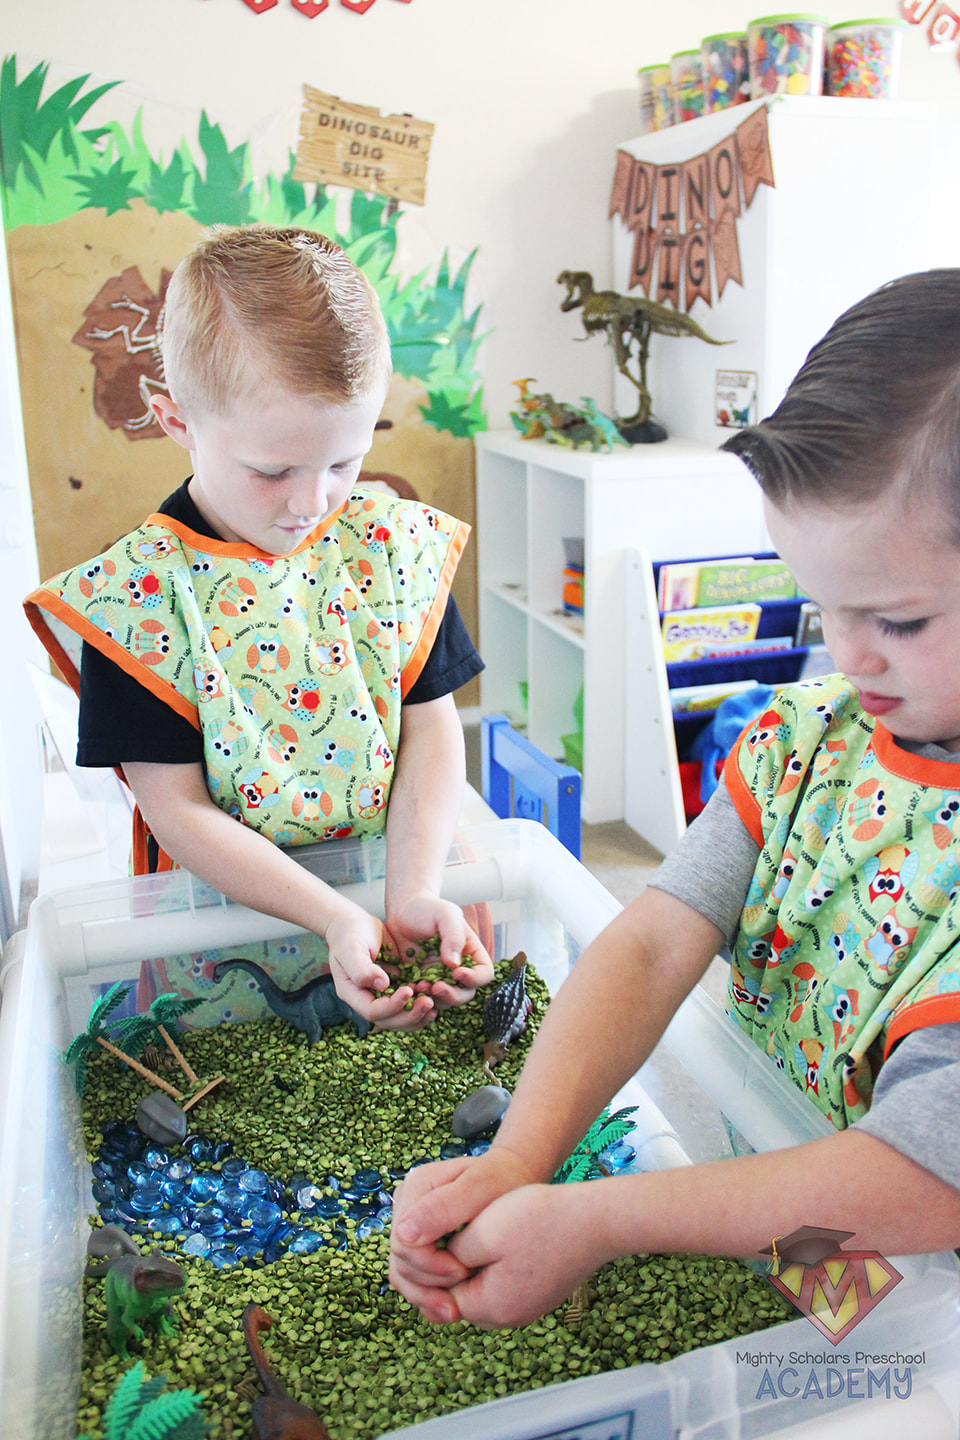
A prehistoric small world sensory table adds to the dinosaur theme,
bringing the ancient creatures to life.
I don't always coordinate my bi-weekly sensory tables with the themes, but when studying dinosaurs, I make an exception. Plastic dinosaurs and fossils, along with plastic palm trees, make wonderful manipulatives for the imagination. The filler is blue glass vase gems and dried green split-peas (otherwise known as "green rocks" in our classroom).
Above the table is dinosaur picture cards from the Pocket of Preschool Dinosaur Dig pack. I laminated them and attached magnetic strips to the back, so they could be removed by my students and compared to the plastic dinosaurs.

The Junior Paleontology Vest decal image can be downloaded below:
Please note, as a participant in the Amazon Services LLC Associates Program, I may earn a small commission on qualified recommended links.
The Amazon Services LLC Associates Program is an affiliate advertising program designed to provide a means for sites to earn advertising fees by advertising and linking to Amazon.com.
My Amazon Picks to complete the Dinosaur Dig theme are:
As we began to move inwards, learning about the human body,
our small group and center discovery activities took us on a journey into what lies beneath the skin.
During the second session in our unit, my scholars learned about the muscles and bones in our bodies. We watched our muscles move and change shape, as we bent our joints and lifted objects. We discussed how our bones wouldn't move without the attached muscles and how to keep them strong and healthy.

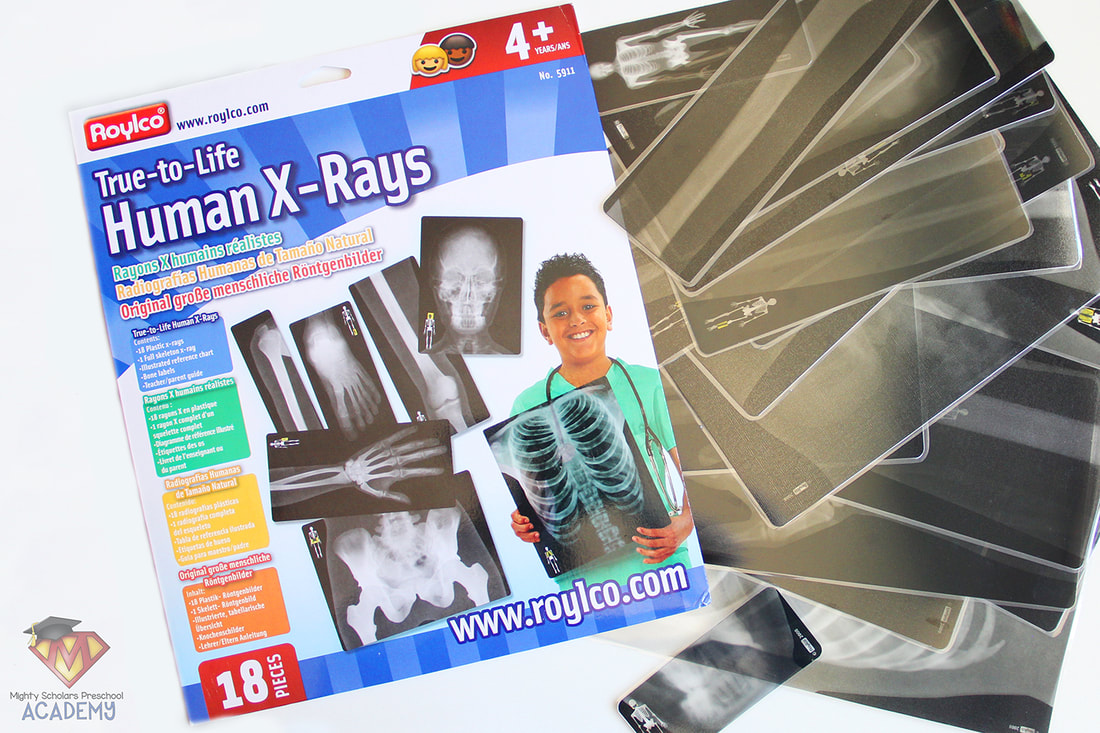
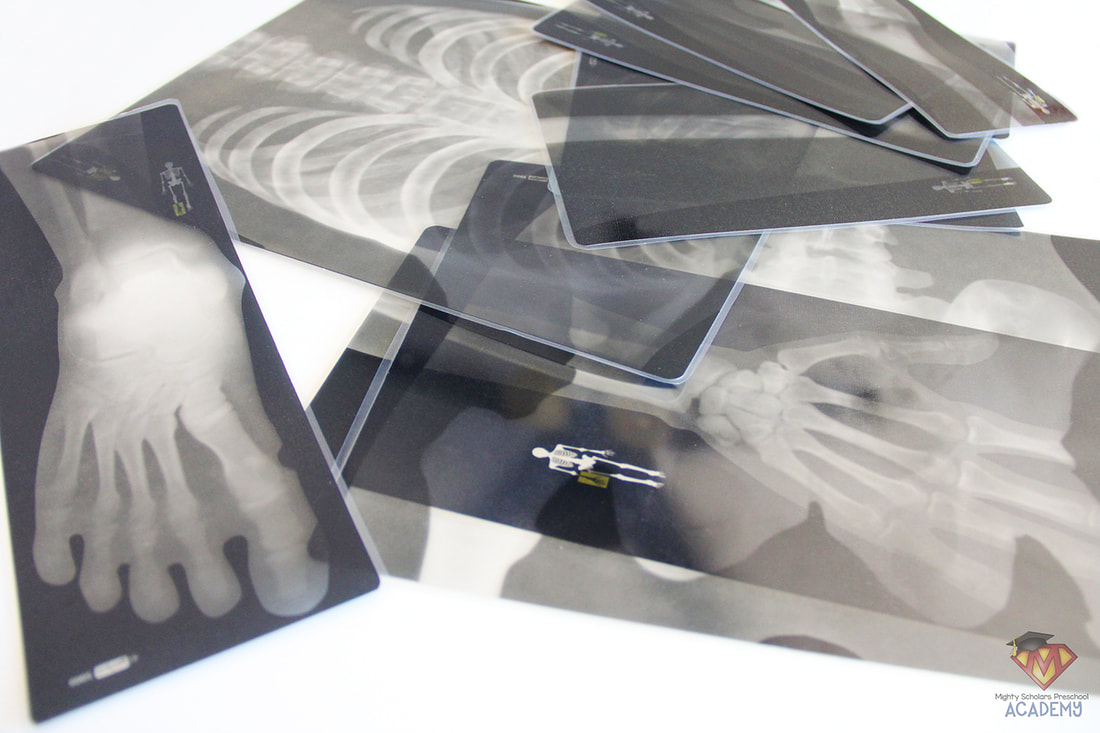
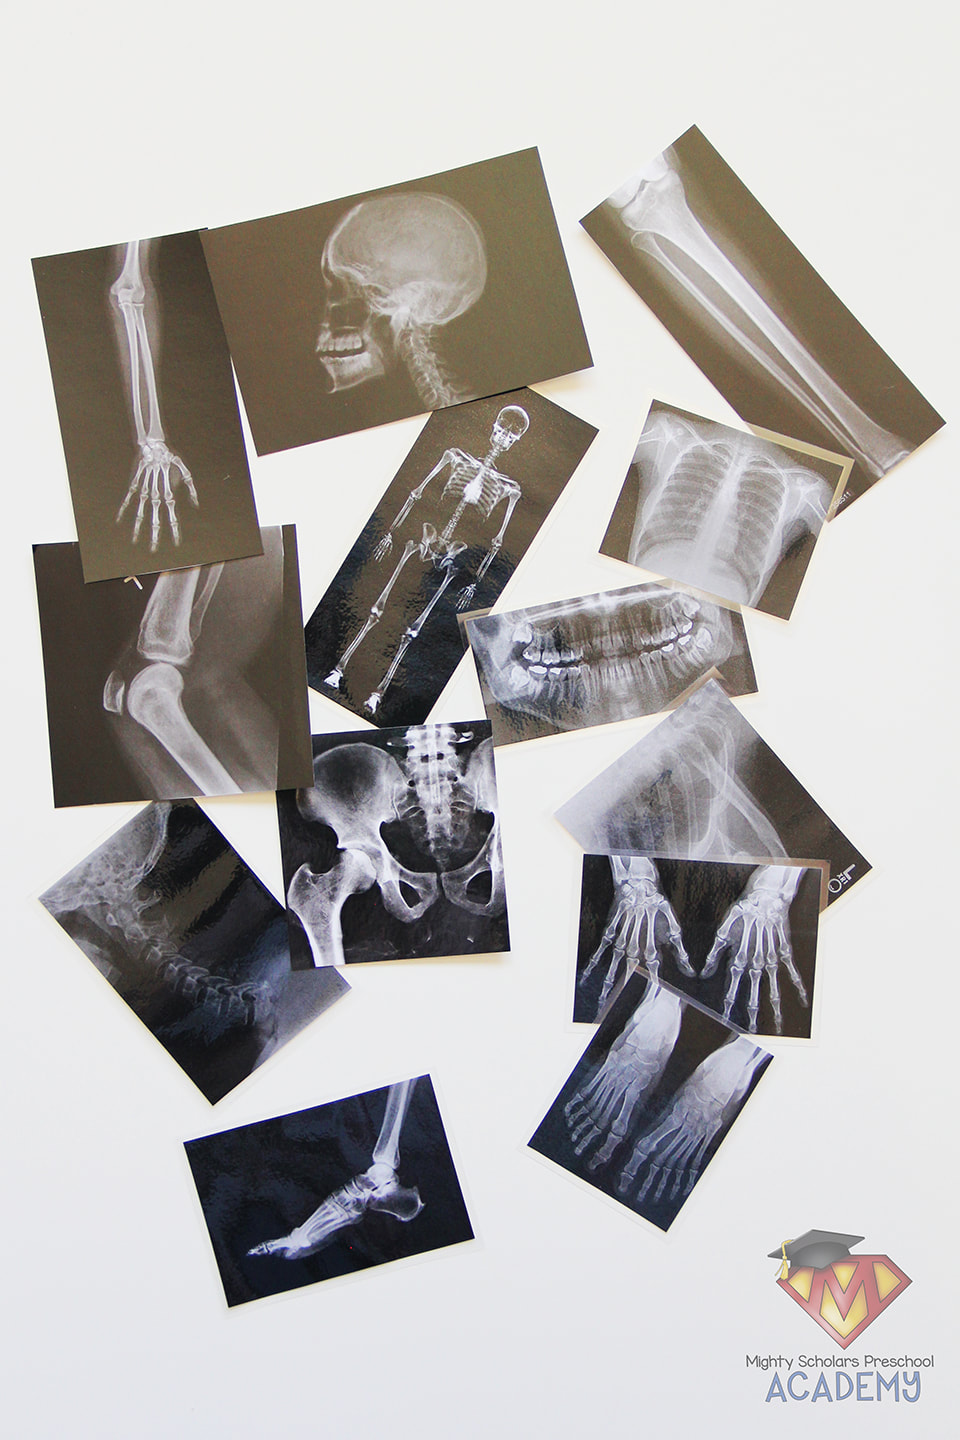
What child, or even adult, wouldn't find x-rays interesting?
It used to be that on occasion, if an x-ray was taken, the attending physician would bring the printed film into the room and clip it to a light source on the wall, to show and discuss what could be seen and the treatment needed. If you were "lucky", you were able to take the film(s) to another physicians office, giving you time between appointments to handle and view your x-rays at home, studying them up close. In the digital age we live in, x-rays are rarely printed to view on a light source. Instead, they are typically uploaded to a computer and viewed by the attending physician, without the patient seeing them. The ability to handle, turn, flip and closely view an x-ray has been somewhat lost. I wanted to give my scholars that experience in the classroom.
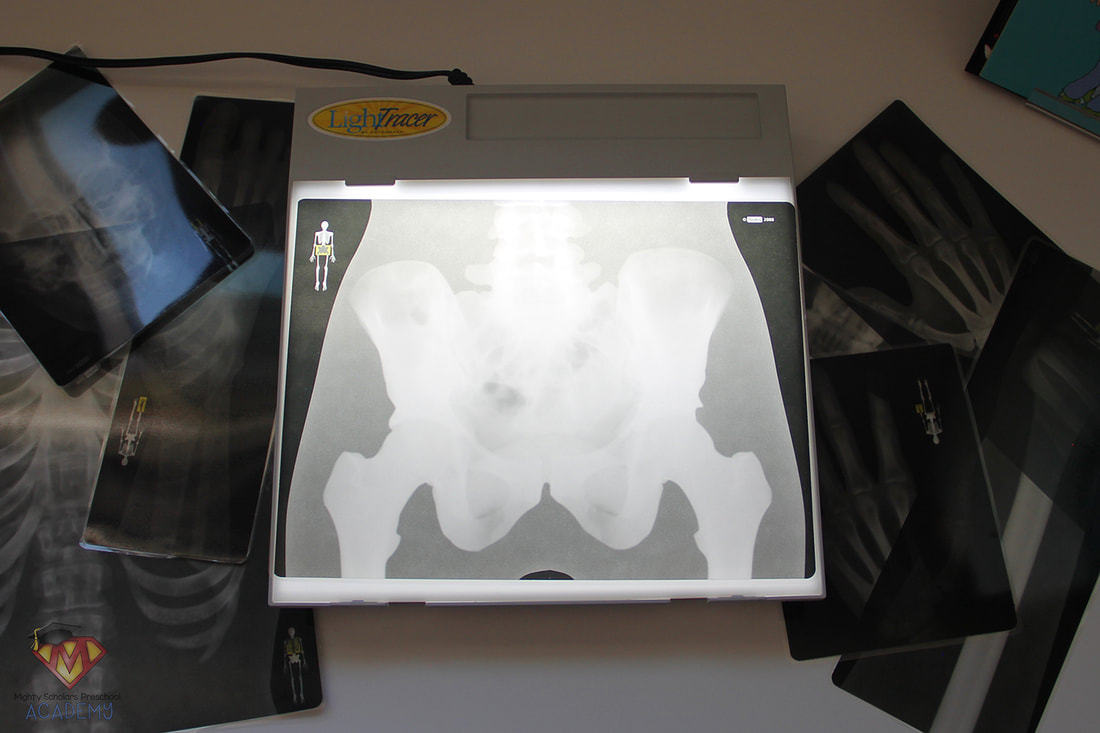
One of the best investments I made, to teach the human skeleton to preschool aged children, is the Roylco True to Life Human X-rays set.
The set includes eighteen human x-rays that can arranged to form a skeleton, and have great detail when used on a light source. The reproductions have been printed on a thick transparency plastic, but can be scratched. In order to make them last from year to year, I laminated each X-ray and made sure there was a good lamination seal around the edge before cutting the lamination. As with everything I introduce in my classroom, we discussed how to care for and properly use x-rays. I also instructed my scholars how to properly hold the x-ray film at the edges, just as they would need to in a real life situation.
The x-ray details can be viewed by holding them up to a light or window, but I chose to use my Light Tracer table. Any light table could be used, but I wanted to use one small enough to fit on the science center table.
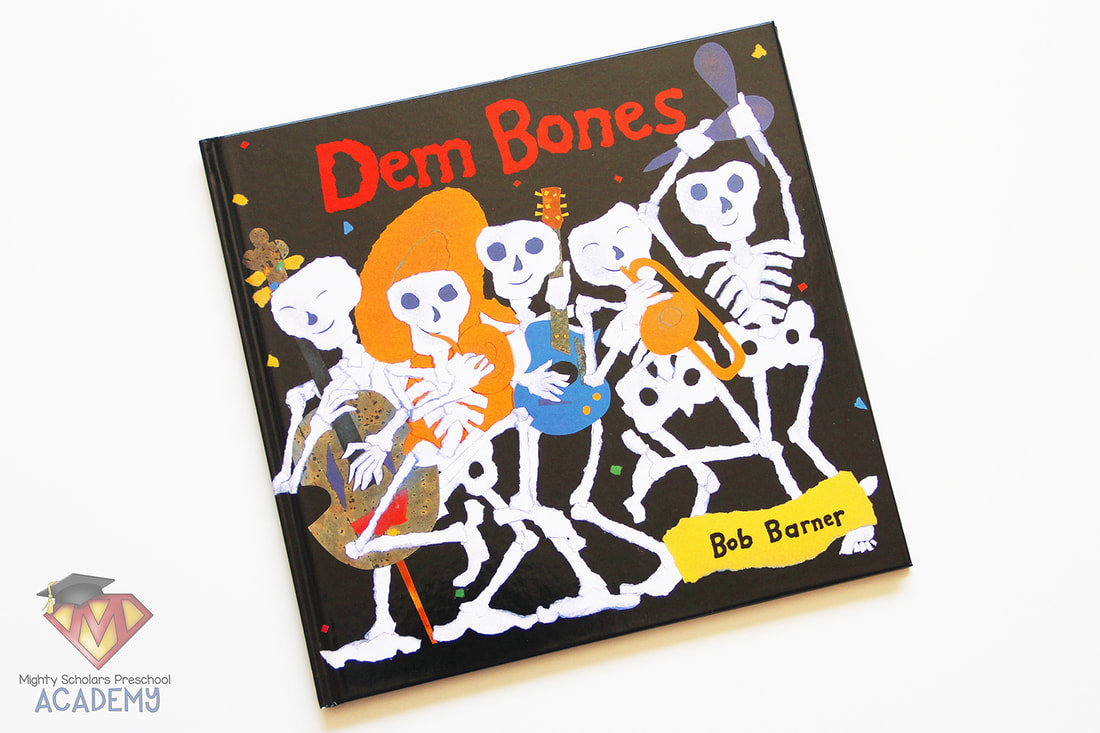
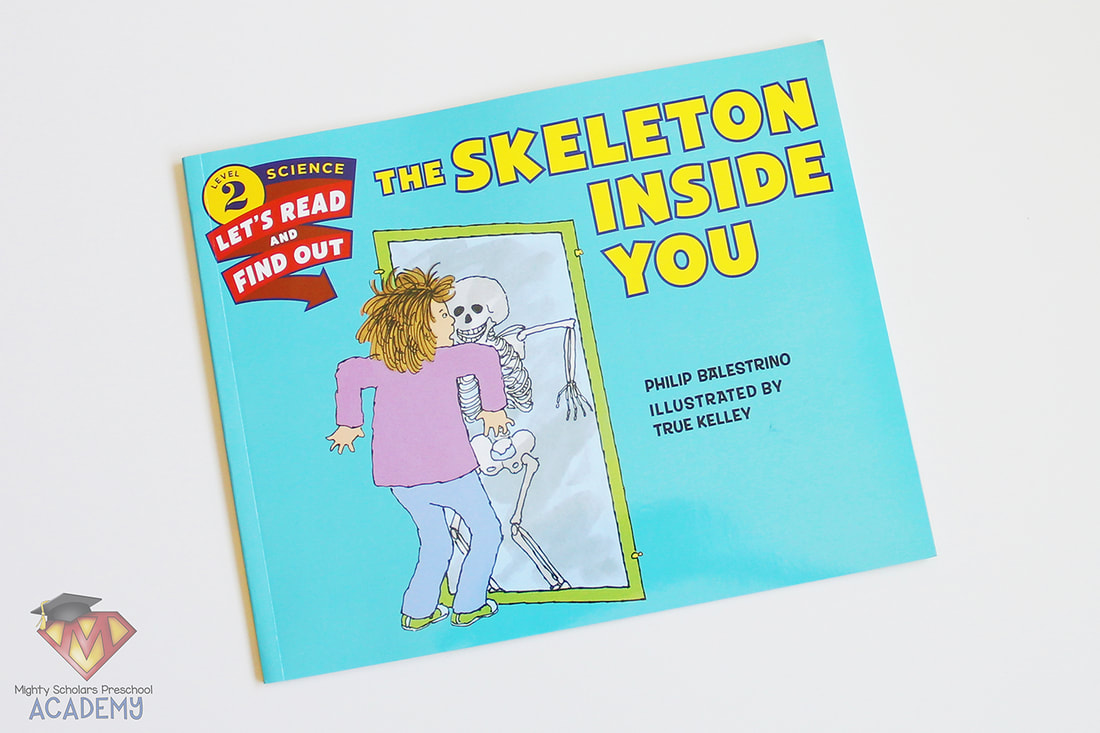
Displaying picture books in a way for students to look through them freely, in each center, is an important literacy component to each subject.
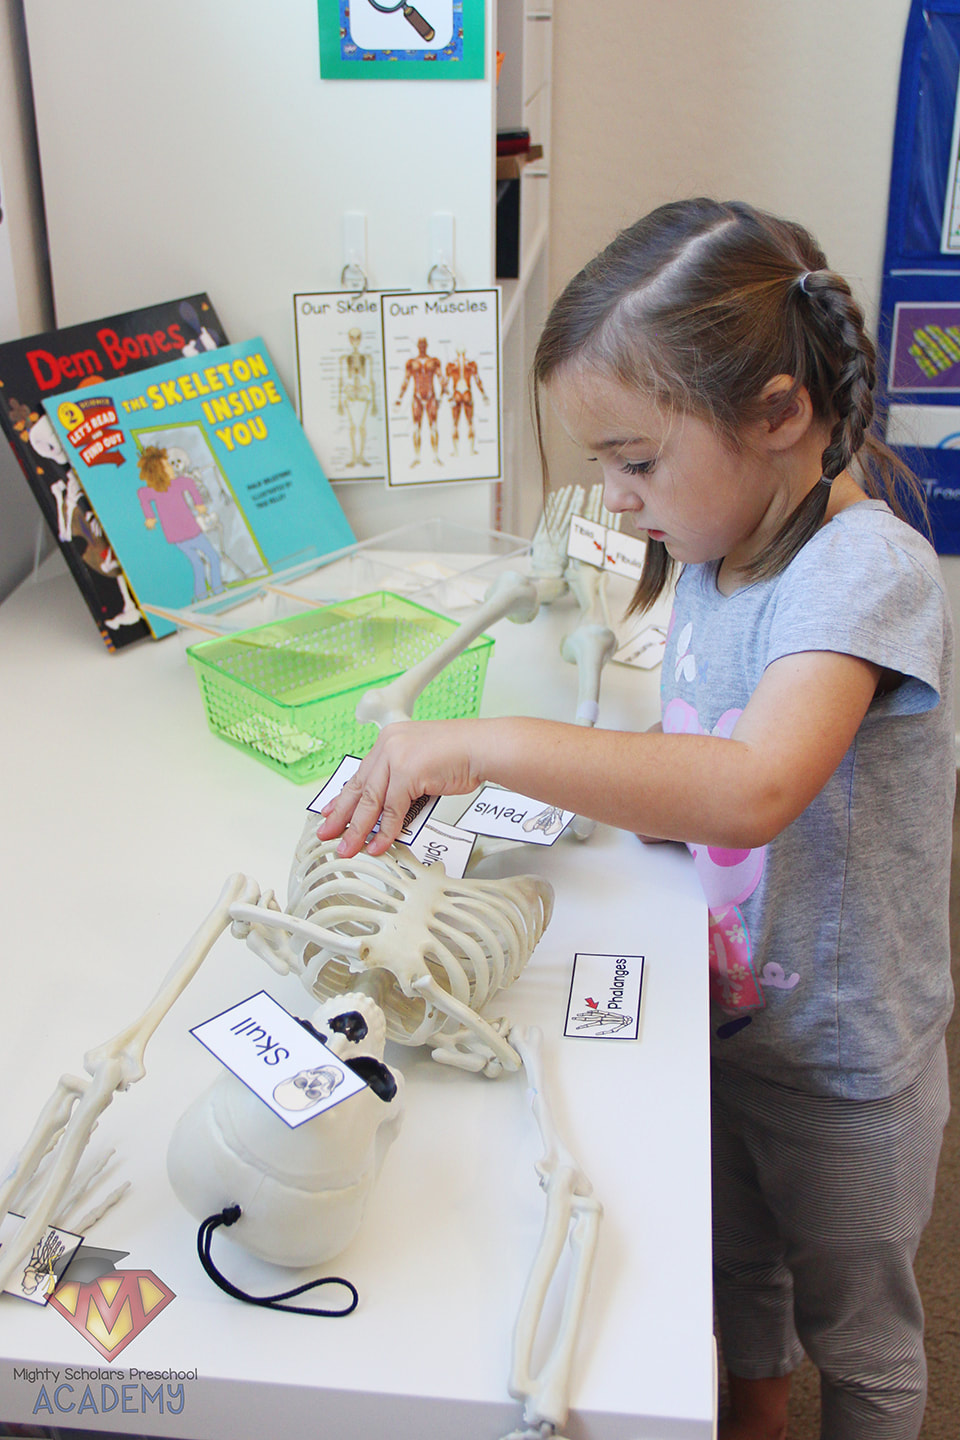
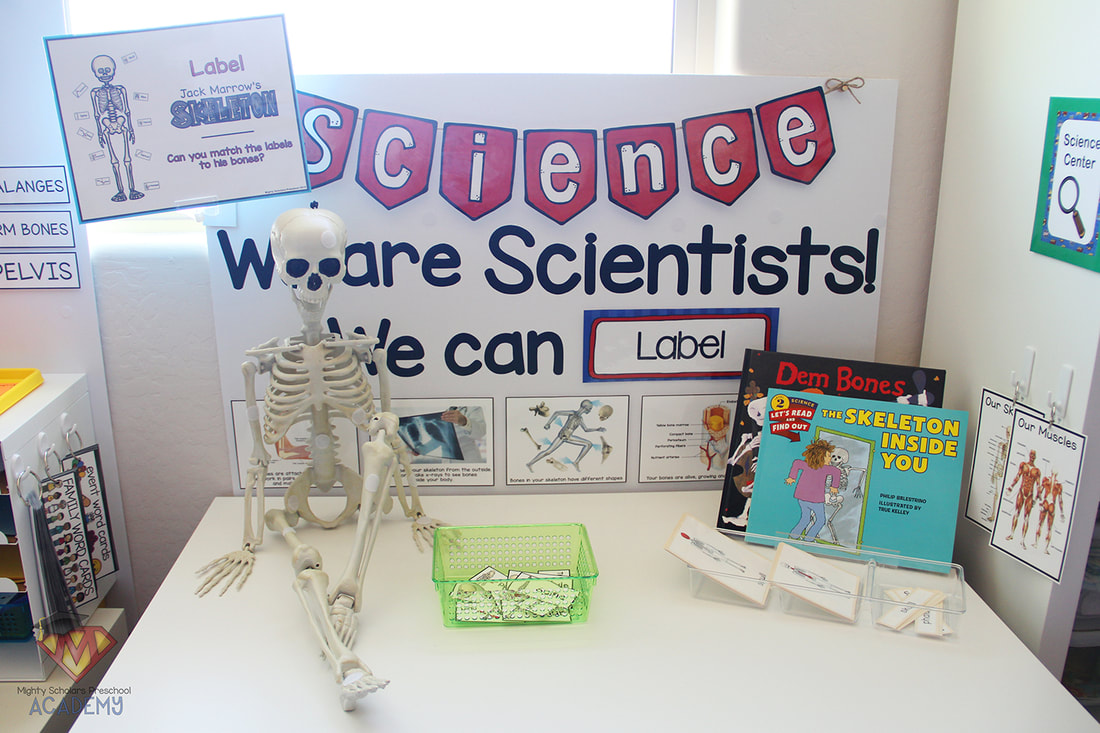
The books 'Dem Bones' by Bob Barner and 'The Skeleton Inside You' by Philip Balestrino, are just some of the choices to add to the center. I set out my chosen books when setting up the center, but also make sure to read each book to my students during the duration the activity is in the center.
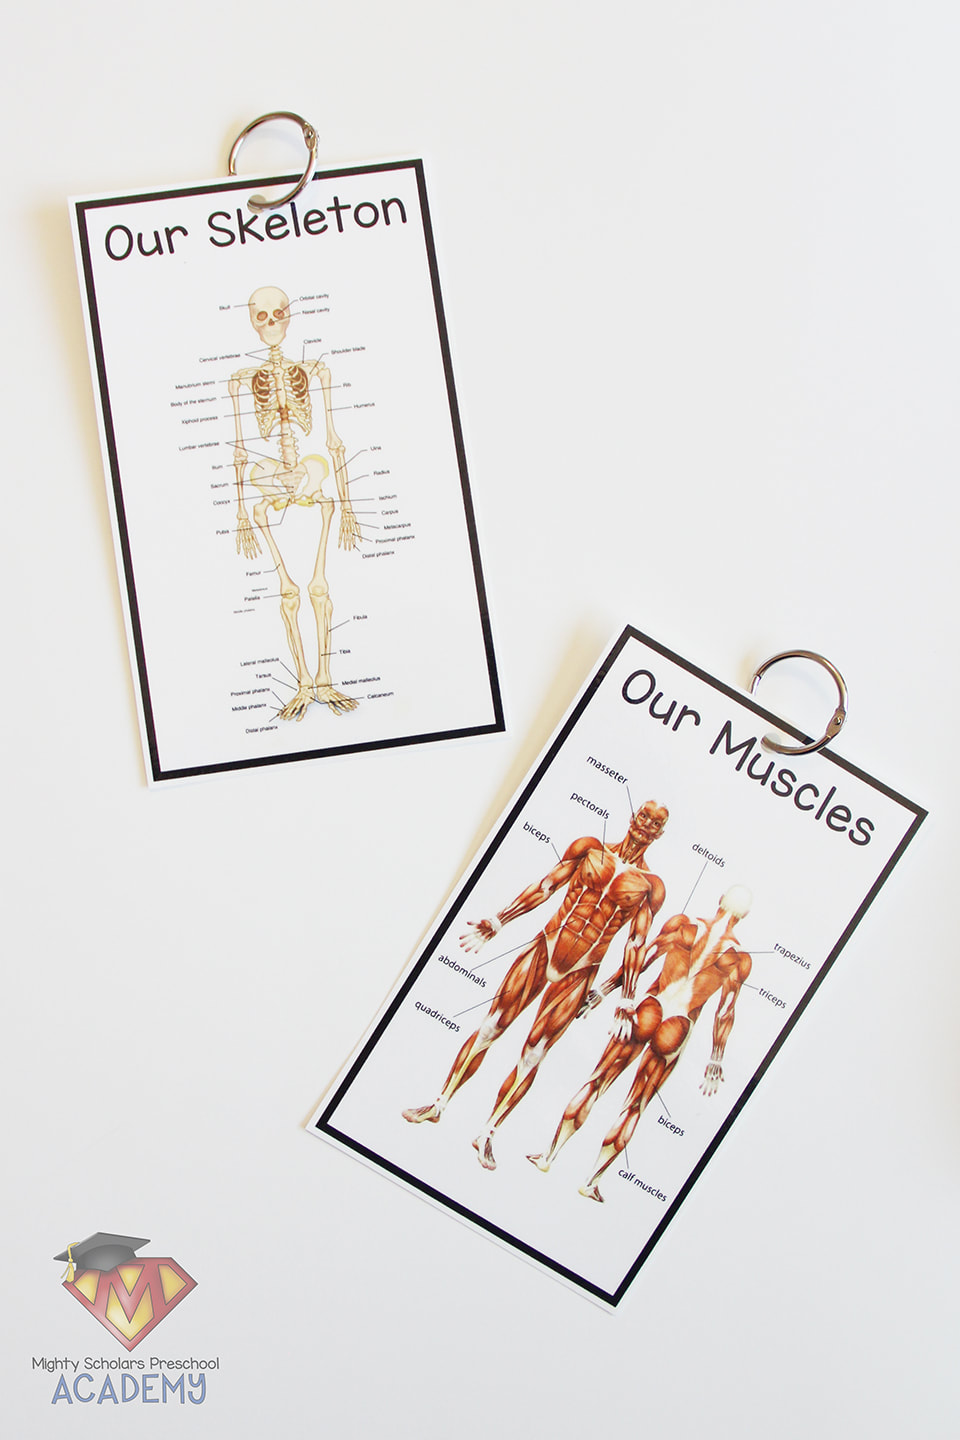
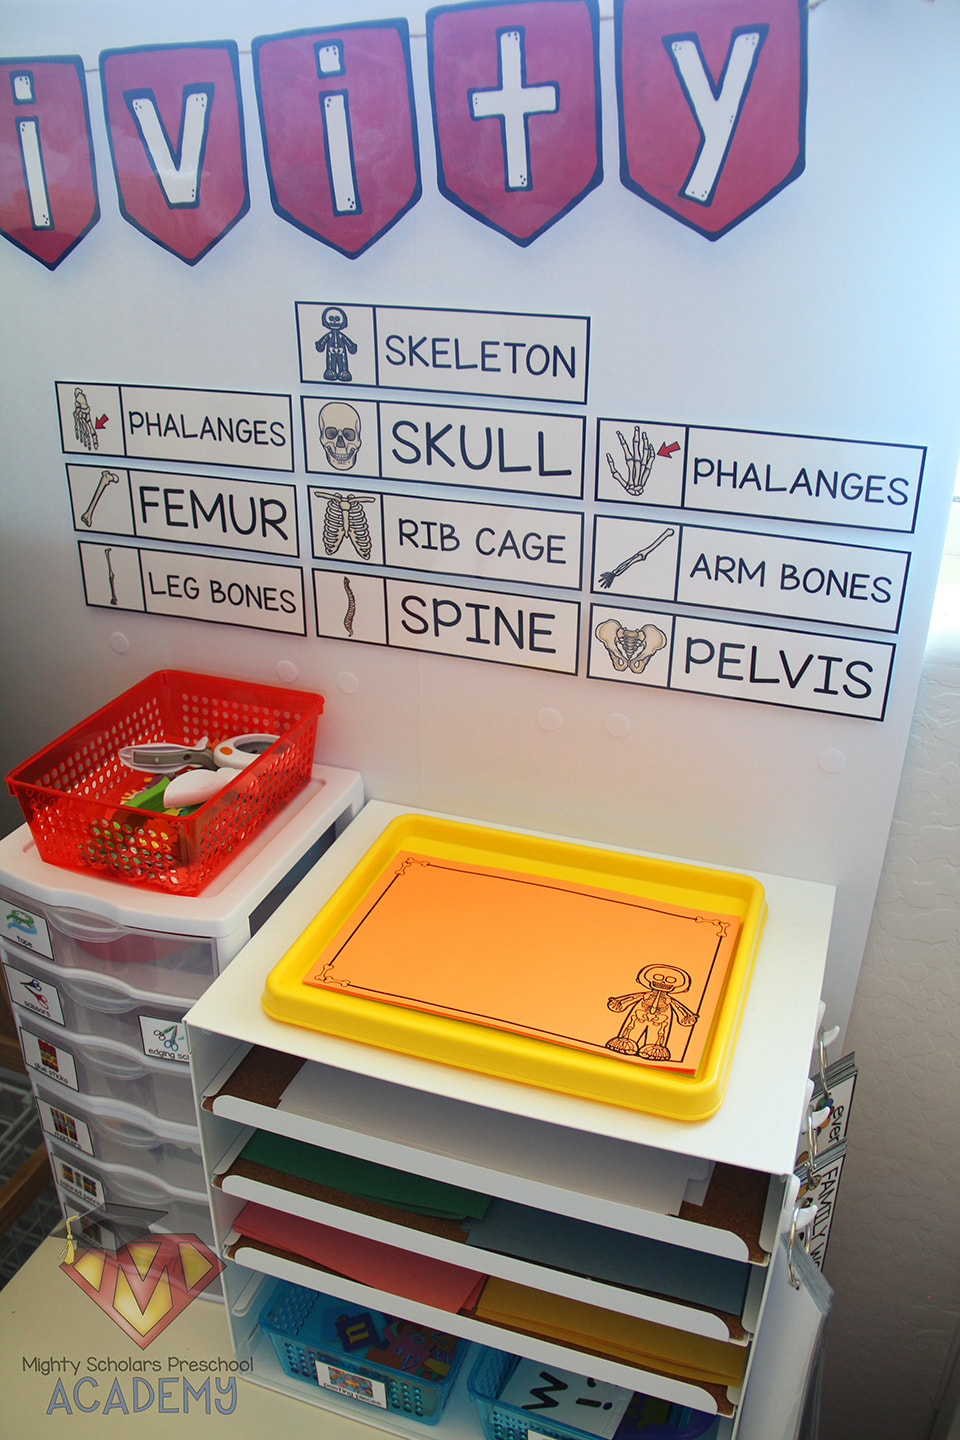
Along the back of the science table, I hung mini posters that show and mention how muscles are attached to our bones, x-ray pictures help us to see our skeleton, that bones have different shapes and bones are living with different layers that serve a purpose. The mini posters are attached to the bulletin board with velcro dots, so that I'm able to remove and use them during our small group or circle time. I also had labeled muscle and skeleton cards hung on book rings for the children to handle and observe up close. While they aren't able to read the labels, they are being exposed to concepts of print and learning that it has meaning. Many students may also be able to recognize letters and sound them out, adding a literacy component to the lesson. I have attached the muscle and skeleton cards as FREEBIES for you to download, at the end of this blog post.
The scientists can 'Discover' bulletin board card comes from a science bundle that I use to supplement my science center lessons throughout the school year, from Jamie White on Teachers Pay Teachers.

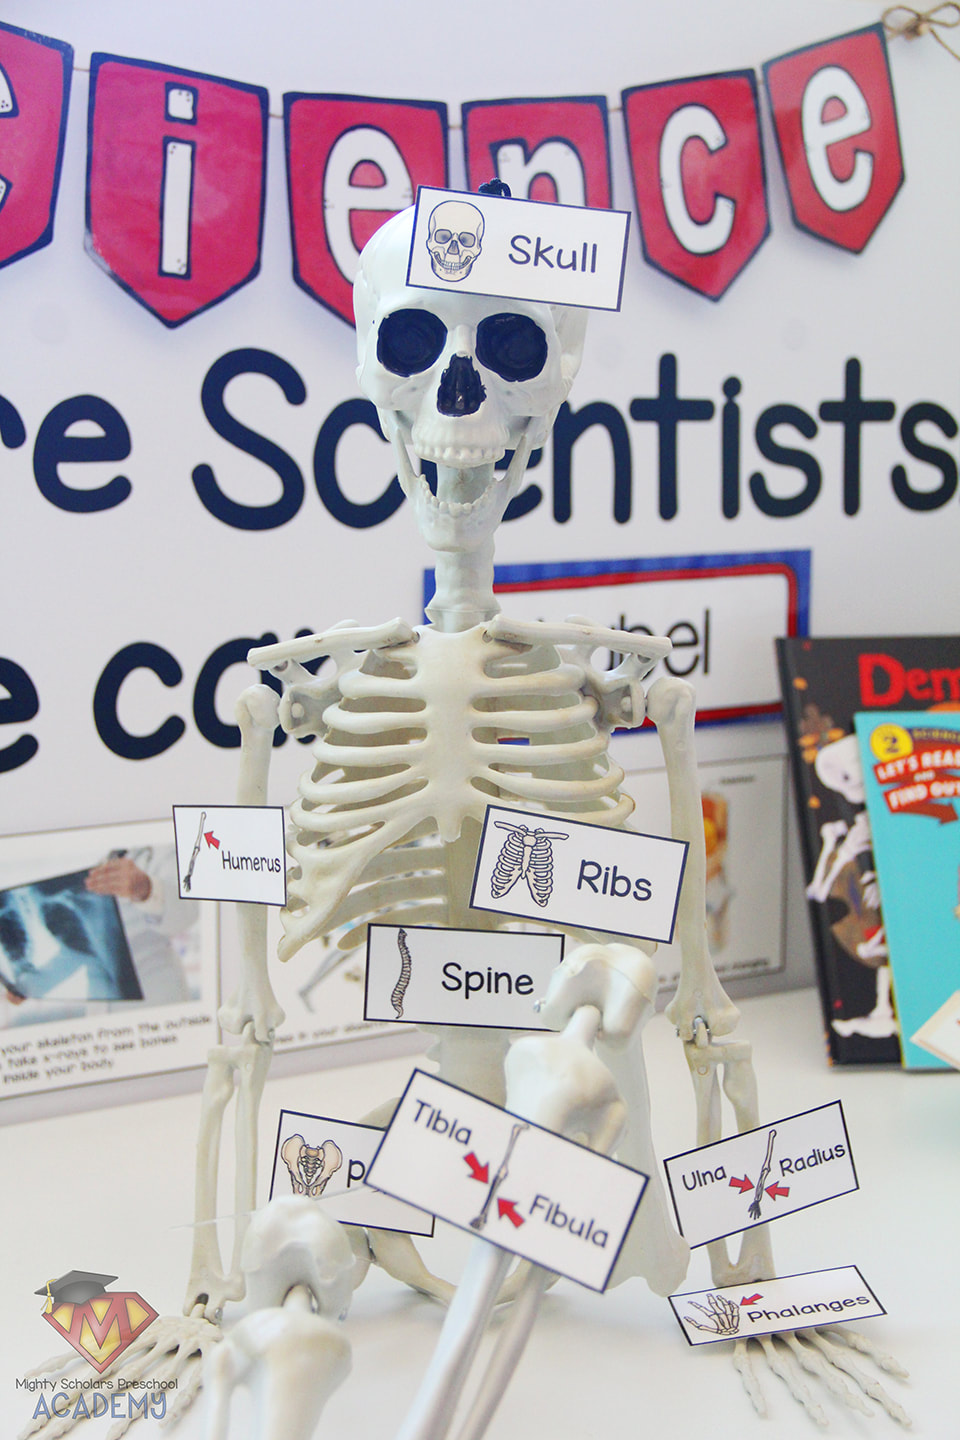
The second science center activity for our muscle and bones lessons
included our class skeleton named "Jack Marrow".
"Jack Marrow" is a posable, jointed skeleton, usually used as a Halloween decoration. It works perfectly as an educational skeleton at the preschool level. Scholars used the simplified bone label tags to label "Jack's" bones and discover the joints that help our skeletal structure to bend. The bone labels can be attached using velcro dots, or simply matched and held up by the student's hands.
My simplified class skeleton bone labels can be found in my Teachers Pay Teachers store HERE.
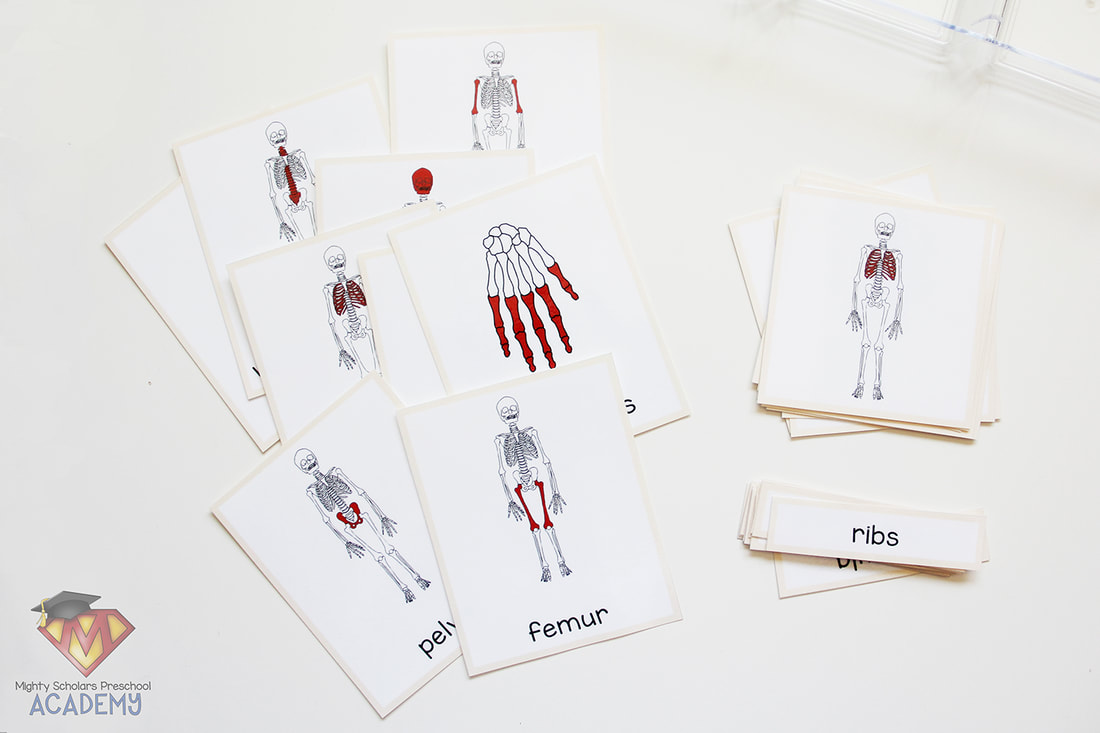
Along with labeling our class skeleton, a set of Montessori 3-part skeleton cards was a part of the science center activities.
Nomenclature cards are a wonderful activity to teach readers and non-readers the assigned names to objects in a small subject area. I only give a lesson on and set out select cards from the set, depending on the age of the class and the children's attention span. Since the 3-part cards are out with our class skeleton, I do try to keep many of the cards the same as the class skeleton labels.

Skeleton related activities were placed in the other centers
around the classroom.
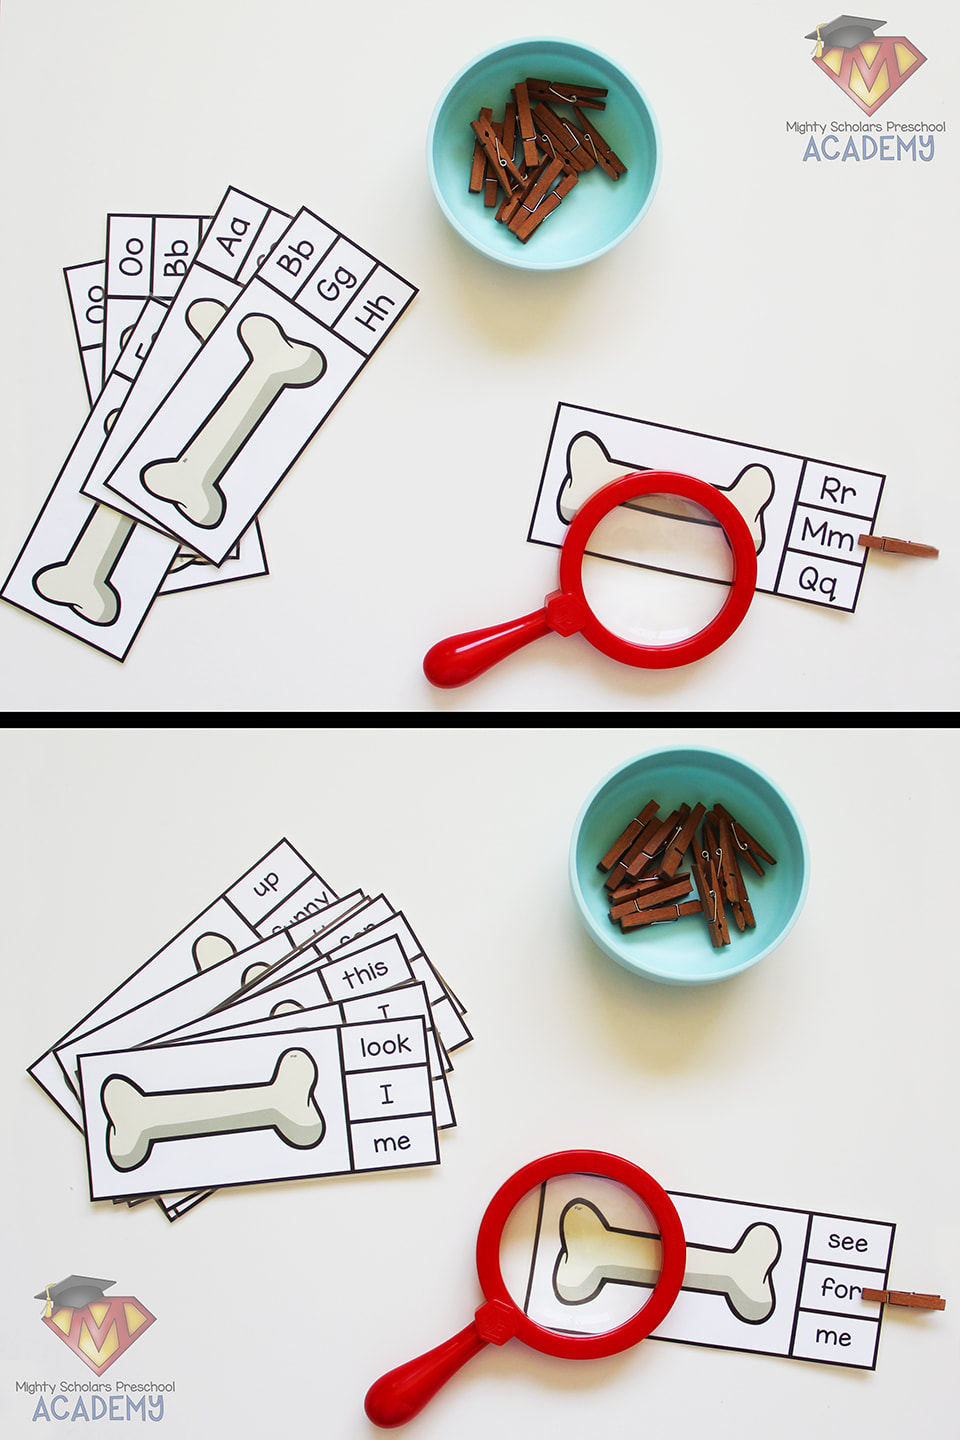
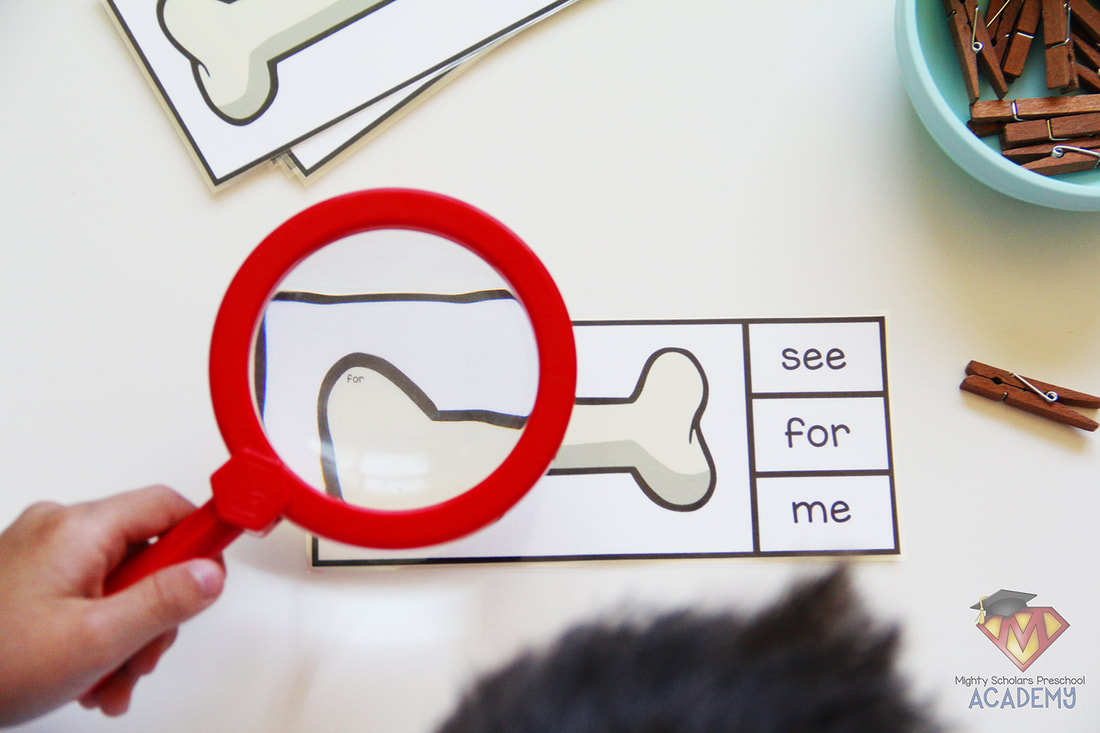
Skeleton Word Cards were hung in the writing area of our Creativity Center, with Skeleton Writing Paper, to encourage writing the vocabulary taught during the lessons. Magnify, Match and Clip Cards were one of the activities added to the Literacy Center. Students used the magnifying glass to look at the sight word or letter on the bone, then clip a clothespin to the matching sight word or letter, on the right of the card. While the words and letters can be seen if you squint up close, the magnifying glass adds excitement to the activity, making it much more engaging.
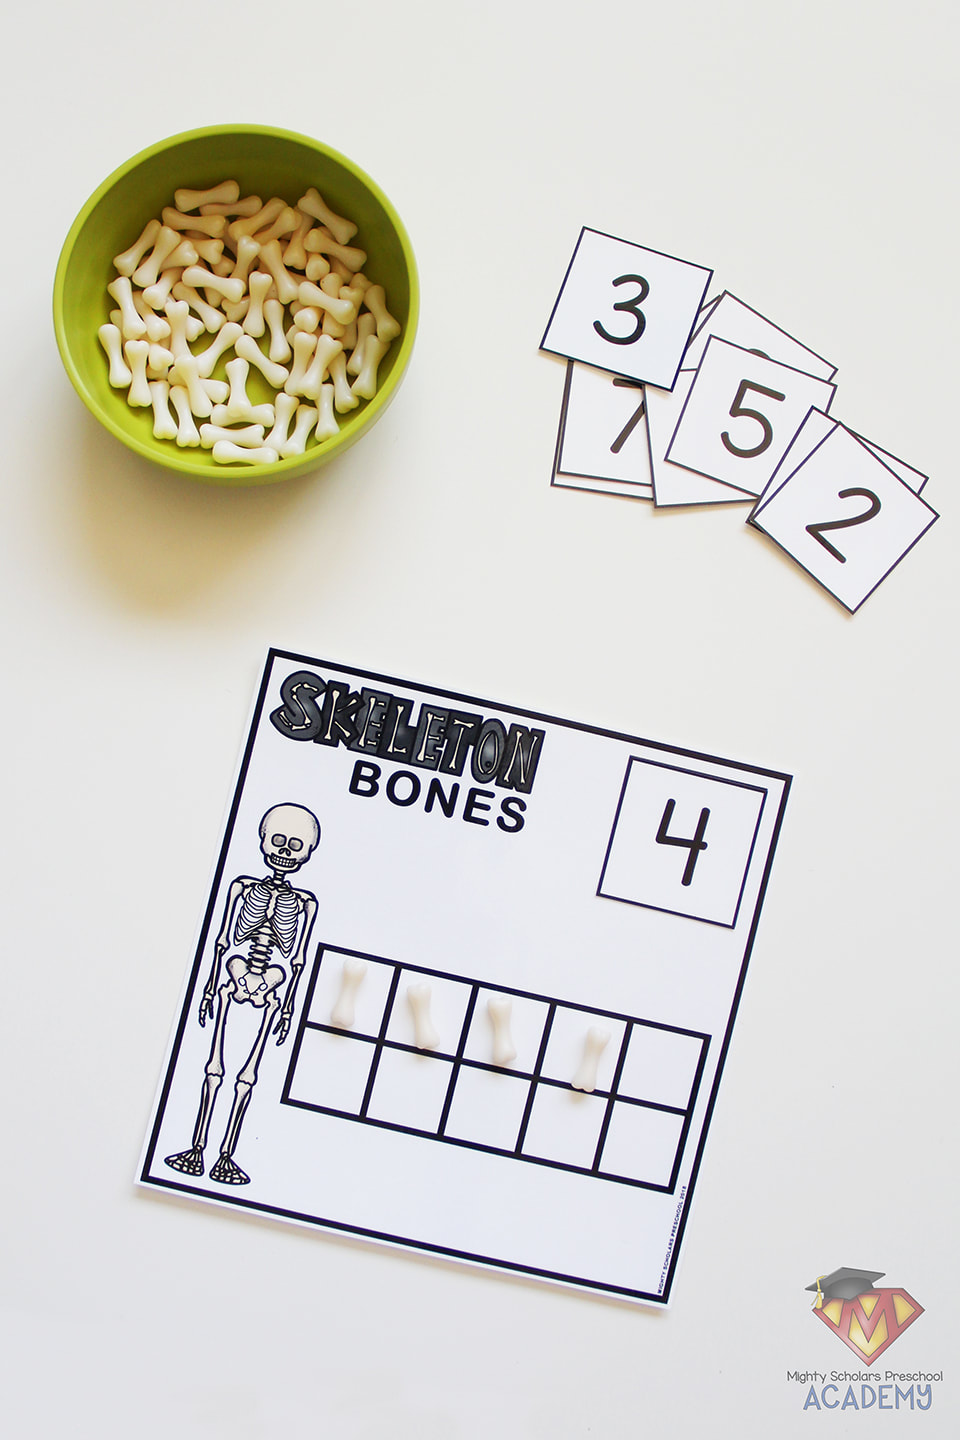
One of the added math activities, placed in our Math Center, used little bone manipulatives that I purchased from the Michaels Halloween decor section. The children use the Skeleton Ten Frame Card and Numbers to count out the corresponding number of bones. My Skeleton Ten Frame Cards and Numbers set comes with a card with a single ten frame and a card with two ten frames, for counting up to twenty.
Each of the various skeleton activities, that I added to our classroom centers, can be found in my Teachers Pay Teachers store, linked below.
You can find the Skeleton Word Cards and Skeleton Writing Paper HERE.
The simplified Class Skeleton Labels and sign can be found HERE. My Skeleton Magnify, Match and Clip Cards can be downloaded HERE. The Skeleton Ten Frame Cards and Numbers can be purchased HERE.
The muscles and skeleton card FREEBIES can be downloaded below:
Please note, as a participant in the Amazon Services LLC Associates Program, I may earn a small commission on qualified recommended links.
The Amazon Services LLC Associates Program is an affiliate advertising program designed to provide a means for sites to earn advertising fees by advertising and linking to Amazon.com.
My Amazon Picks for The Human Body: Muscles and Bones
Our year-long science unit is all about The Human Body,
starting from the outside in.
For the first week of our unit we covered all about the parts of the body: facial features, arms, legs, hands, etc. The science center hosted the largest activities on the subject, with smaller activities embedded throughout the classroom centers. Children love to look at themselves in a mirror, especially while they are working on an activity. During the two weeks, I added a large mirror to our science table to give my students the opportunity to observe their own features and parts.
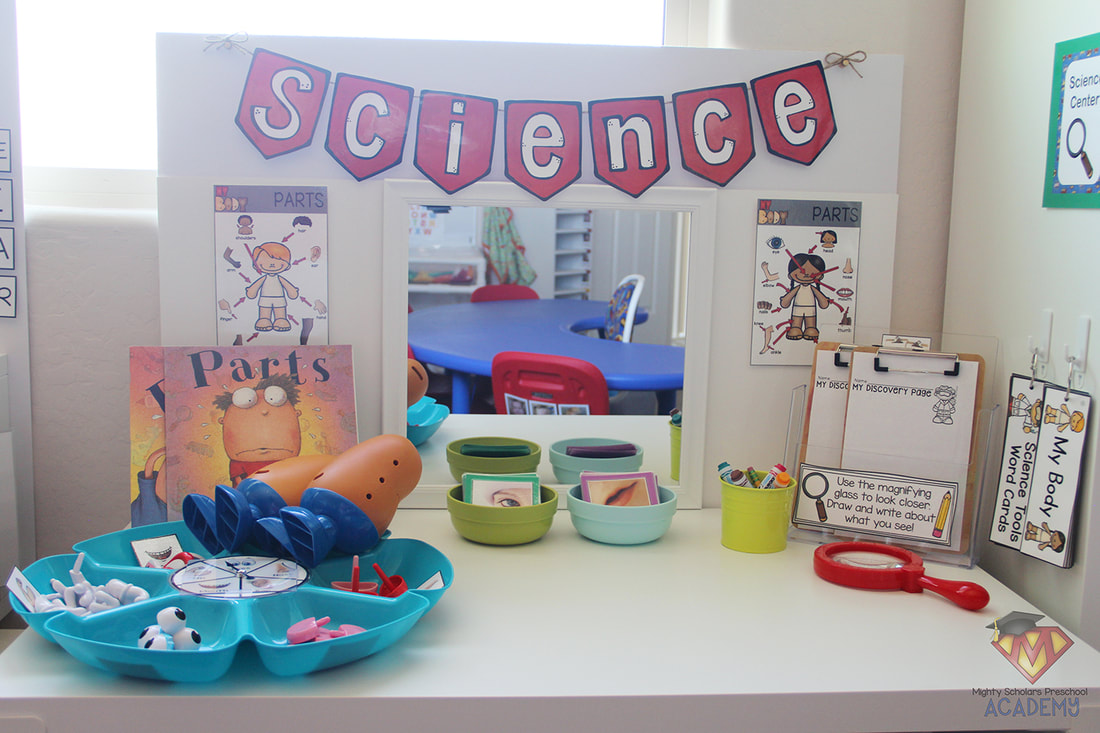
The outside features of our bodies are what preschool aged children notice, are the most excited to recognize and also to learn about.
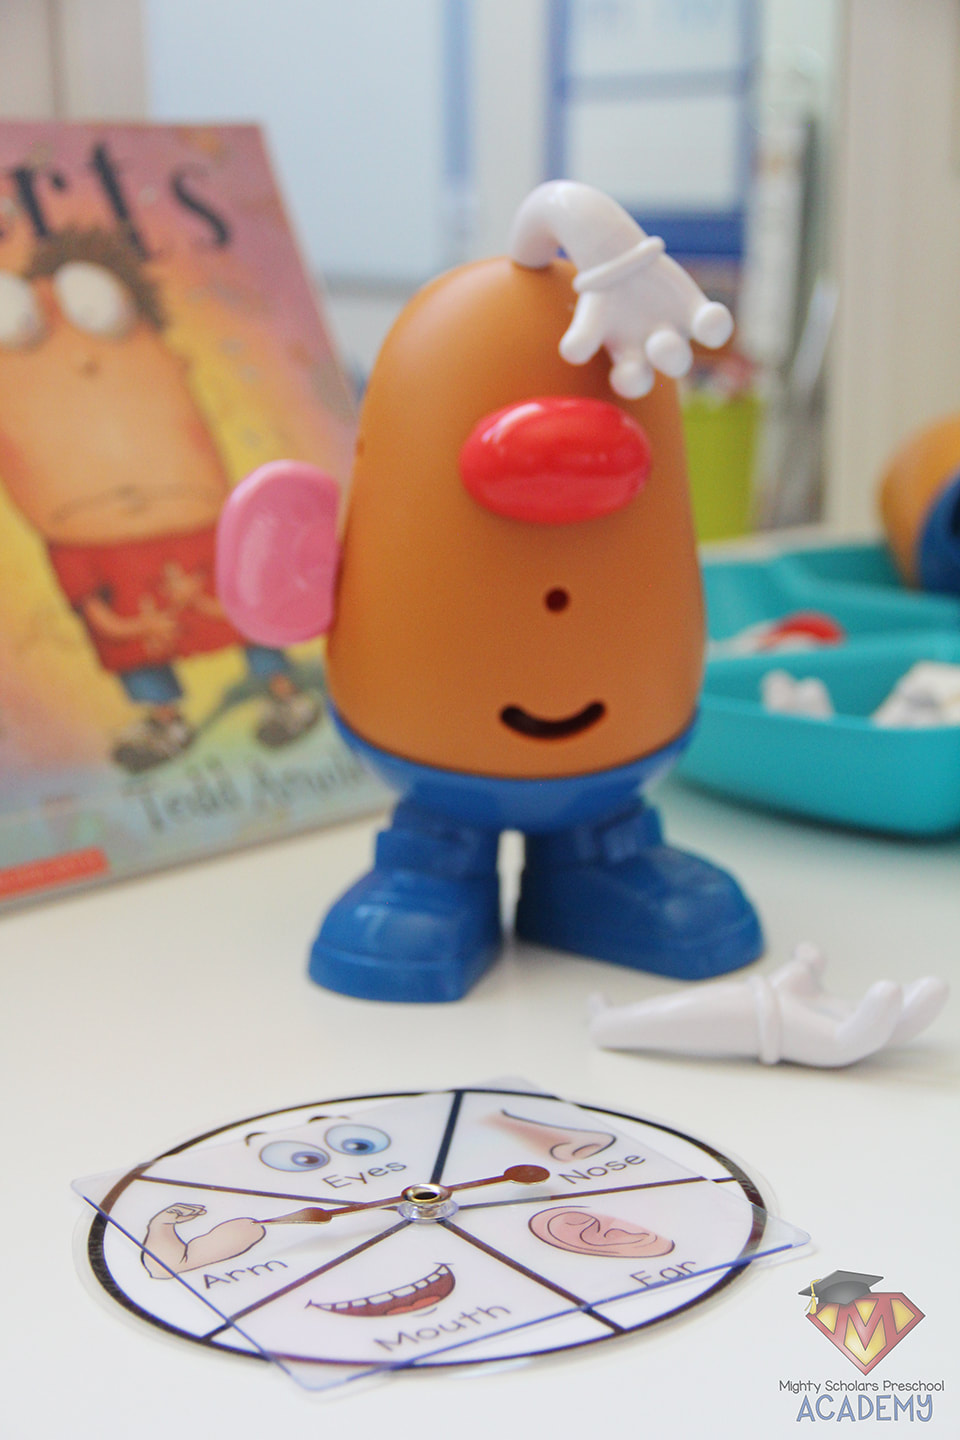
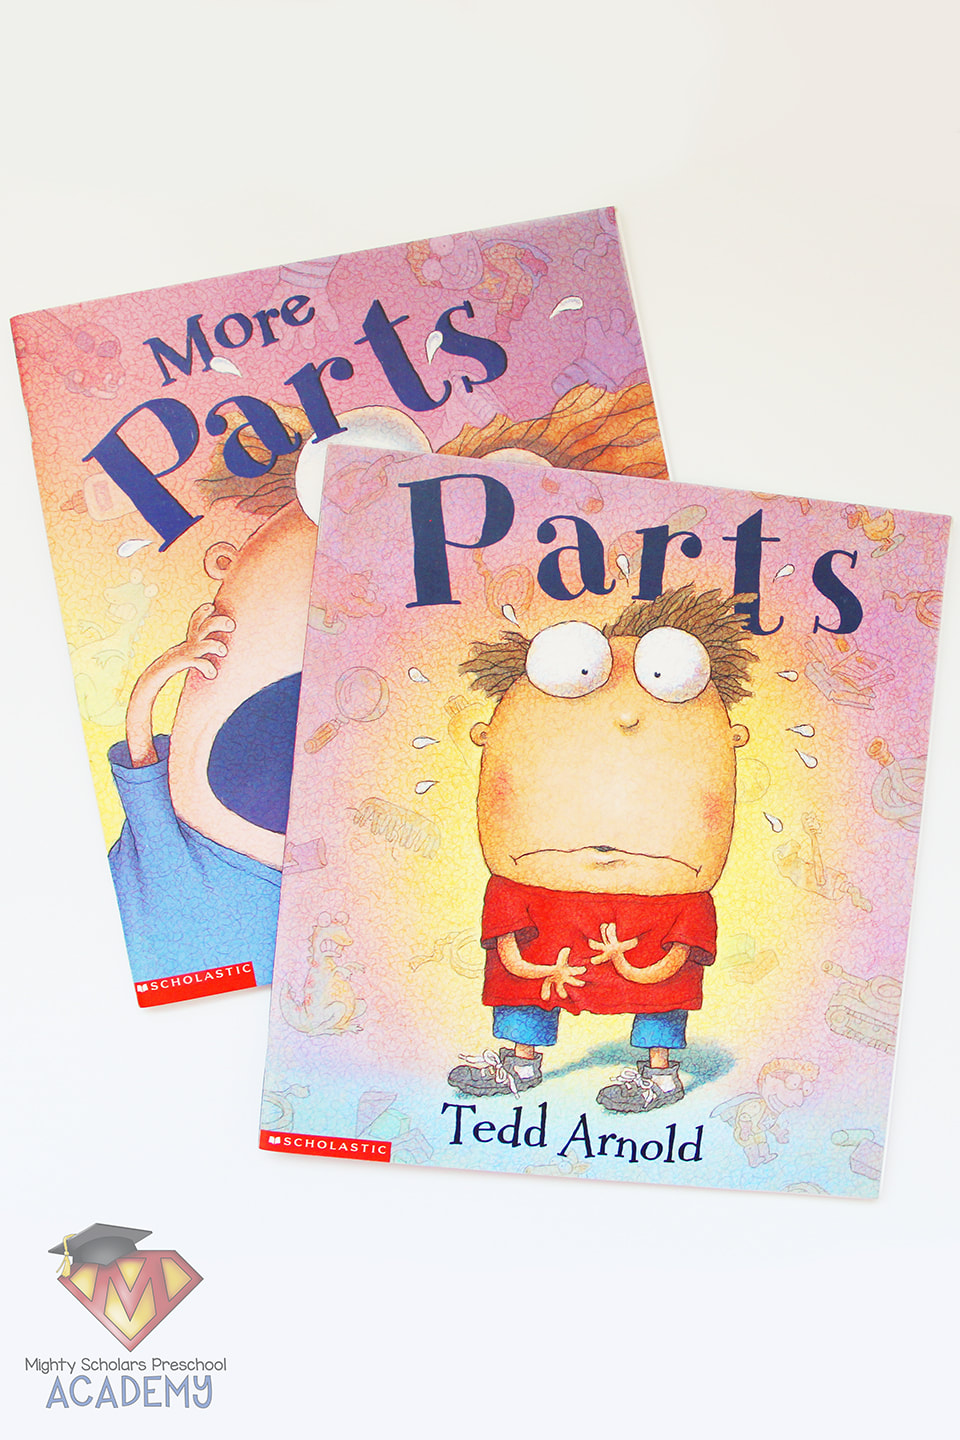
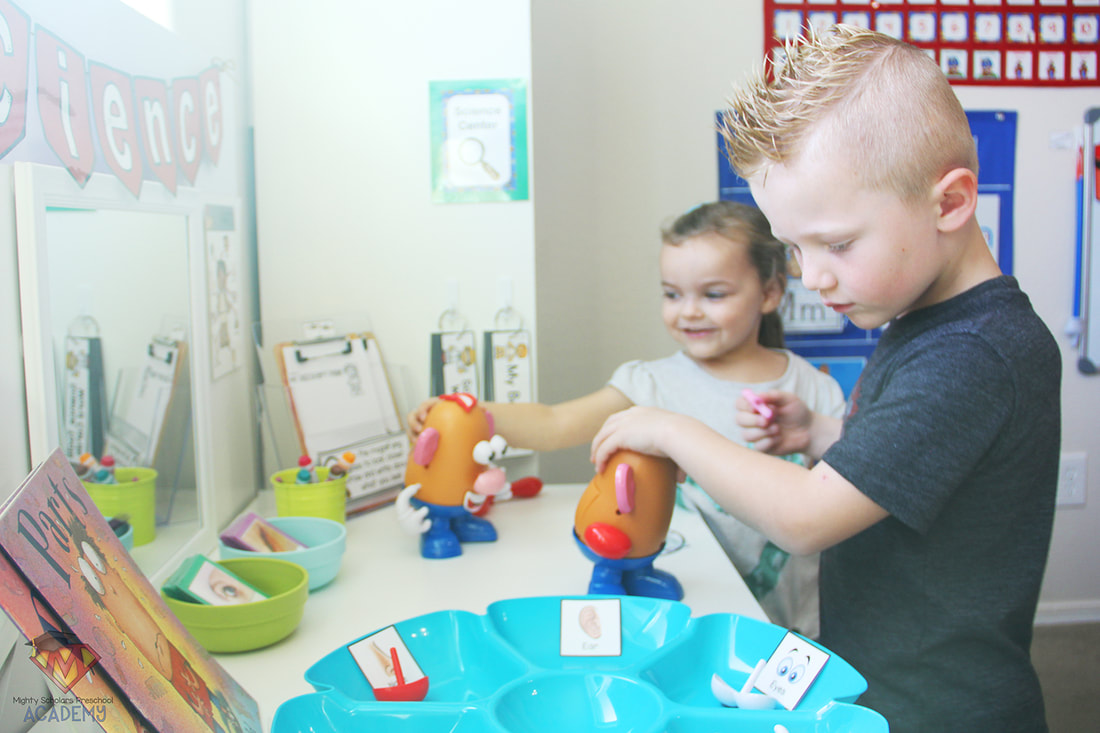
To introduce the lesson, I read the book 'Parts', by Tom Arnold. My students love the illustrations and the funny narrative. We used games to make learning about our parts fun and engaging. One of the most engaging games included Mr. Potato Heads and extra parts.
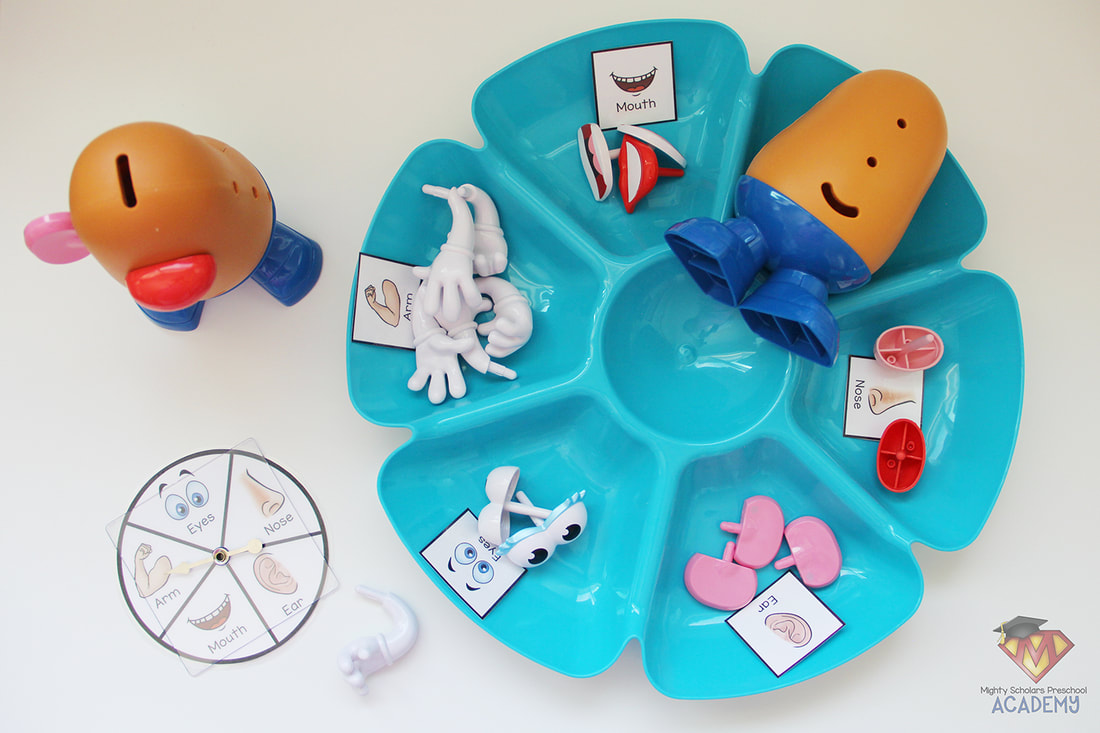
The Body Parts Spin Game is a goofy, fun identification game, that requires one-to-one correspondence and taking turns.
Each participant takes turns with the spinner and adding the corresponding body part to their potato. Many students like to choose alternative placement for the body parts, especially when they get more than what would be on the average human body. I've attached the game spinner as a freebie at the end of this blog post.
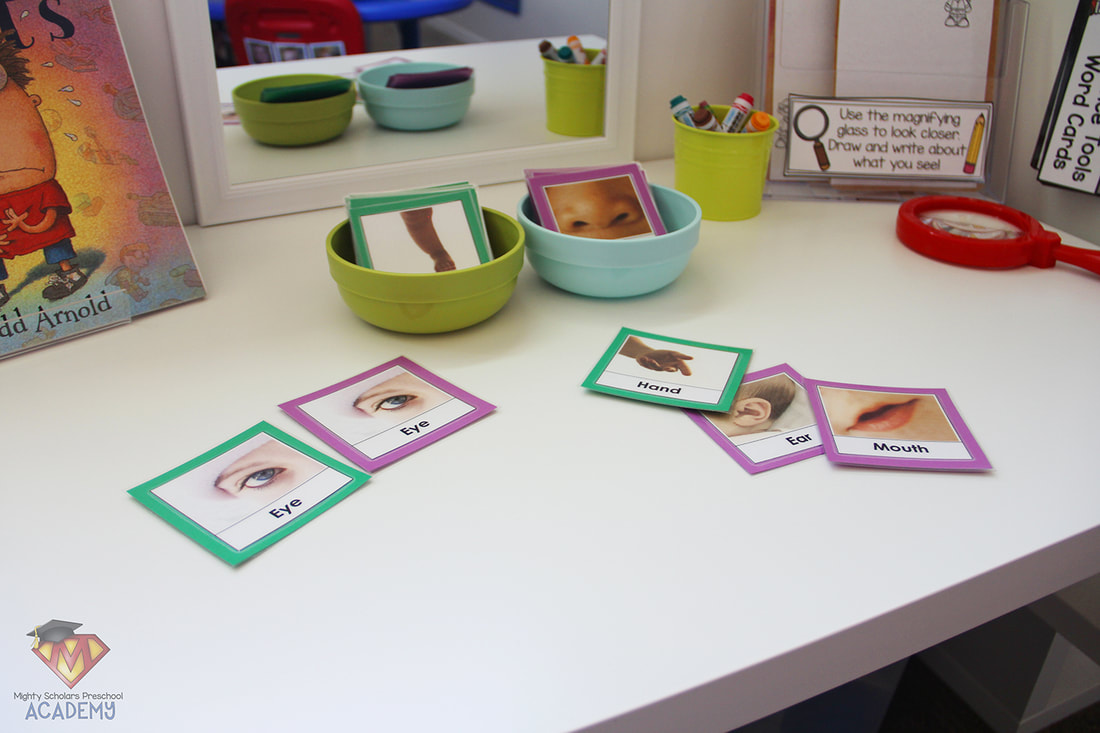
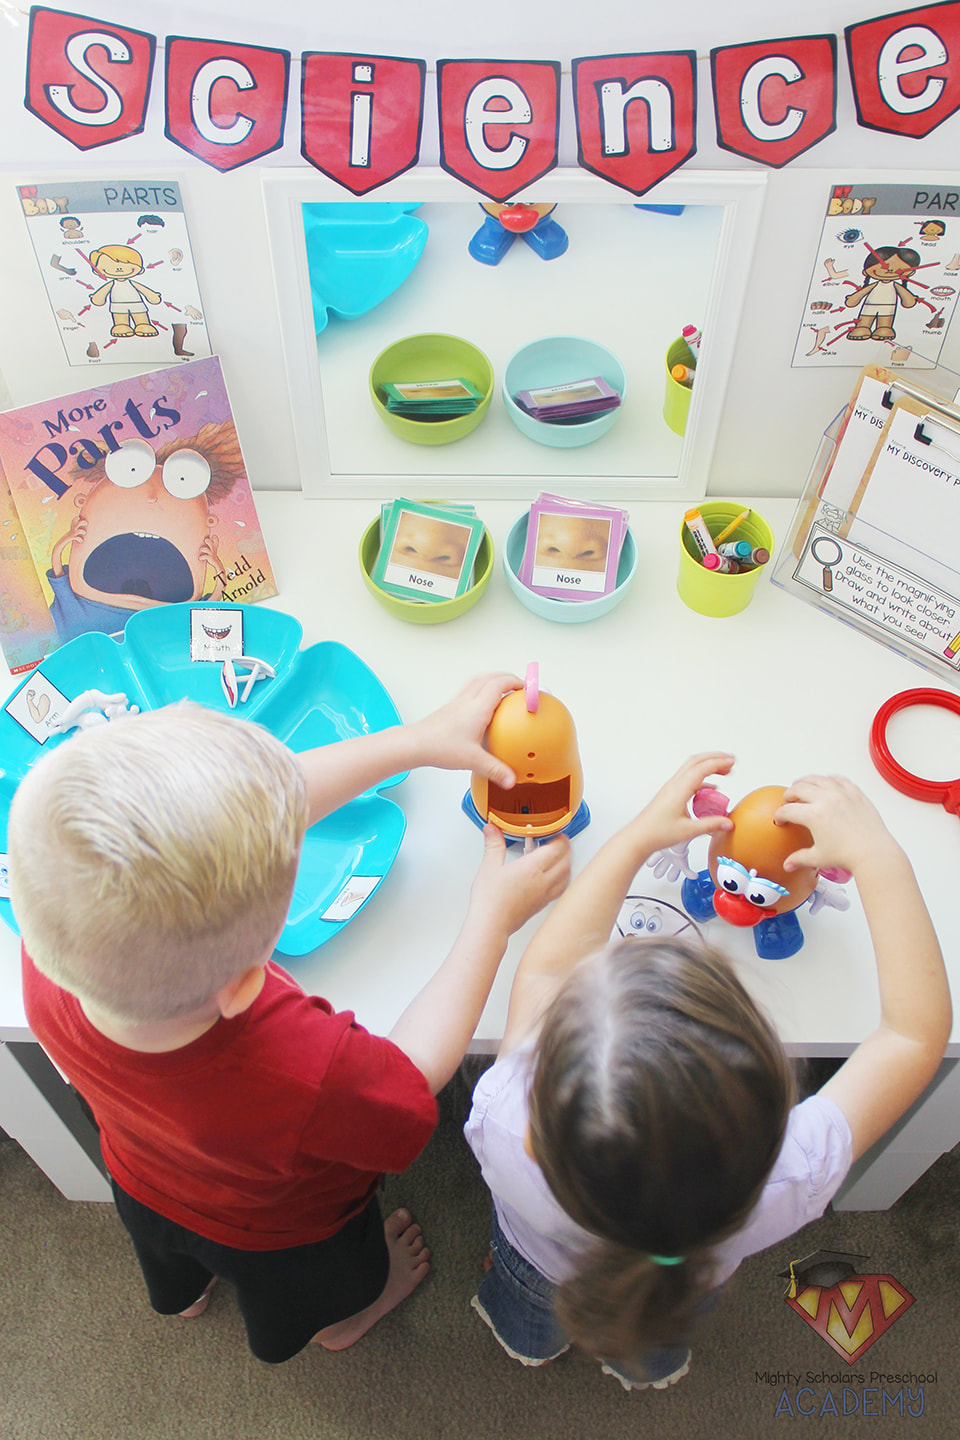
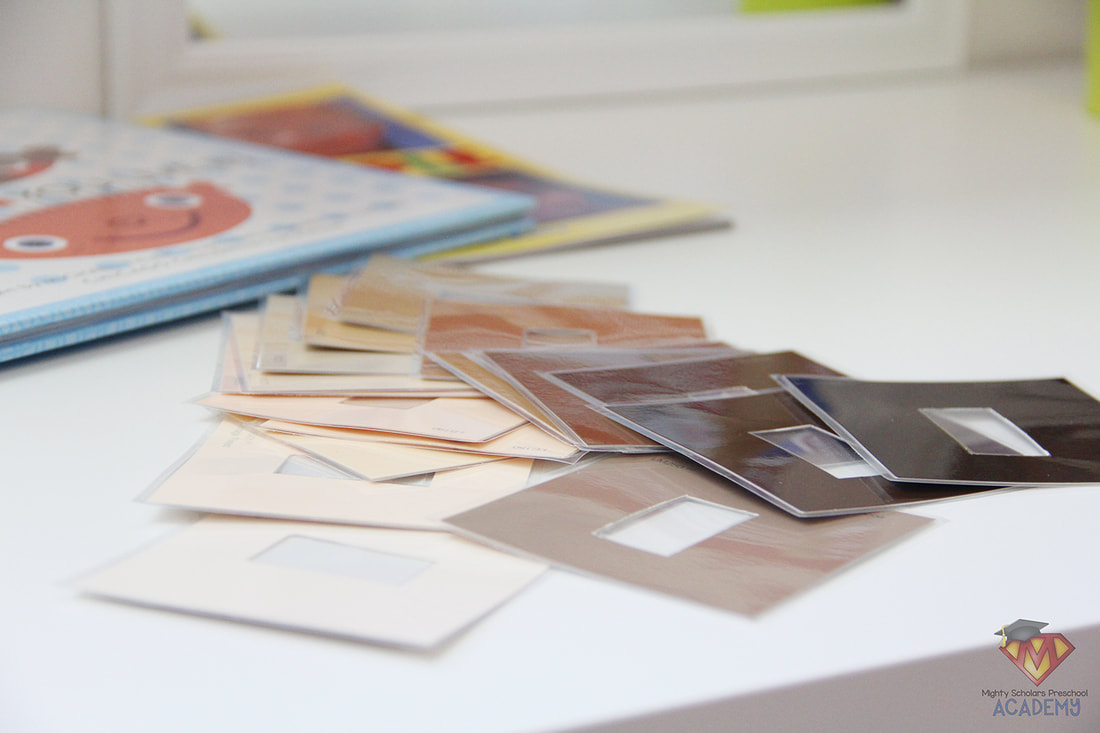
The second activity required matching body parts with real photographs.
While clip art images are fun, its important to have real images presented. The most studied activities in our units are those with real photographs. Identification in the real world won't look like cartoon drawings. When I present the matching game to my scholars, we talk about each of the photographs together, before its placed out on the science table.
This particular set of matching cards and additional wonderful activities can be found at
Every Star Is Different.
Adding literacy to the center is giving students the opportunity to go back over the books we've read, or cards we've used together.
Students enjoy looking through the books we have read together, recalling the sequence of the stories and retelling it in their own words. The more opportunity to a wide variety of books, the better. Ted Arnold has several books in the 'Parts' series. We read two during the week: 'Parts' and 'More Parts'.
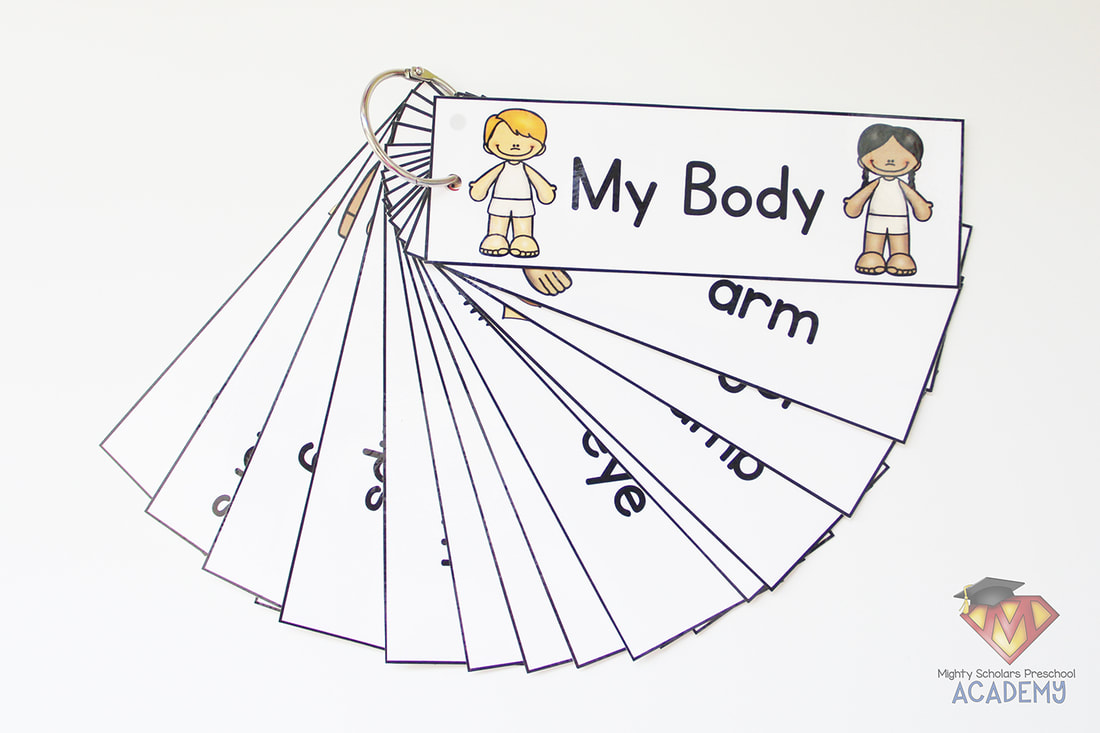
I always try to add hanging word cards for my students to look through, with each subject. I used the word cards to play versions of "Heads, Shoulders, Knees and Toes" and "Simon Says", during our circle time. I hang word cards from book rings, so students can easily flip through them, on their own. The My Body mini posters can be found in my Teachers Pay Teachers store, HERE.
I found the 'My Body' word cards at PreKinders.
Karen, from PreKinders, has a great list of activities to use with her word cards. 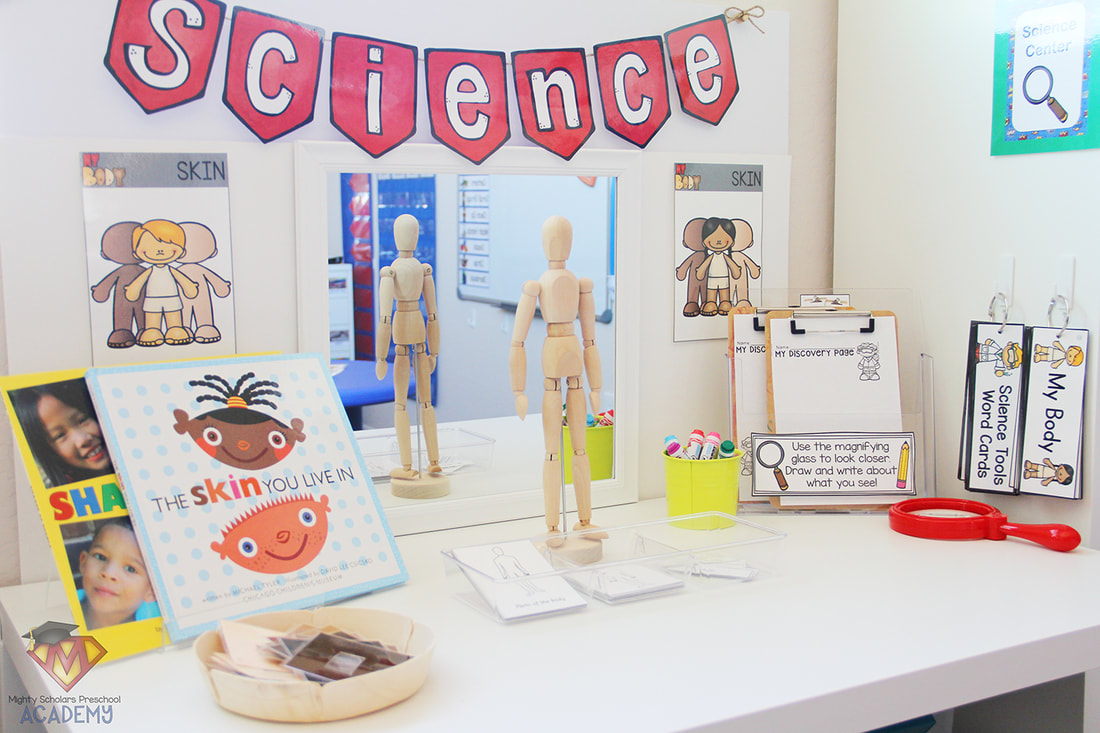
The second week in the Human Body Unit,
covered the subject of our largest organ: our skin.
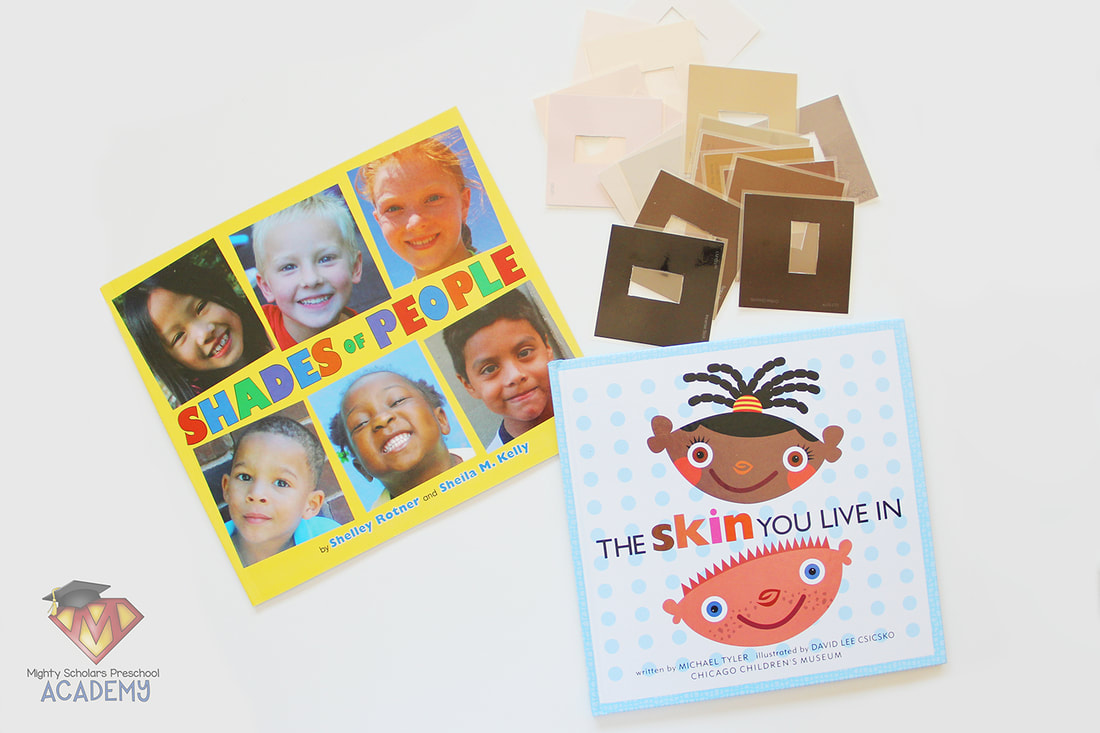
Skin, at a preschool level, is very simplified. I like to teach my students how their skin grows and moves with them, never needing to be changed, unlike the clothes we outgrow. We talk about how our skin is like a protective coat for everything inside our bodies and how we can take care of it. During this lesson, I read 'The Skin You Live In', by Michael Tyler.
During the week, we discuss the word "shades" and how every one of us has a beautiful and unique shade of skin; observing the beauty in diversity in our classroom and around the world. To teach this concept, I read the book 'Shades of People', by Shelley Rotner and Sheila M. Kelly. My students then compared their unique shade of skin to the other students in the class and we talked about how our shade of skin can change with emotions or environment, such as tanning or sunburn.
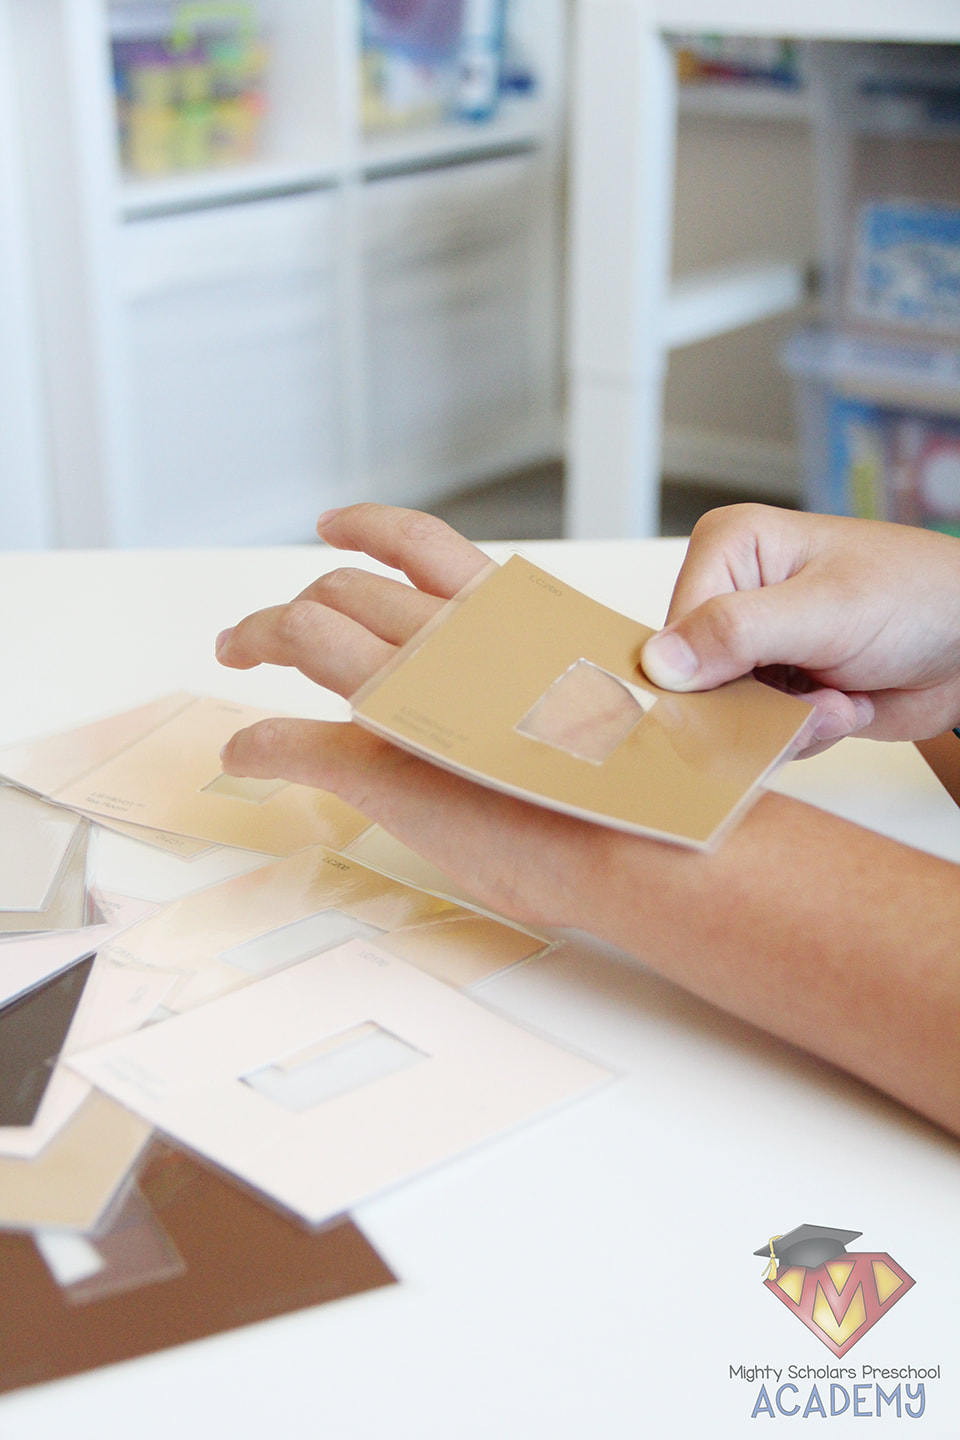
As an extension activity to shades of skin, paint chip cards make a
fantastic, diverse, visual comparison.
My local hardware store carries the larger square paint chip cards, perfect for classroom activities. I scoured the wall for as many skin shades as I could find, from one end of the spectrum to the other. I carefully cut out a rectangular window in the center, with an X-acto knife, before laminating them. Students then used the cards to compare their own beautifully unique shade of skin to the shade on each card, through the window.
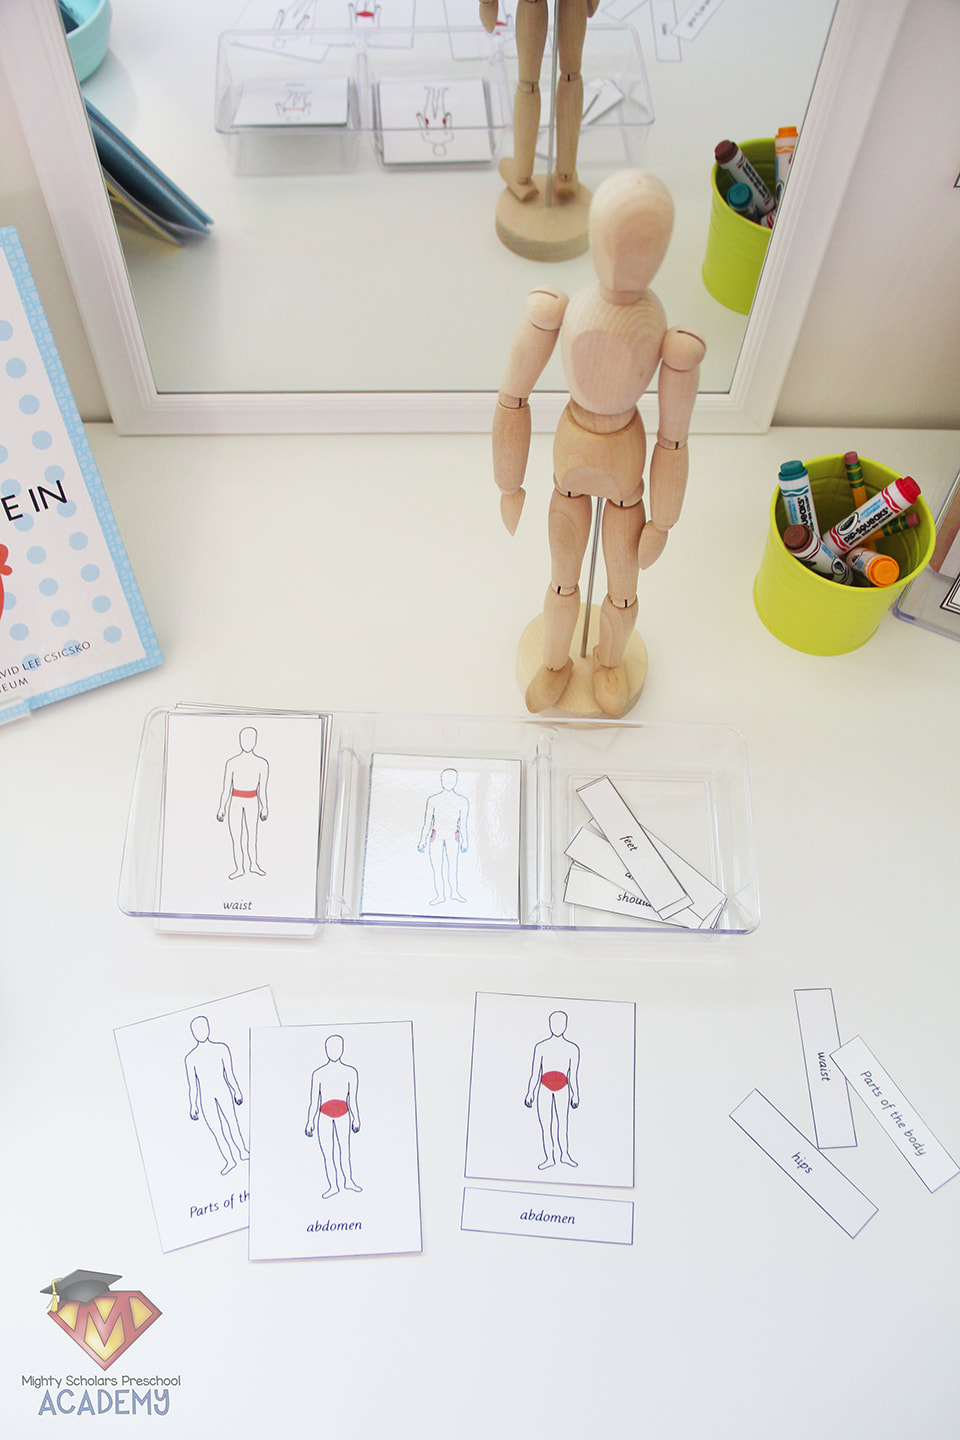
A continuation of the previous body parts week was also added to the center, with Montessori 3-Part cards.
To blend in with our subject of skin, but carry on the previous subject of body parts, I found a great activity from Mama's Happy Hive, using a wooden artist mannequin and Montessori 3-Part External Parts of the Body cards, from Elementary Observations.
My students used the cards to locate the body parts on the mannequin, as well as matching the cards to each other. While they weren't able to read the body part names, we did go over them together during the lesson and they learned that the printed text has meaning. I only set out a select few for my students to use and switched them out mid-week to keep them interested.

My free Body Part Spin Game can be downloaded via the link below:
Please note, as a participant in the Amazon Services LLC Associates Program, I may earn a small commission on qualified recommended links.
The Amazon Services LLC Associates Program is an affiliate advertising program designed to provide a means for sites to earn advertising fees by advertising and linking to Amazon.com.
My Amazon Picks for The Human Body: Parts and Skin
Learning through sensory exploration is vital and comes naturally to children. They are developing skills that will be crucial in making
informed decisions throughout their day, as adults.
Sensory table activities help children to refine their senses and help their brains to create stronger connections to sensory information. Over time, children learn what their thresholds are, what is useful and what can be filtered out. Sensory play develops motor and language skills, problem solving, scientific thinking and the five senses. It can also involve mindfulness activities, that can benefit anyone at any age.
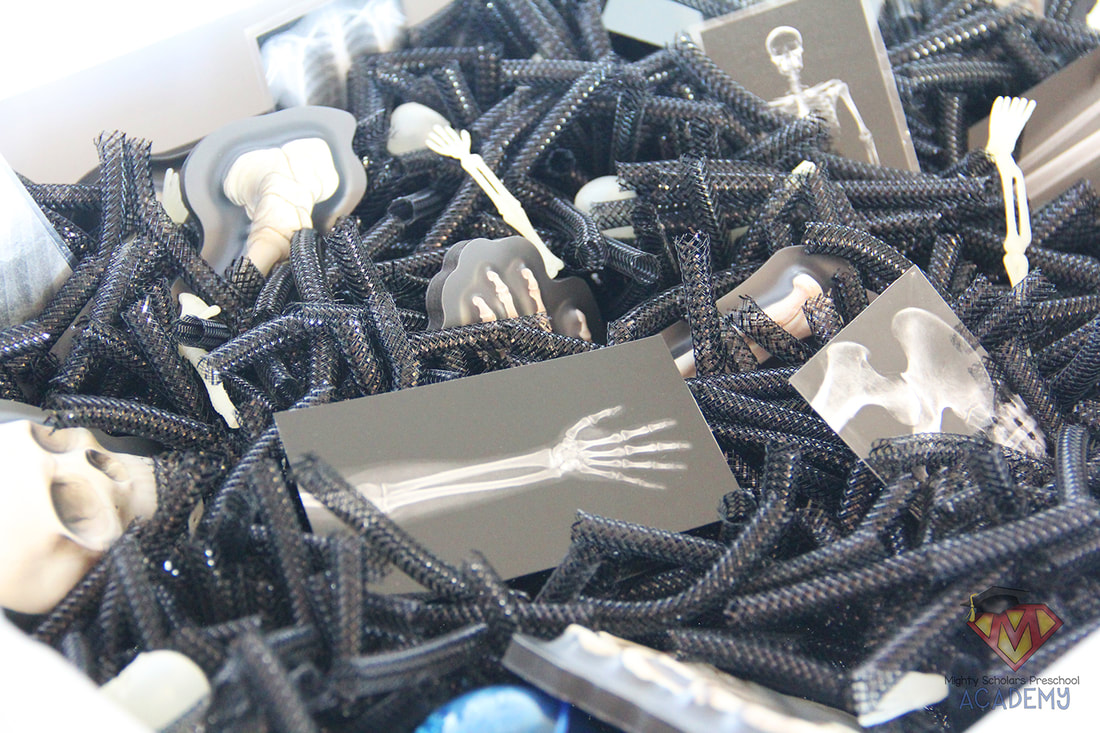
For the next two weeks my scholars will be learning about
the muscles and bones of our bodies.
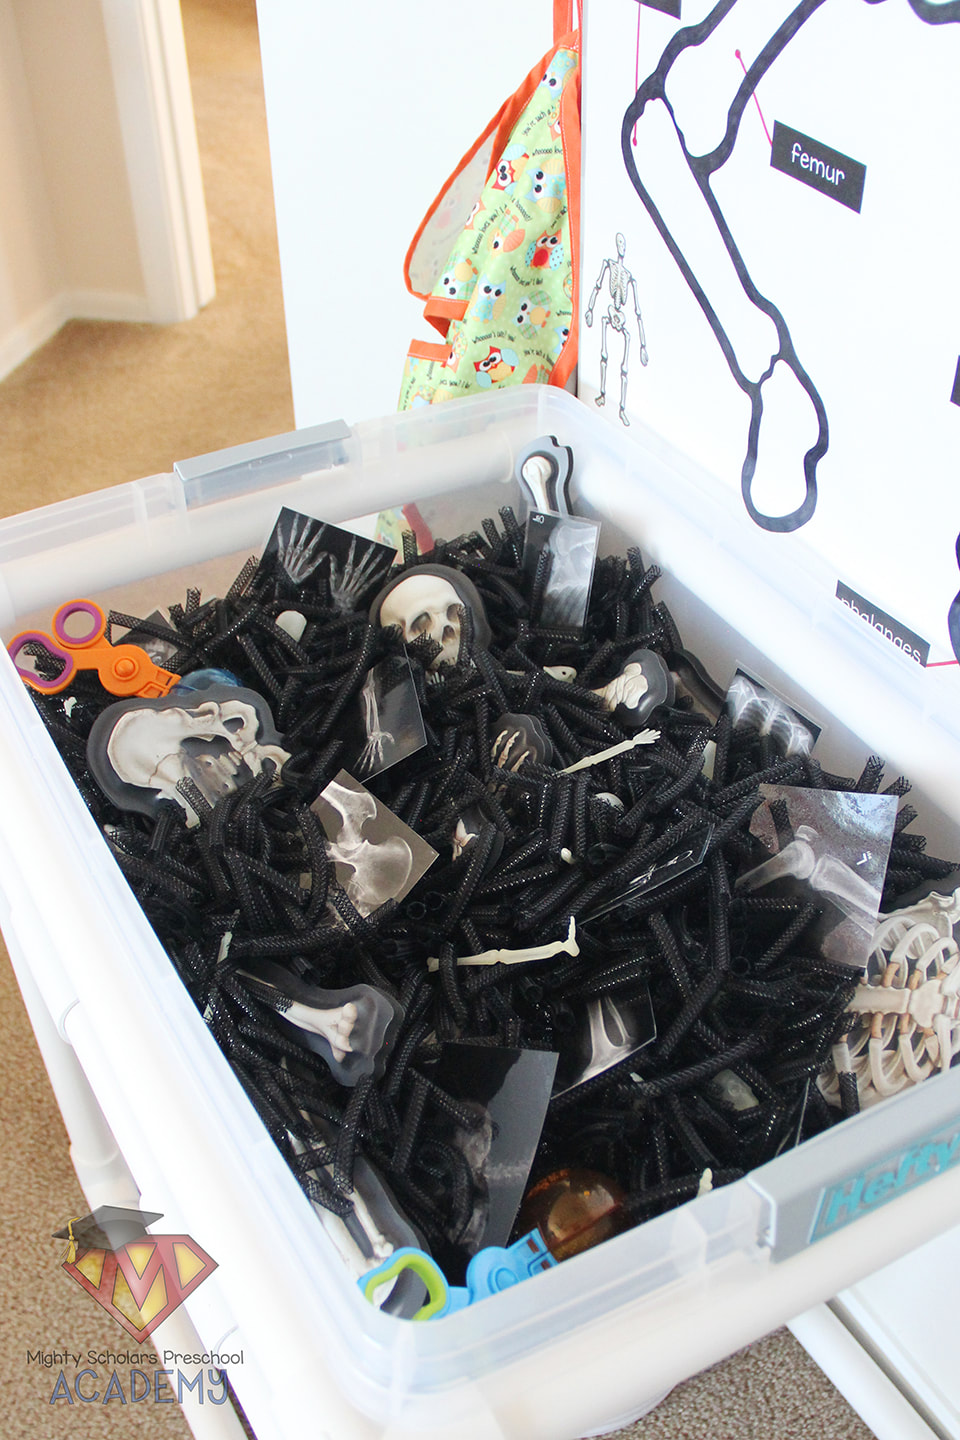
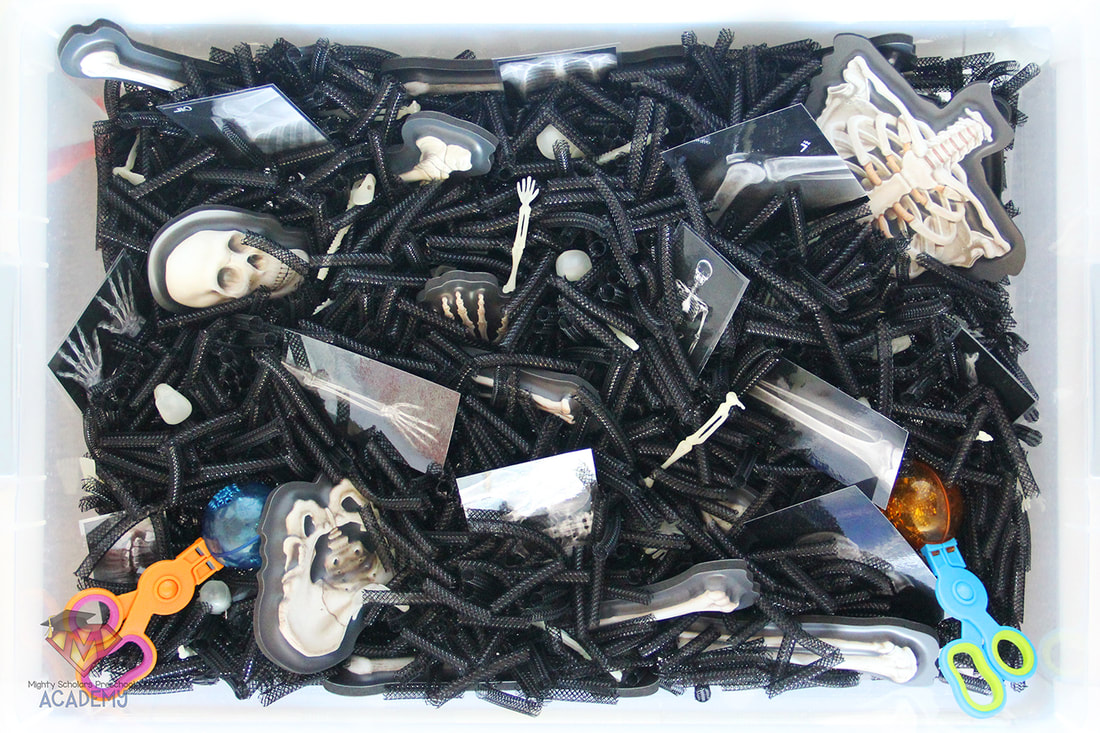
Activities that fit the same theme are embedded around the classroom, in all of the centers. While muscles are a more difficult concept to learn and find educational activities about, bones are usually used as the main manipulatives and activity base. So I chose the skeleton and x-rays as our sensory table theme.
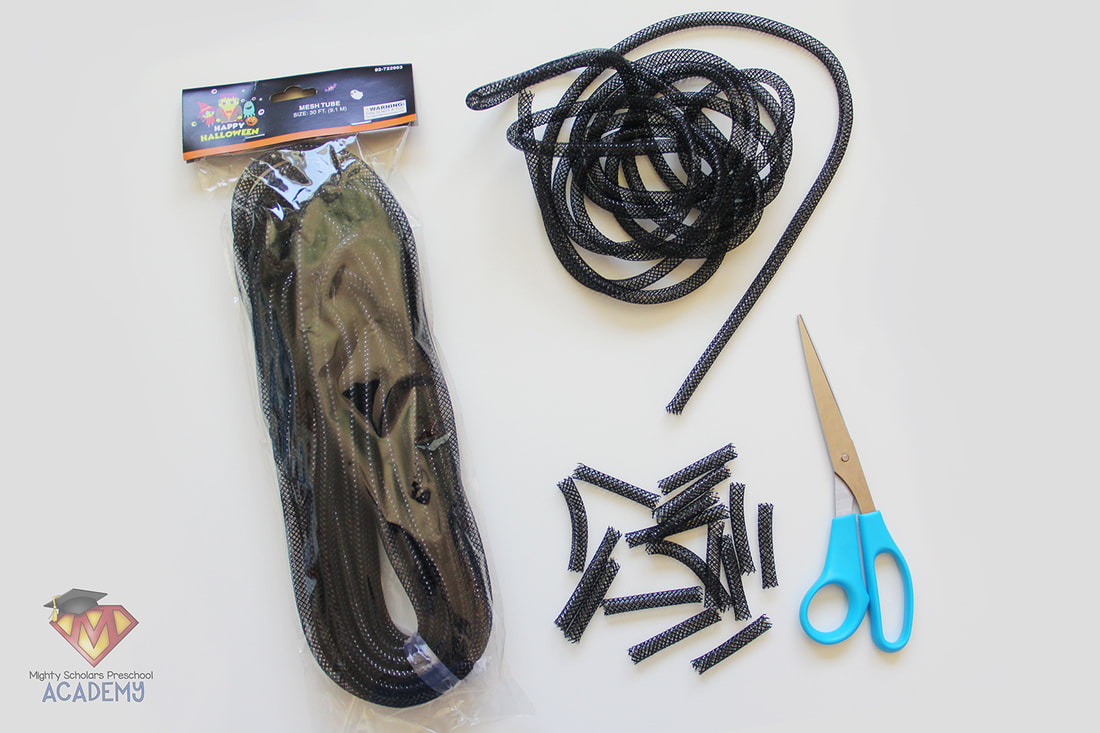
Fall is the perfect time to find the black mesh tubing sensory table filler.
Many dollar stores carry the black mesh tubing during the fall. It can also be found at most craft or fabric stores. Its a unique sensory table filler that can be easily manipulated and bounce back to its original shape. It literally bounces like a metal spring. The mesh tubing isn't only fun to manipulate, its also soft and very light weight. Like most sensory table fillers, my students like to run it through their fingers and over their hands. In a classroom where there is a lot of busy exploration and discovery going on, it makes very little noise, which is a plus.
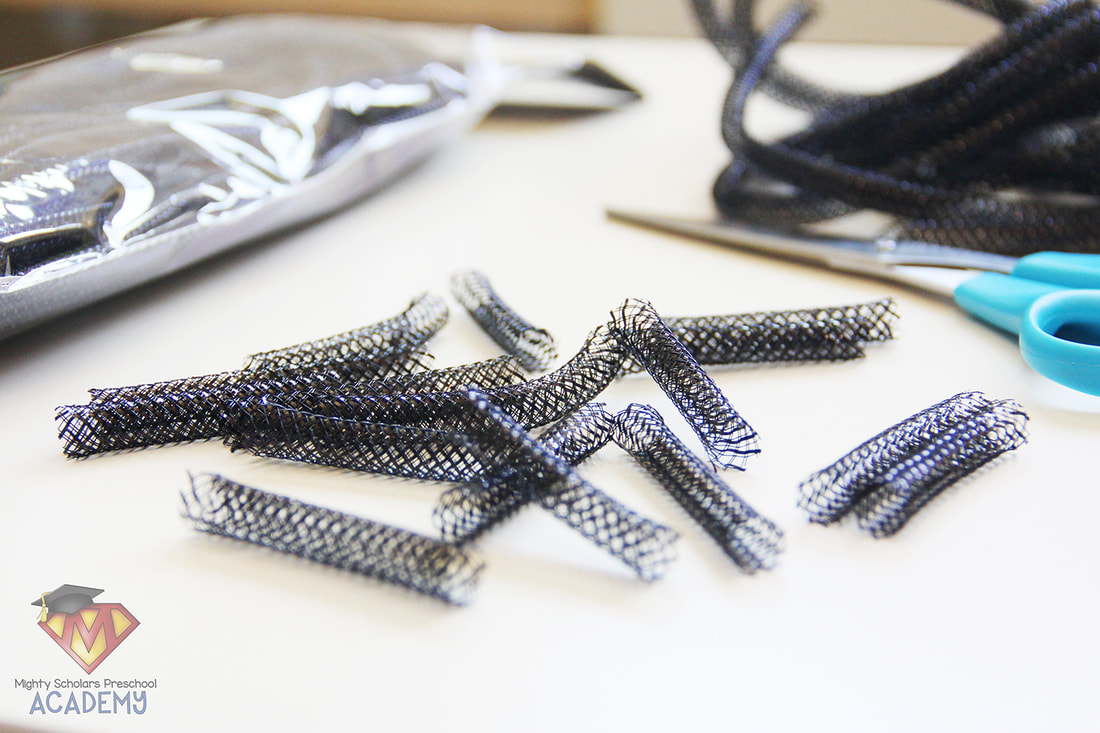
Mesh Tubing can be cut in various lengths
to add variety and be used in different ways.
As the students explore, some may be able to discover and share with their classmates that the longer cut tubing can be turned in on itself (excellent fine motor practice), or that the longer tubing pieces can also be used similar to Chinese finger puzzles. The shorter cut mesh tubing gives better bounce, that students quickly notice.
Teacher Hint: Make sure your scissors are nice and sharp, when cutting up the tubing, or it can get caught and fray more than usual.
Add-Ins and tools make the sensory table exciting and academic.
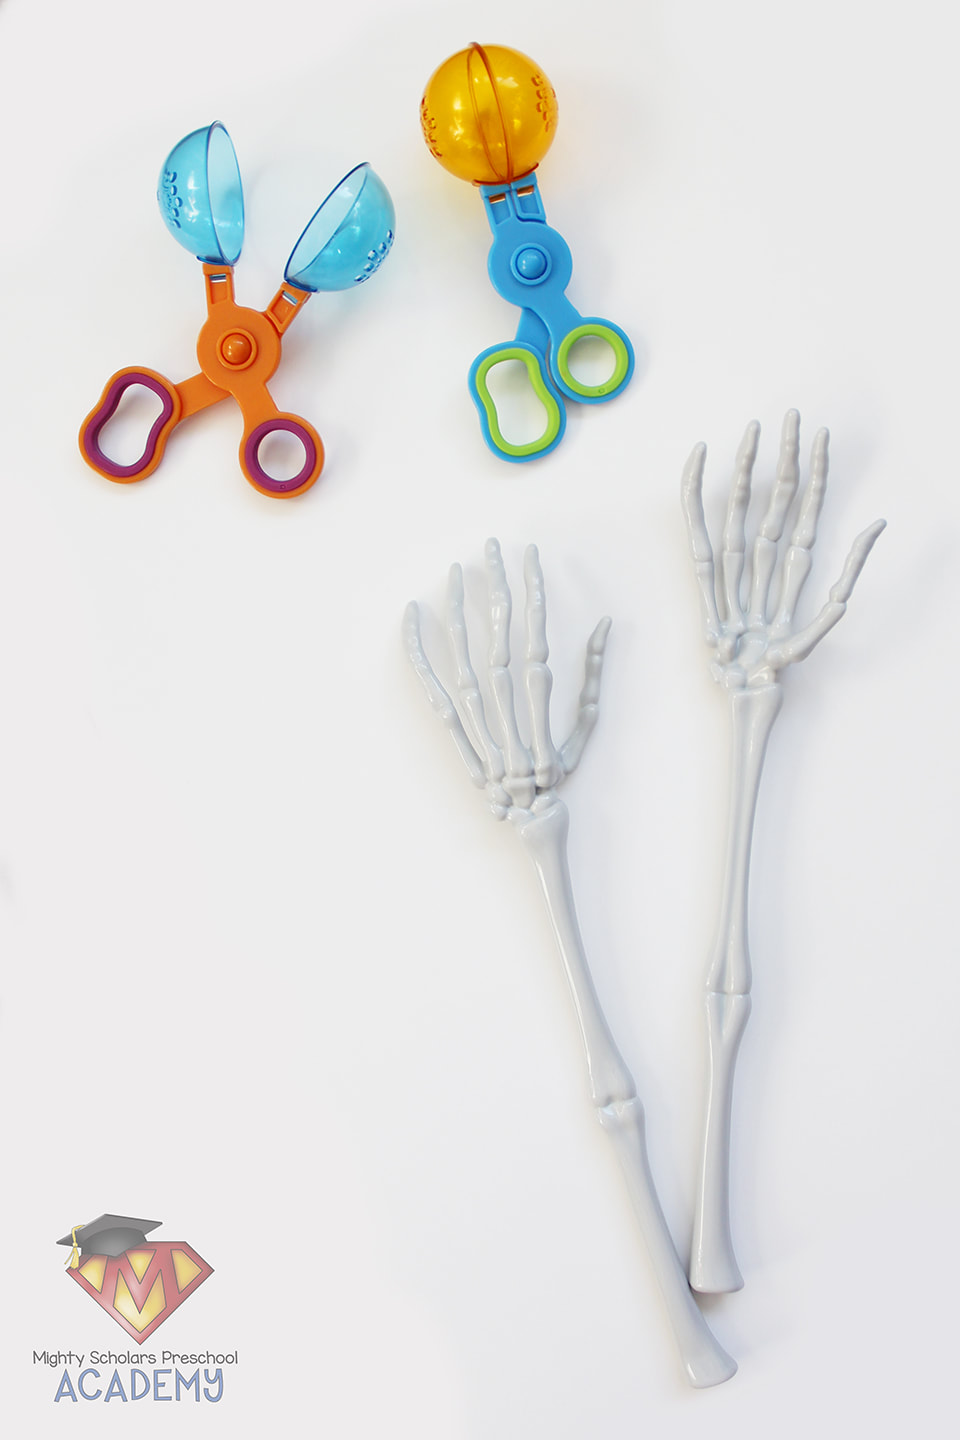
I printed and laminated several small two to three inch clip art images of real x-rays, since our lessons cover how we are able to see our bones, the process of having an x-ray taken and what x-ray images look like. I switch out my tools for the second week of the sensory table, to make it extra inviting and encourage students to return and explore more. For the second week tools, I purchased skeleton salad tongs from the dollar store, sold each year around Halloween.
A perk to using this sensory table around Halloween
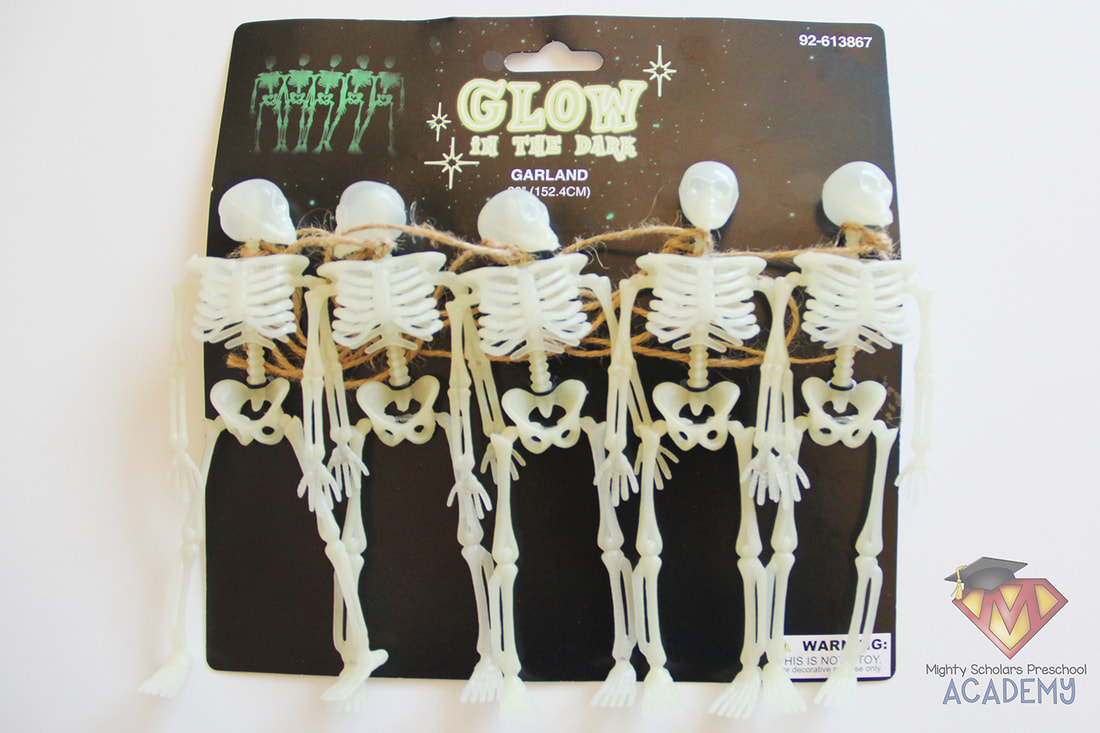
is the fantastic, easy to find, miniature skeletons.
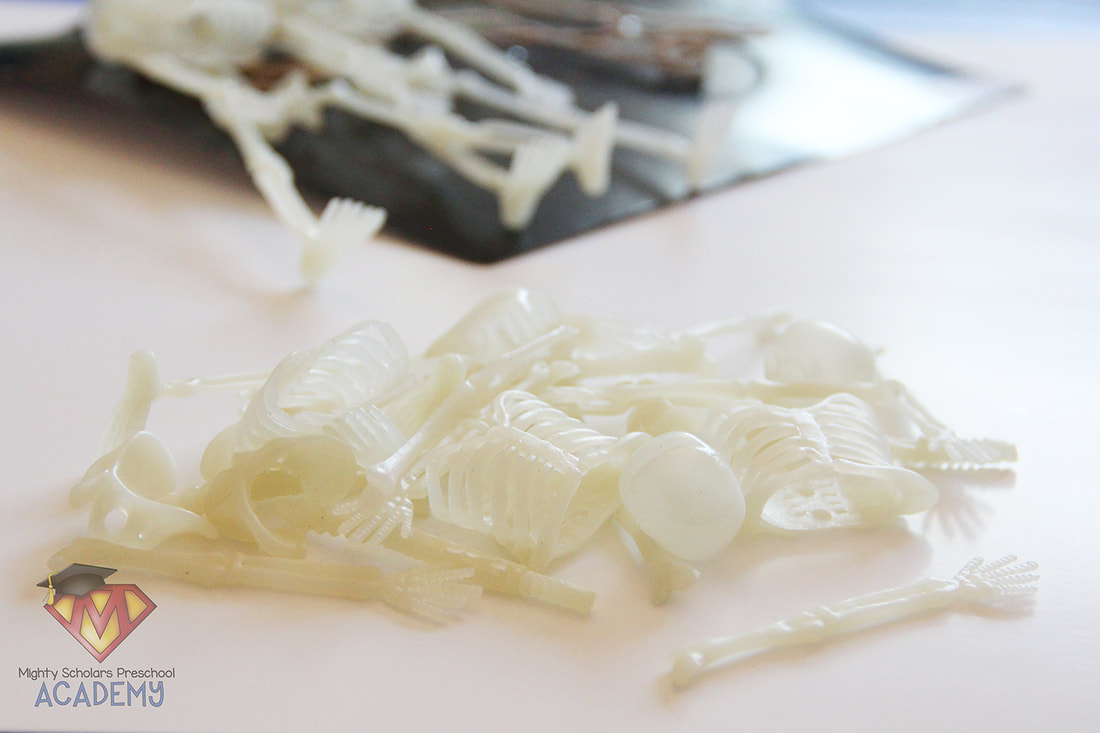
Small or mini skeleton bones can be purchased online, or found in several stores during the fall. I found these mini glow in the dark plastic skeletons at Target, that were easy to cut up into separate bones and added to the sensory table filler. Students like to look for the pieces to build a mini skeleton.
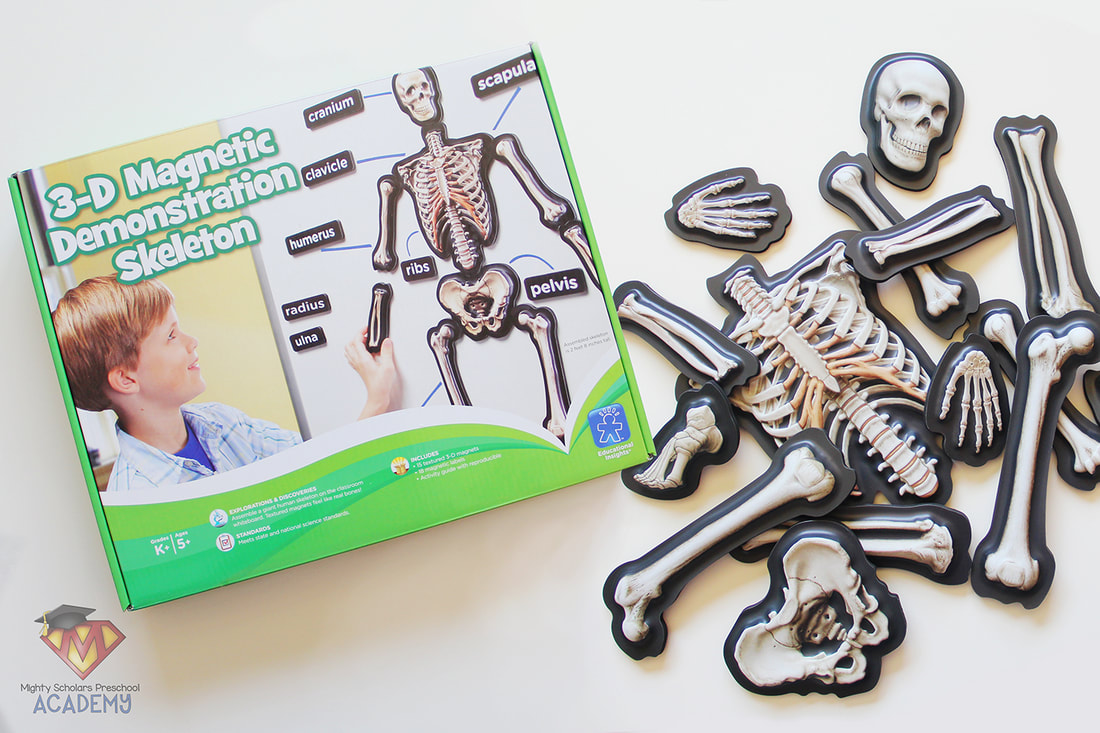
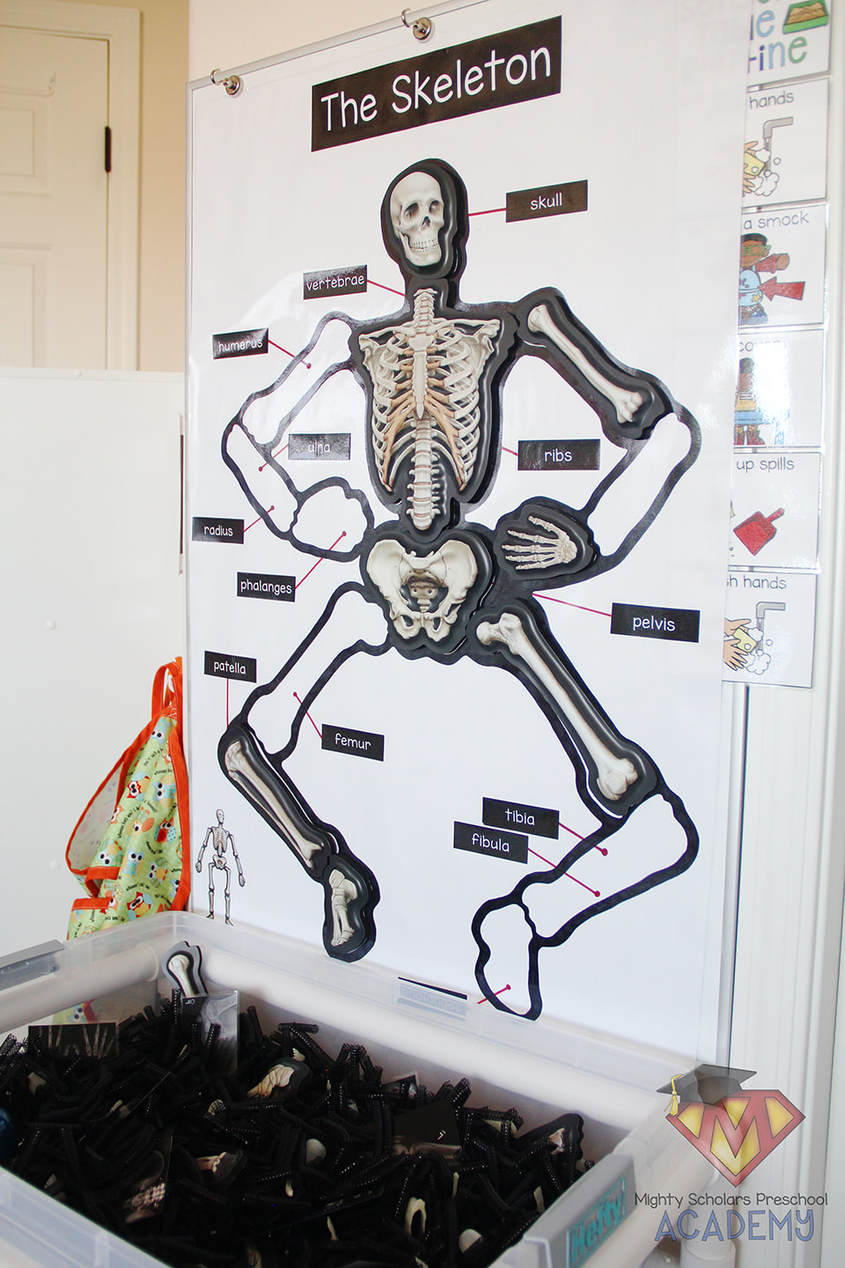
The academic challenge added to this sensory table is the large,
three dimensional, magnetic skeleton.
The pieces to the skeleton are large and sturdy. The plastic three dimensional skeleton picture is mounted to thick foam with a magnetic bottom layer, making it perfect for little hands. While the kit comes with magnetic bone labels, I chose not to use those and instead, focus on the large skeleton parts as a wall puzzle.
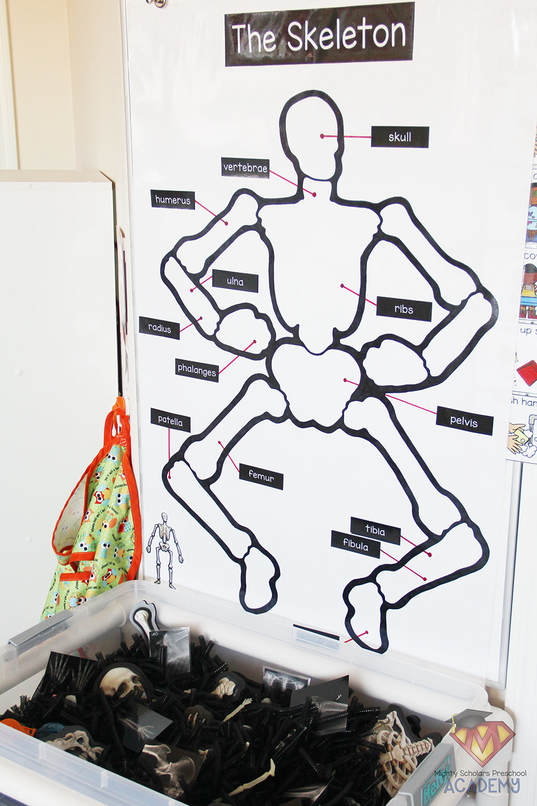
Exposure to a simplified group of skeletal bone labels helps children recognize letters, concepts of print, and learn that print has meaning.
Thin banner paper and a black permanent marker makes the perfect puzzle poster for a magnetic whiteboard. First, I traced the skeleton pieces in the layout I wanted displayed on the board. Keep in mind that the skeleton is quite tall and may require a whiteboard to be placed lower for children to be able to have the puzzle in full reach. Next, I printed off the labels I wanted to use and glued them in position. Finally, I used red permanent marker to draw lines from the labels to the general location of the bones.
If possible, choose a 1.5 mil lamination when laminating your poster. If the poster is too thick, the magnetic skeleton won't have enough magnetic pull to hold the pieces in a vertical position. I taped the finished skeleton puzzle poster to the magnetic whiteboard and scattered the 3D pieces throughout the sensory table filler. 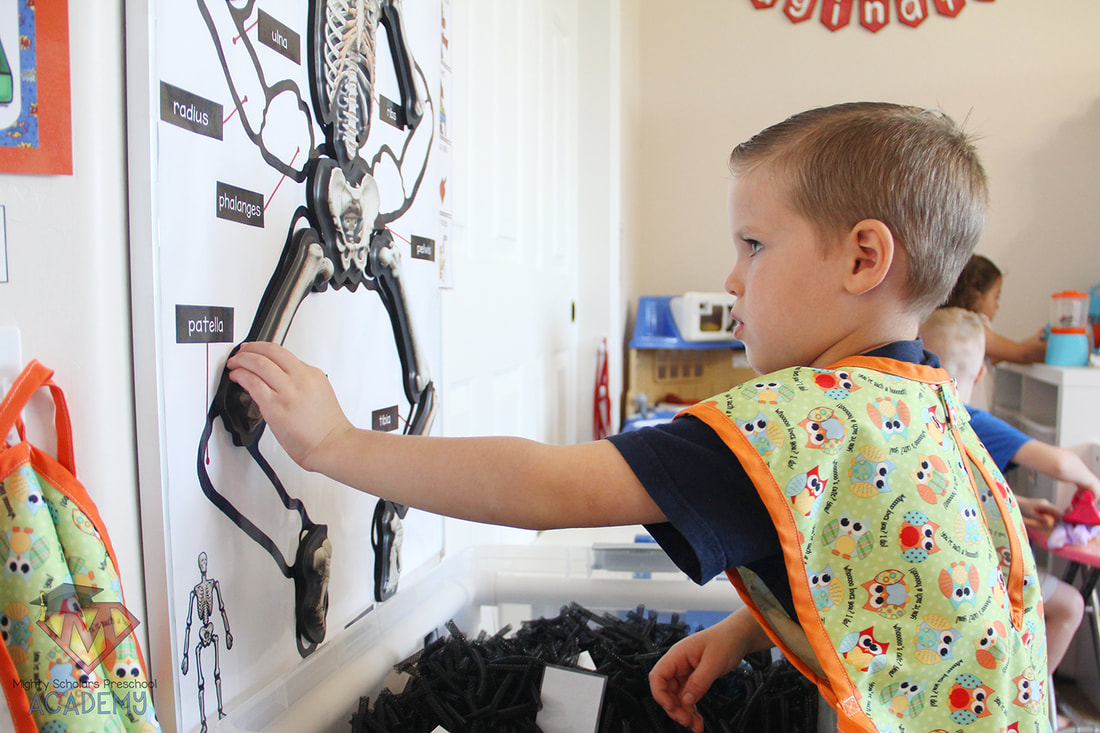
Another variation to the 3D skeleton would be
laminated paper skeleton bones, with magnetic strips on the back.
If the Educational Insights 3D Magnetic Demonstration Skeleton is out of your budget, a skeleton poster could be cut, laminated and magnetic strips attached to the back of each piece. You would need to have the paper skeleton pieces easily distinguishable from the x-rays in the filler, by mounting them to colored paper or possibly giving them a colored outline.
The Skeleton Sensory Table pairs nicely with the hands-on x-ray discovery lesson, in the science center.
Look for more about that in a post after this coming week.
Please note, as a participant in the Amazon Services LLC Associates Program, I may earn a small commission on qualified recommended links.
The Amazon Services LLC Associates Program is an affiliate advertising program designed to provide a means for sites to earn advertising fees by advertising and linking to Amazon.com.
My Amazon Picks for
The Human Body: Skeleton Sensory Table 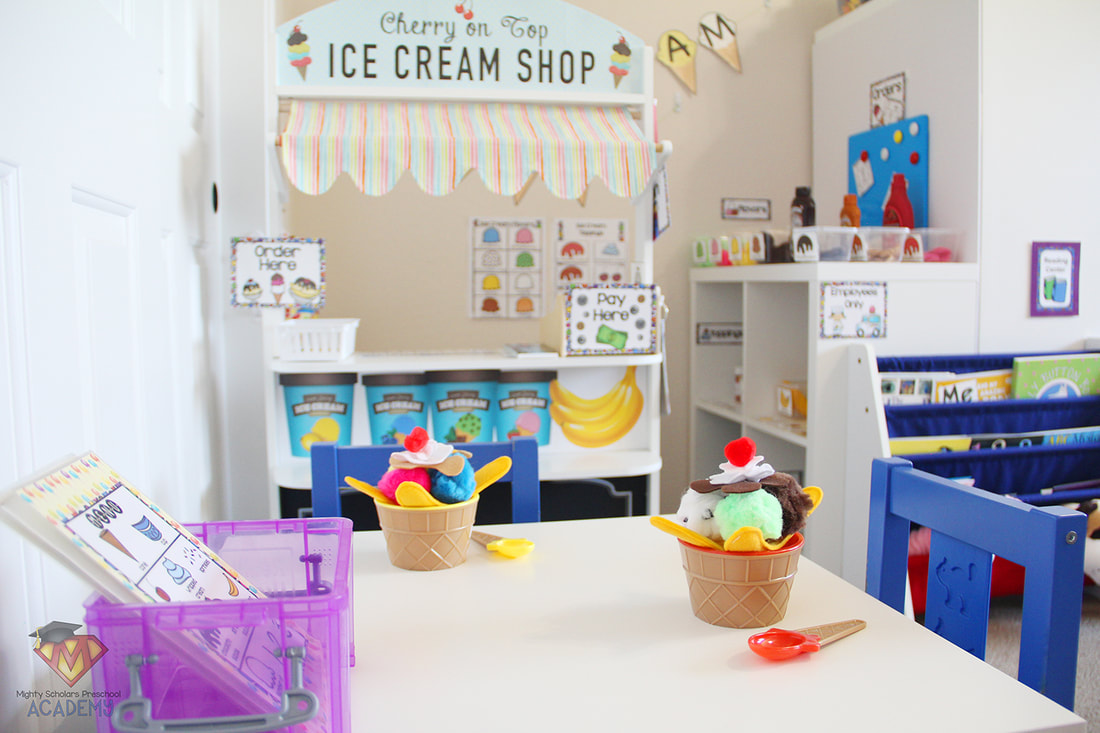
"Play is like fertilizer for the brain and we would be crazy not to use it."
- Dr. Stuart Brown
Play is one of the most important learning tools for early childhood development. Play is usually looked down on in a traditional educational setting, yet the benefits on the brain and the learning process have been proven.
One way to bring educational play into the classroom is through thematic role play. My classroom changes themes bi-weekly. For two weeks out of the month I completely change out the home living setting in our Imagination Center. Not only does our Imagination Center change, but I also change out many of the learning activities in all of the centers to correlate with the specific theme. Added educational and developmental tools and props are always embedded into each thematic play set up. Math, literacy, writing, STEM and fine motor are all a part of the learning environment. While children are playing, they are learning important educational concepts, spacial and problem-solving skills, how to think creatively and to develop complex social skills. 
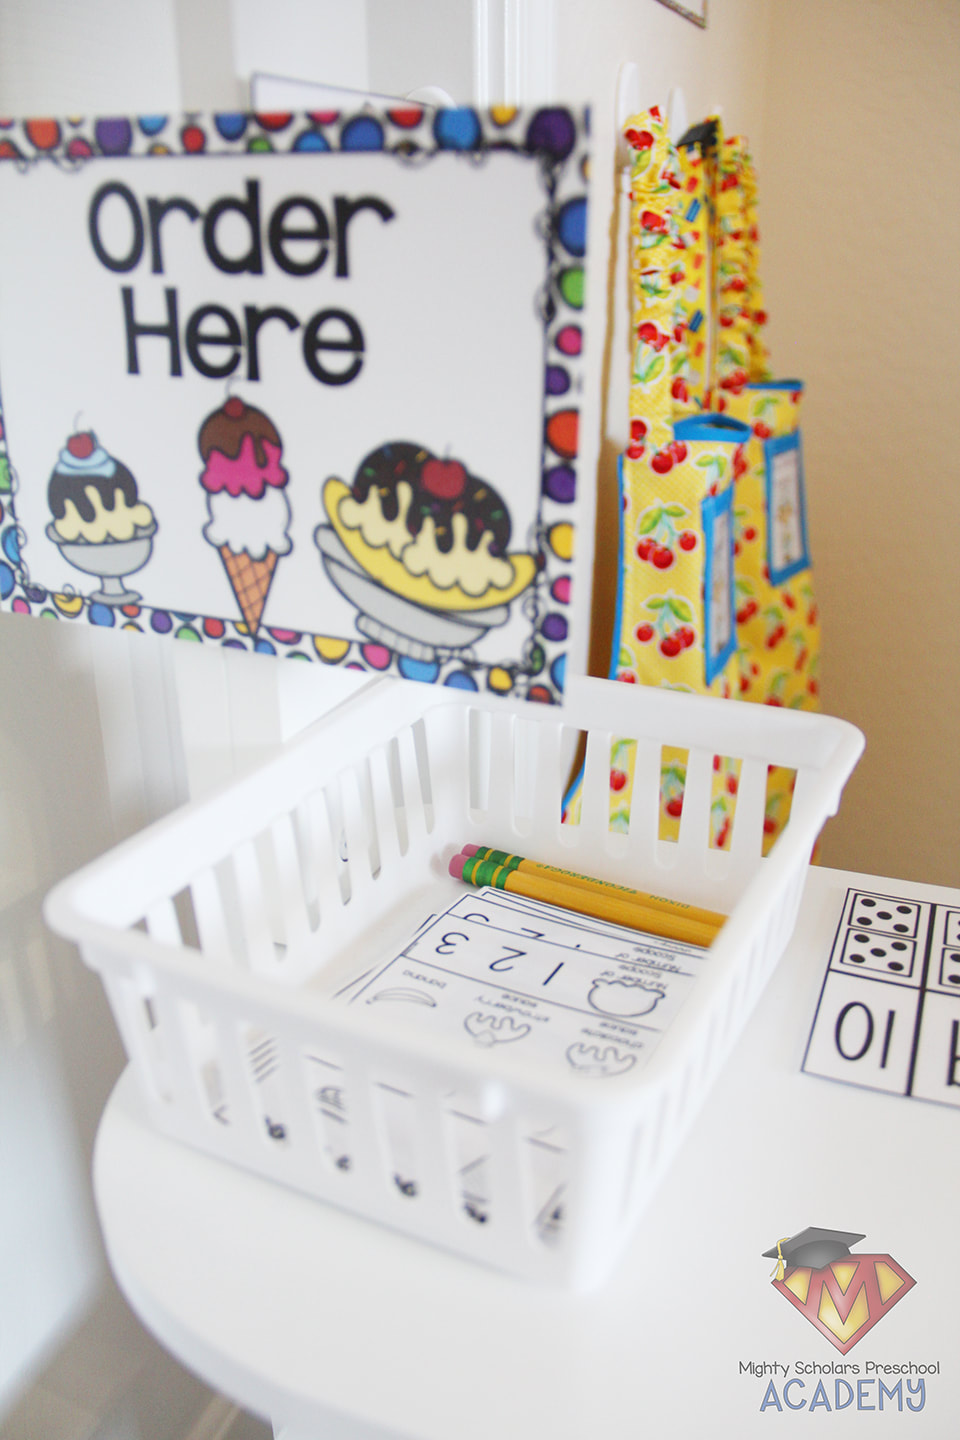
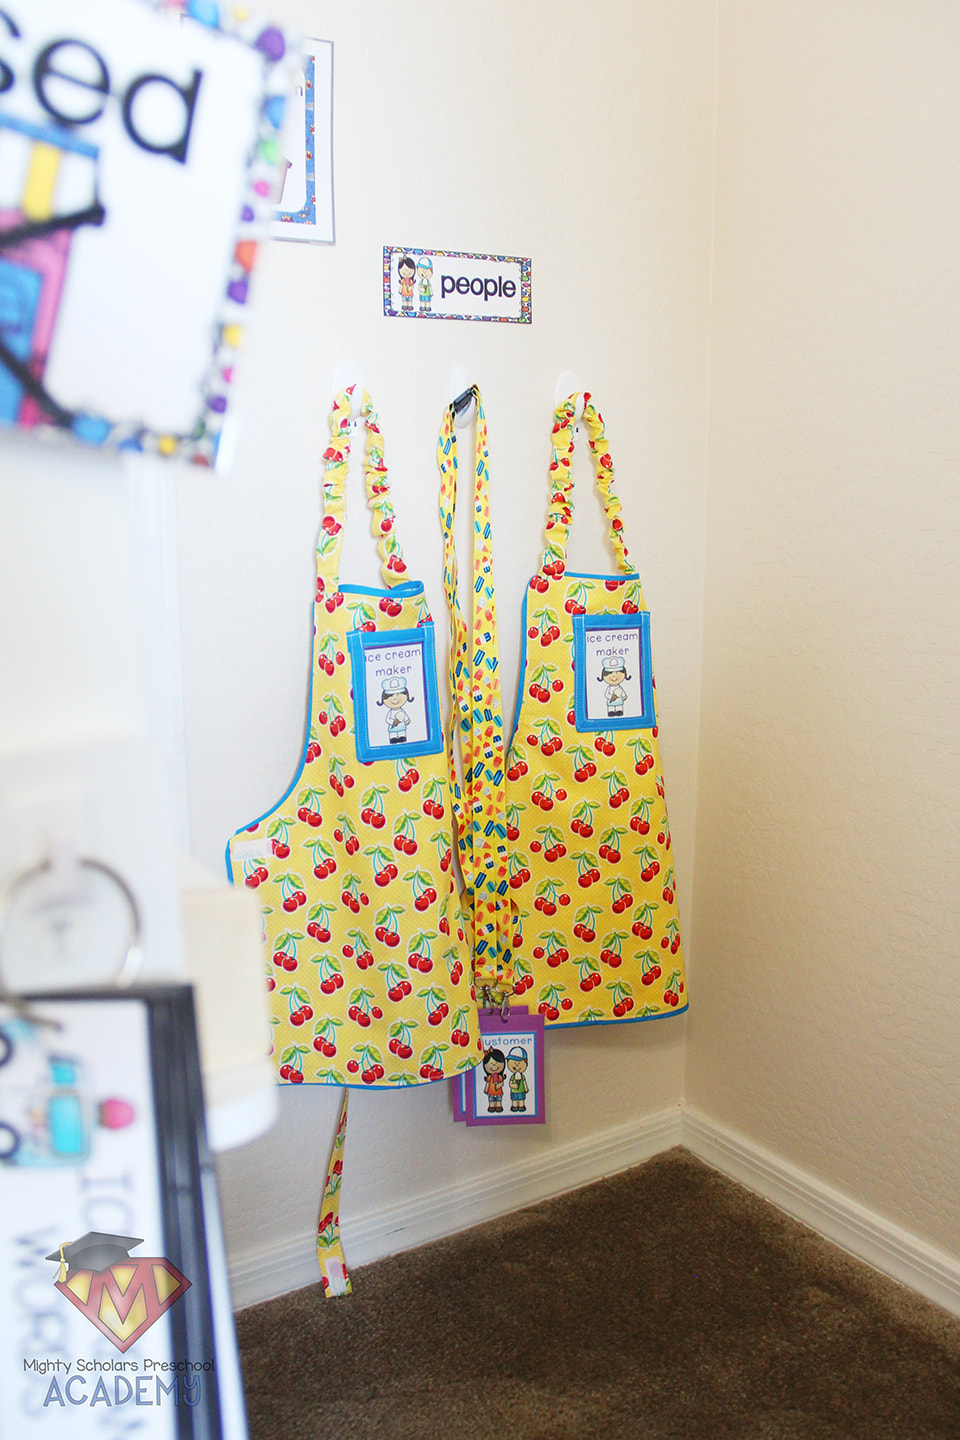
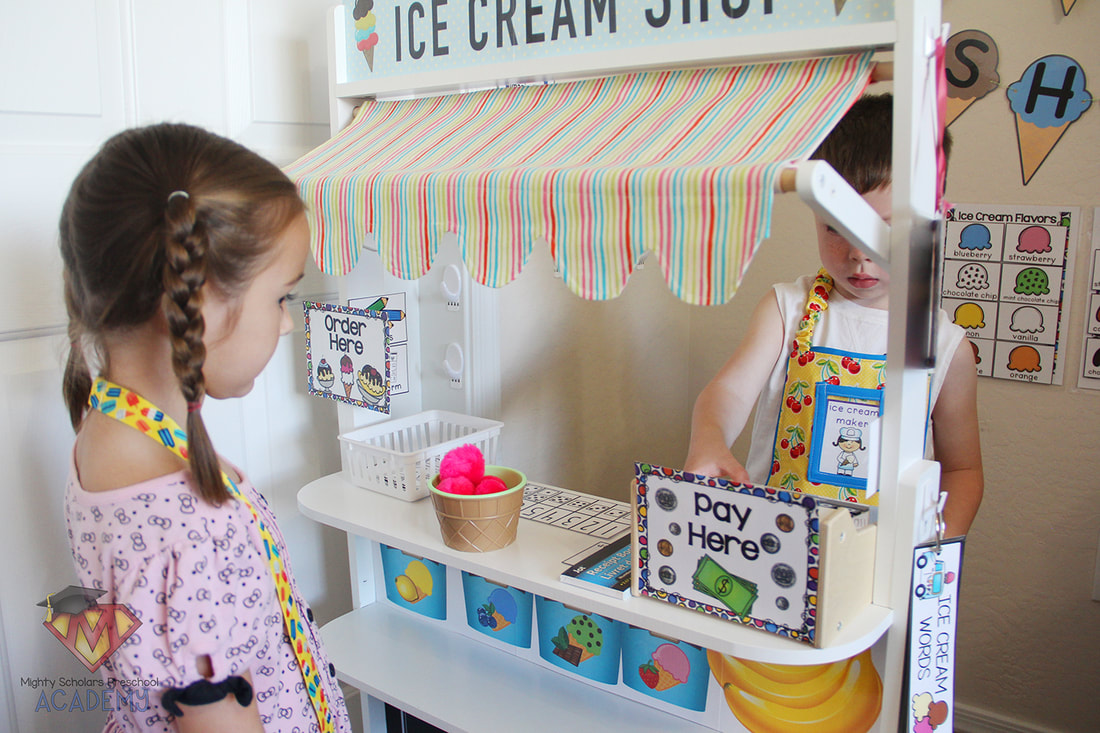
The Cherry on Top Ice Cream Shop offers several roles that students can play: order taker, ice cream maker, cashier, server and customer.
The stand I use in my classroom is sturdy and affordable. Its a house brand from Walmart called Spark. To personalize our shop, I made a shop sign and an ice cream display shelf. The freebies for both of these can be found at the end of this post. The stand came with a red and white striped awning that cannot be easily removed, so I attached my own coordinating ice cream shop awning panel, using fabric velcro dots. The fabric velcro dots have a VERY strong hold and allow me to easily change out the look of the awning if desired. The shop awning is sewn out of a half yard of inexpensive cotton fabric.

The shop printables, including the number line, menu and labels are from the incredibly creative Pocket of Preschool Ice Cream Shop pack
on Teachers Pay Teachers.
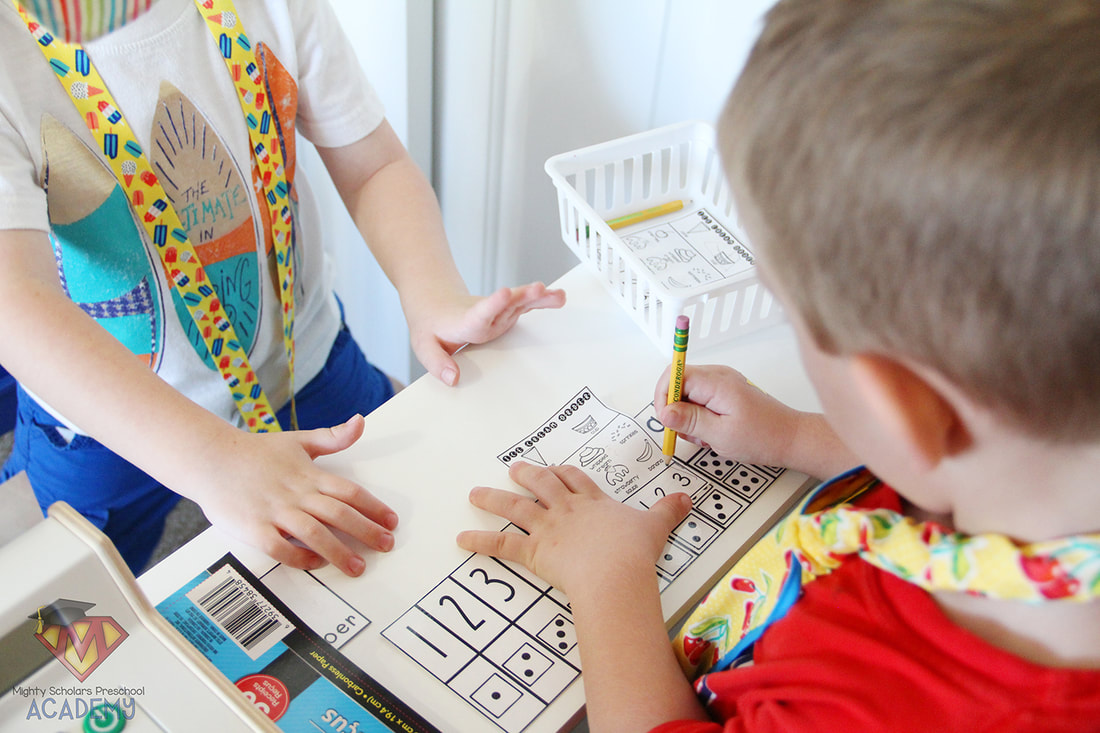
A receipt book was added to entice students to use and improve upon their writing skills and fine motor practice. Young children really enjoy writing out receipts and being able to tear them out of the book to give to the customers. The receipt books come in various sizes and can be found at the Dollar Tree, or most dollar stores, so they certainly don't break the bank. TIP: use golf pencils or pencils that have been cut in half, to help discourage fisting pencils and encourage pincer grip instead.
Props don't need to be elaborate. That's the magic of a child's imagination.
No matter what props are set out, children use their creativity to make them whatever they would like them to be.
The shop aprons are Montessori style aprons, that foster independence by one simple easy velcro closure. The apron tags are in a vinyl pocket that is sewn onto the apron, making the tags removable and the aprons washable on the delicate cycle. The customer tags are on coordinating breakaway lanyards.
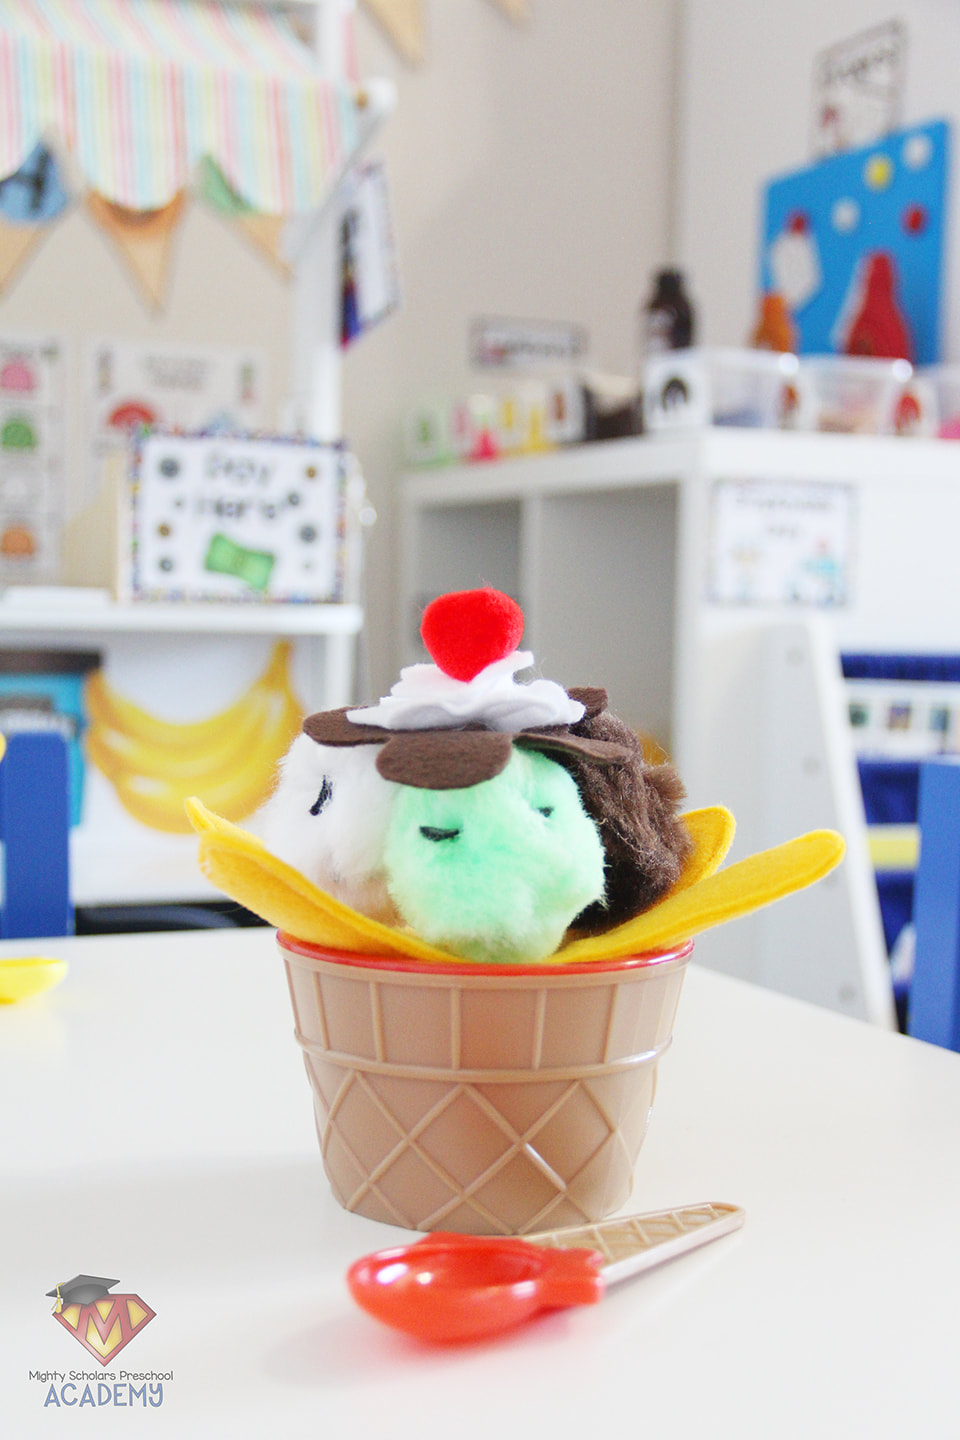
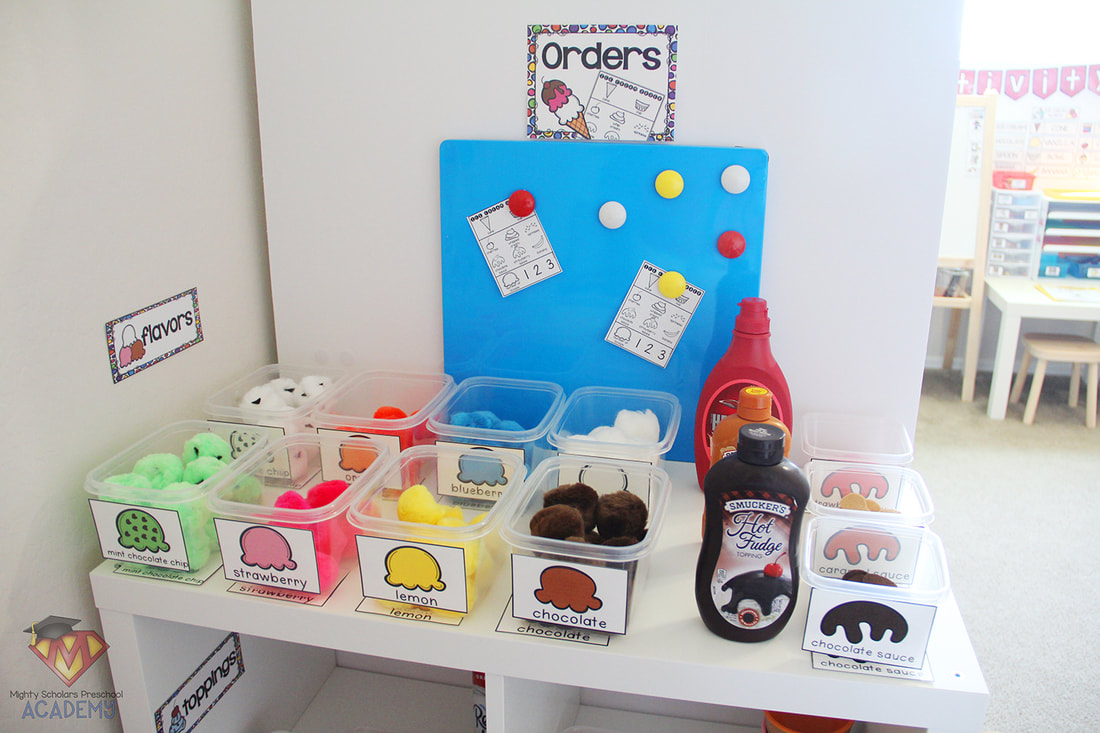
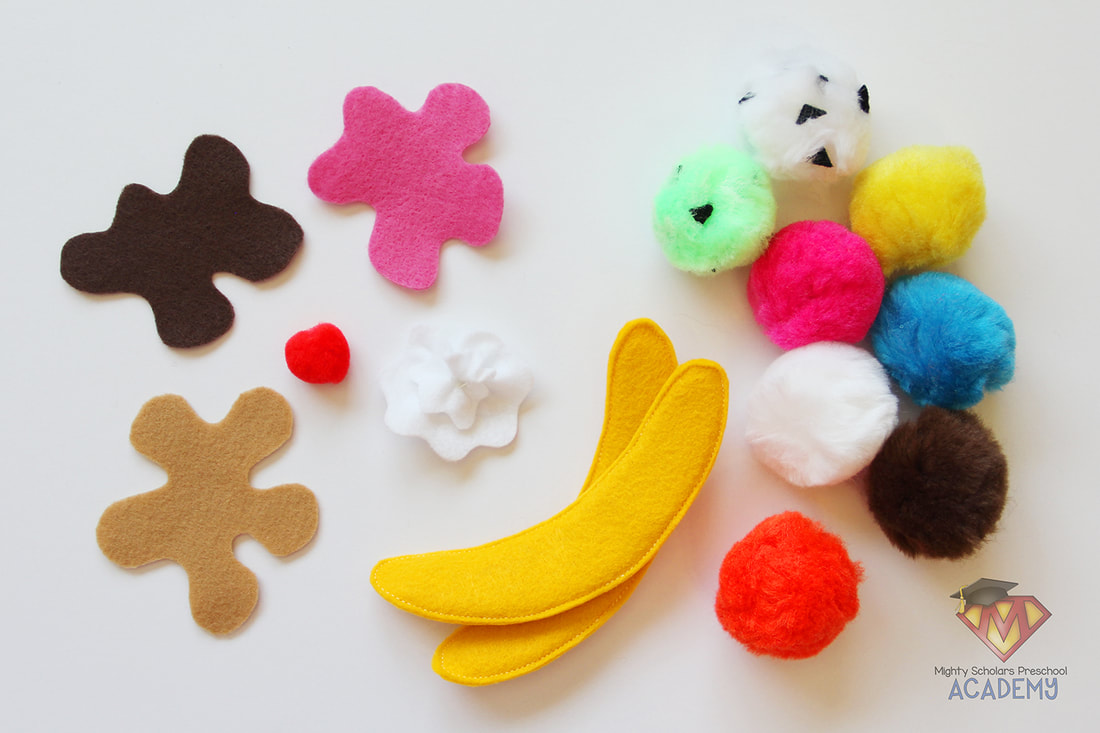
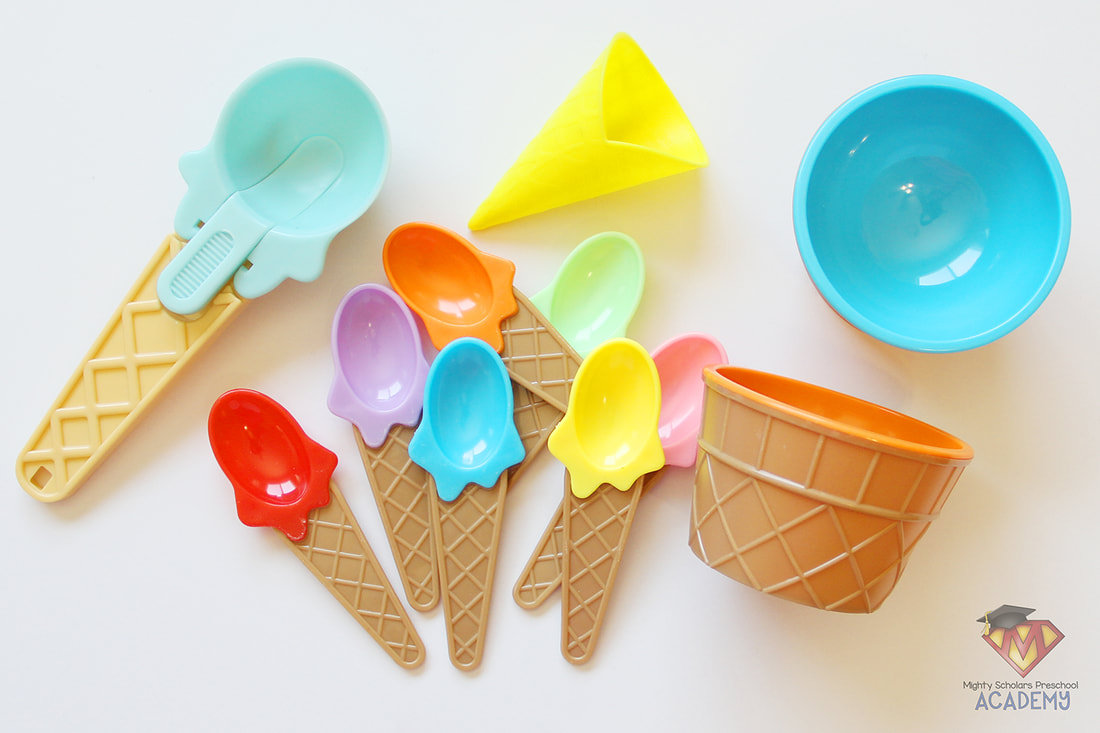
The scoops of ice cream are two inch pom-poms. I glued small "chocolate chip" felt clippings to the vanilla chocolate chip and the mint chocolate chip ice cream pom-poms. The large pom-poms fit perfectly in ice cream scoopers. The containers are plastic food storage containers that can be easily stacked when stored away. The toppings are also made from pom-poms and felt. The bananas are layers of felt sewn together to make them more stable and durable. The chocolate, caramel and strawberry sauce is felt cut in random splash patterns. The whipped topping is two white felt rippled circles, in different sizes, sewn together to give the appearance of the classic whipped topping that comes from the can. Empty whipped cream, chocolate, caramel and strawberry sauce containers provide great additional props and environmental print. I cleaned and dried them out completely, then hot glued the lids to keep them secure. The colored sprinkles container is full of real sprinkles, but the lid is also glued tightly to keep the sprinkles inside. The real sprinkles add to the effect of the prop. My students like the soft rattling noise they make when the sprinkles container is shaken to add pretend sprinkles to customer orders. Children enjoy the opportunity to clean, so cleaning props are provided to "clean" their shop as needed. Play money for customers is in individual zipper pouches and also in the cash register, giving students the opportunity to practice math skills. I printed play money onto green Astrobrights paper, from the Pocket of Preschool Ice Cream Shop pack and added plastic play coins. 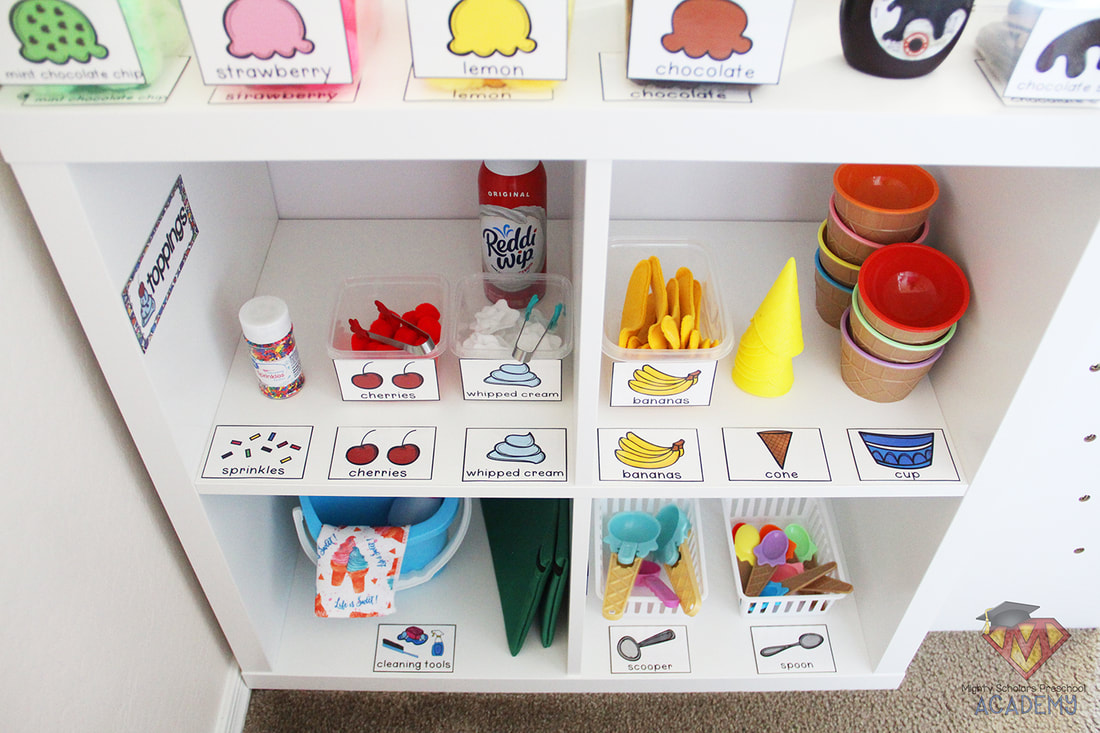
Many grocery chains carry very inexpensive disposable paper ice cream bowls and plastic spoons. Some local ice cream shops may also be willing to generously donate some of their disposable bowls with the shop logos, if you speak with a manager, explain you are an educator and what they'll be used for.
The plastic bowls and matching spoons in our classroom ice cream shop are from Amazon. Although I was able to have bowls donated from one of our local ice cream shops, I chose the plastic over paper for durability and to provide props that were neutral, to keep with our Cherry on Top shop name.
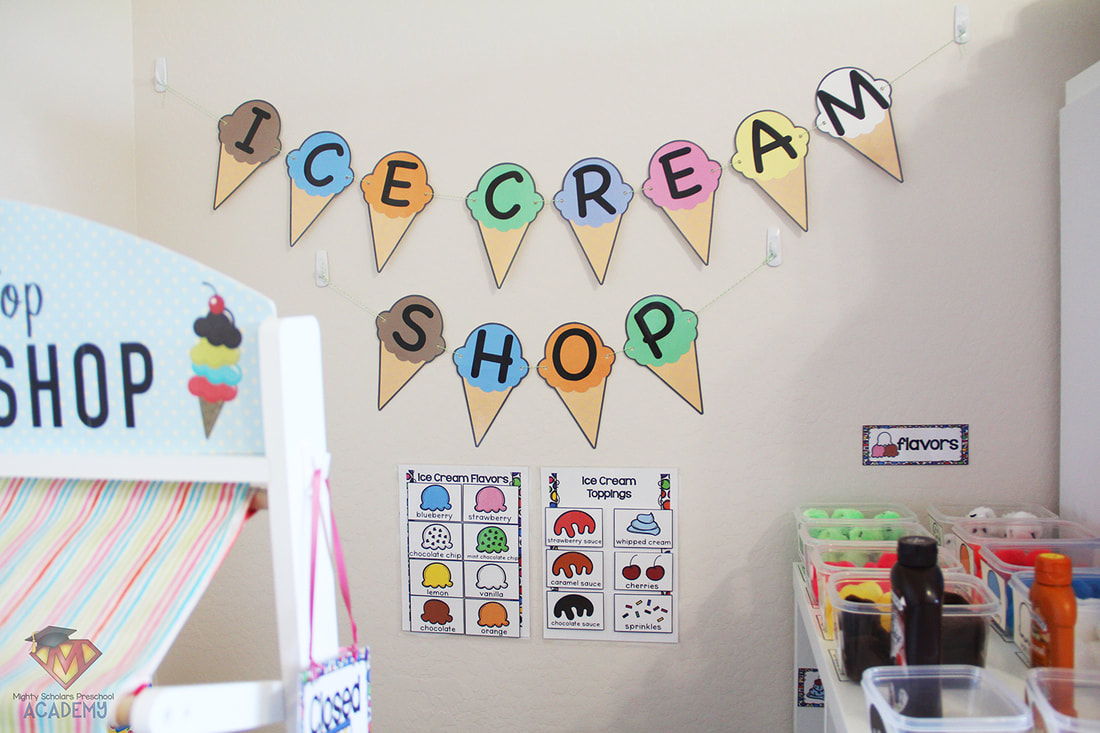
The Ice Cream Shop bunting and all wall signs are attached using
Command strips and Command hooks.
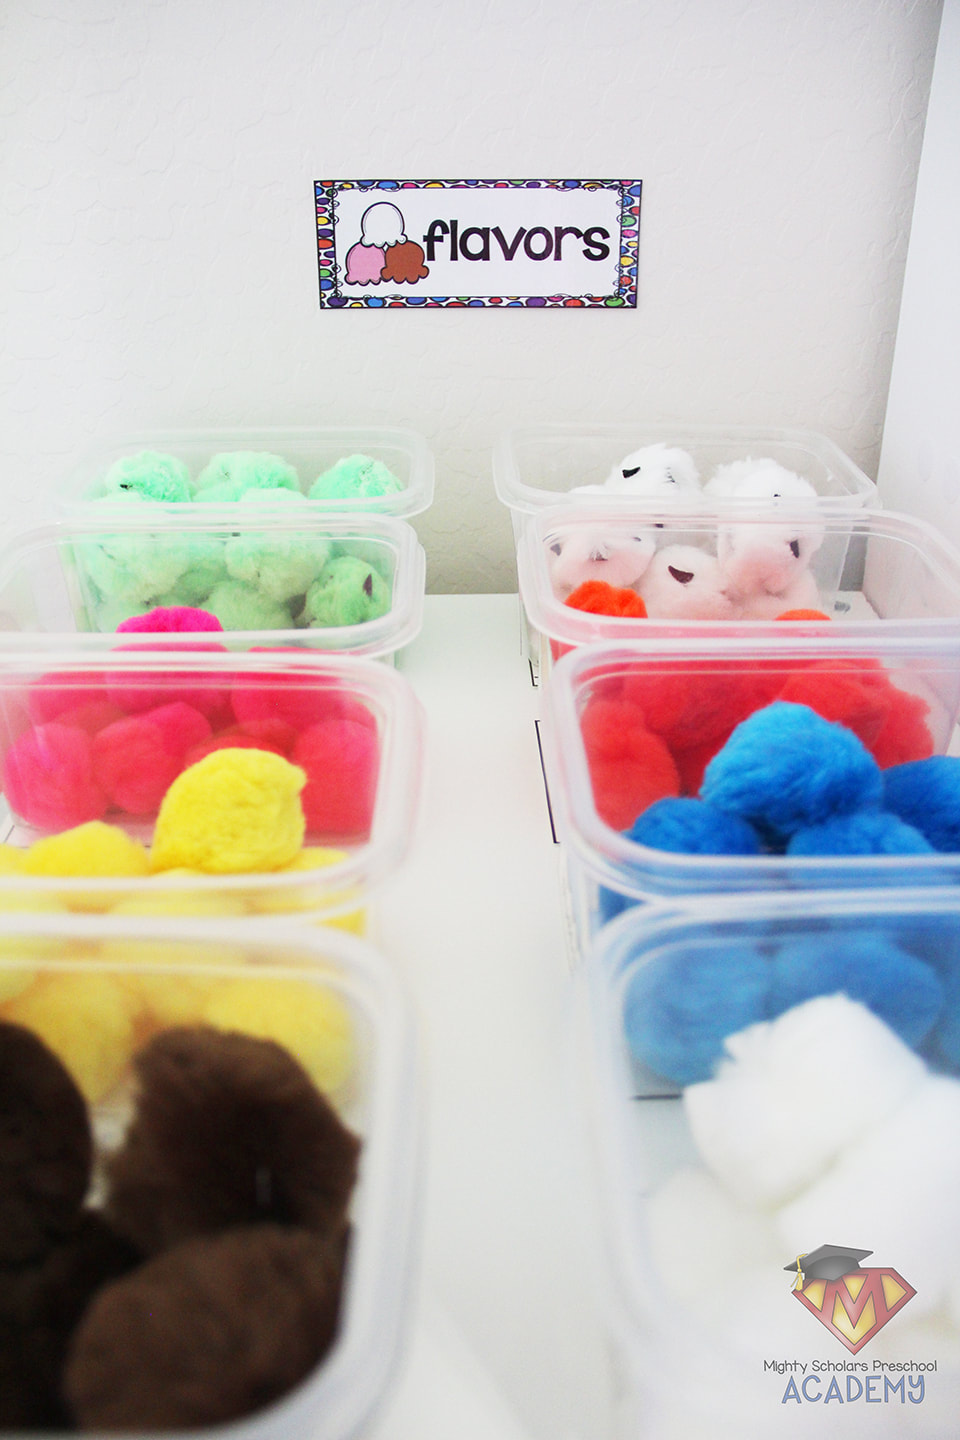
Since the Imagination Center is changed out so regularly, you can imagine the damage that could occur to the walls. To alleviate that problem, Command products provide a temporary but secure option. The flavors and toppings boards have removable options, if those running the shop want to only provide certain types to their customers. I laminated each option and used velcro dots to attach them to the corresponding board. The Command strips secure the boards to the wall well enough that students can rearrange the cards as often as they would like without the board coming off or damaging the wall.
The Ice Cream Shop bunting is hung with colorful baking string. I always make sure to laminate all the signs, labels, bunting and anything else that could use the added protection. It will also keep your props in great shape to be used over and over again in the future. I've attached the ice cream shop bunting freebie to the bottom of this post. 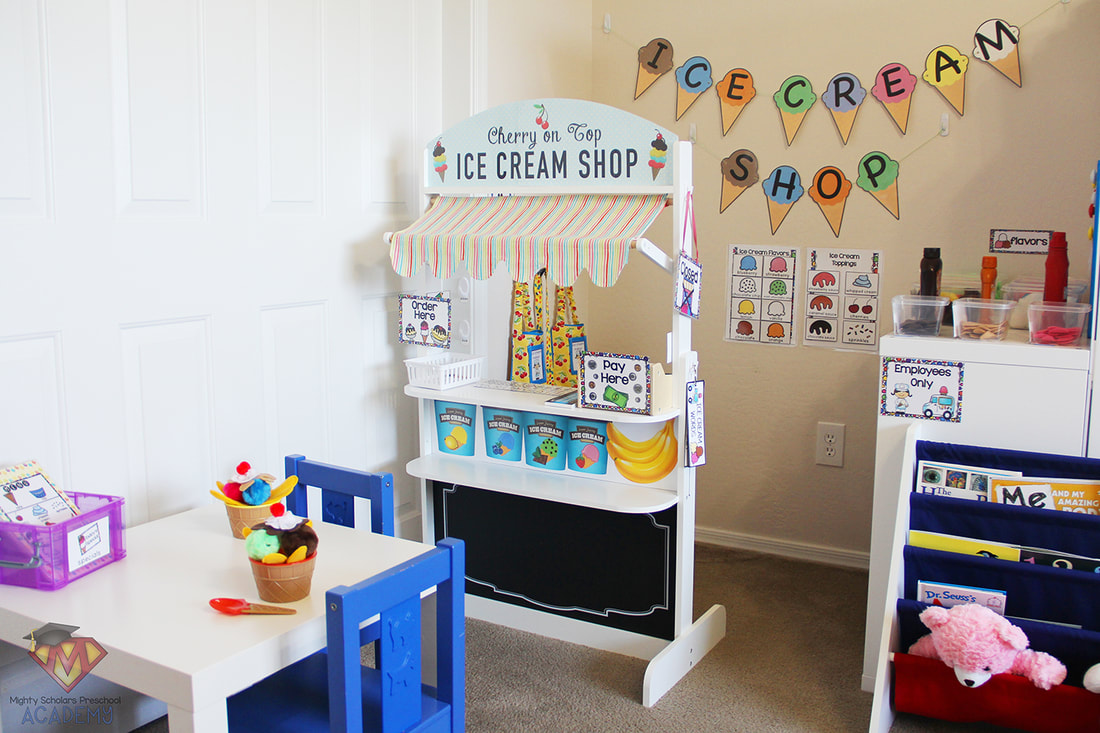
To get the Cherry on Top Ice Cream Shop sign, Ice Cream Shelf and the Ice Cream Shop Bunting freebies, click on the files below:
Please note, as a participant in the Amazon Services LLC Associates Program, I may earn a small commission on qualified recommended links.
The Amazon Services LLC Associates Program is an affiliate advertising program designed to provide a means for sites to earn advertising fees by advertising and linking to Amazon.com.
My Amazon Picks, to make the
Cherry on Top Ice Cream Shop are: 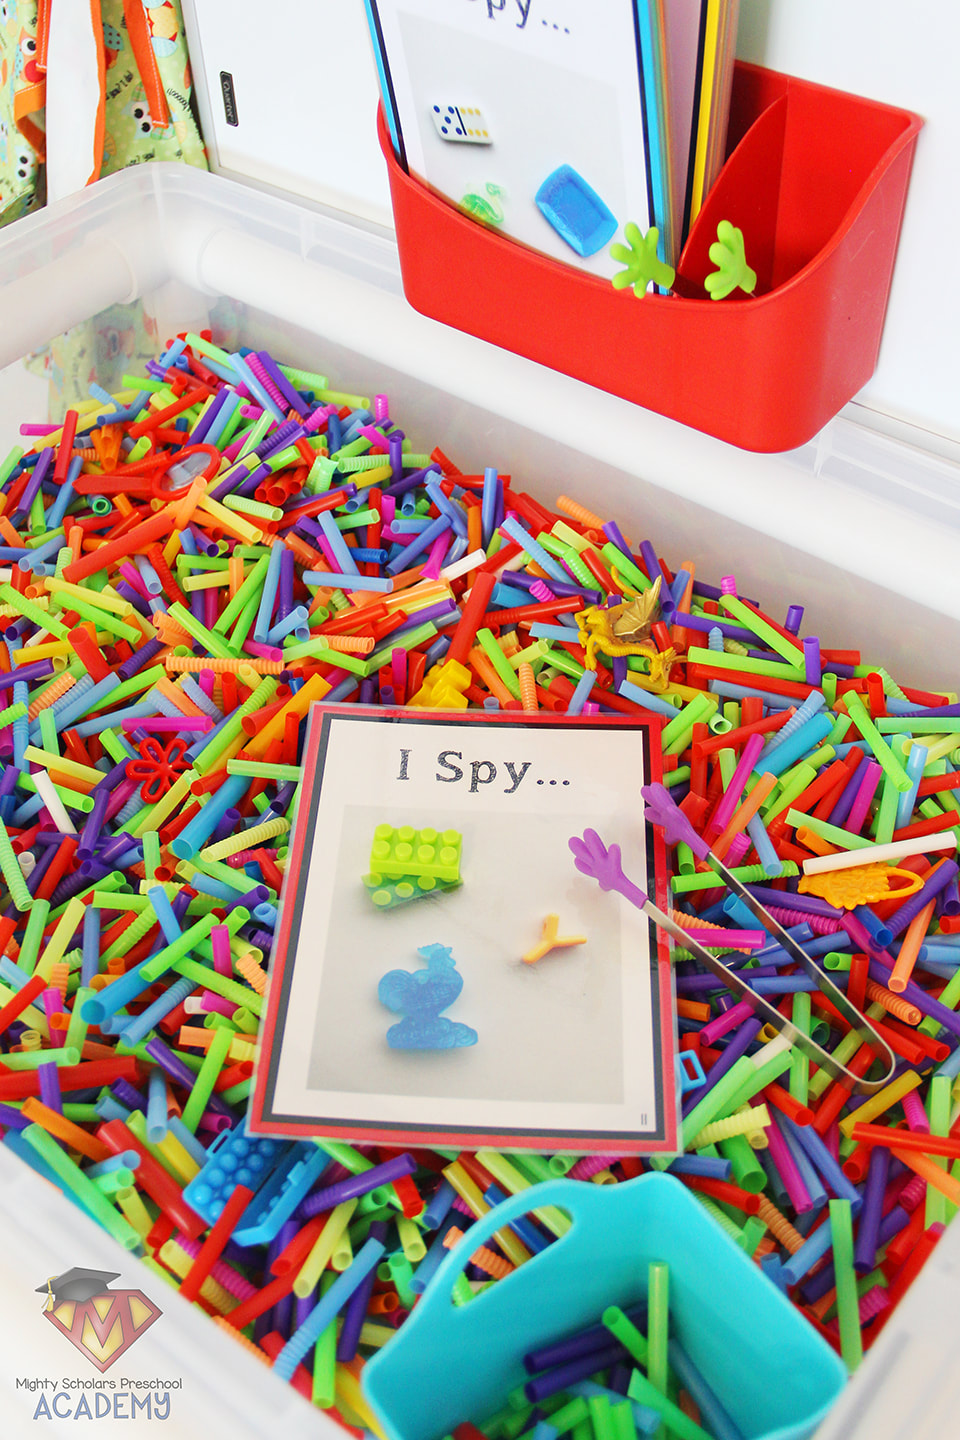
Our year-long science unit is All About The Human Body
and one of the lessons is on our five senses.
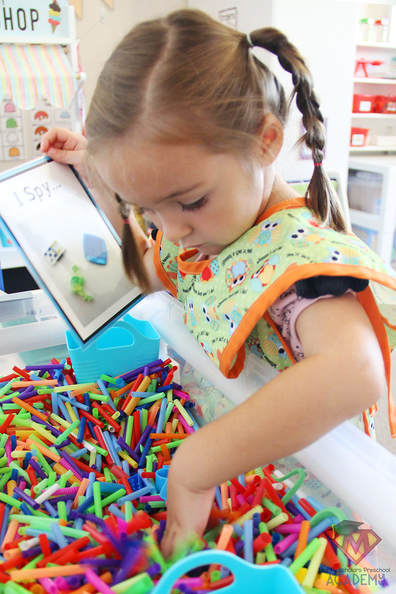
I like to separate the five senses lesson and give my students the opportunity to learn about each of the five senses as stand-alone lessons. There is so much to discover about each of our senses and the sense of sight is one of my favorites to teach. Children are so drawn to bright colors and enjoy searching for items. This sensory table is a fantastic setting to teach about the sense of sight.
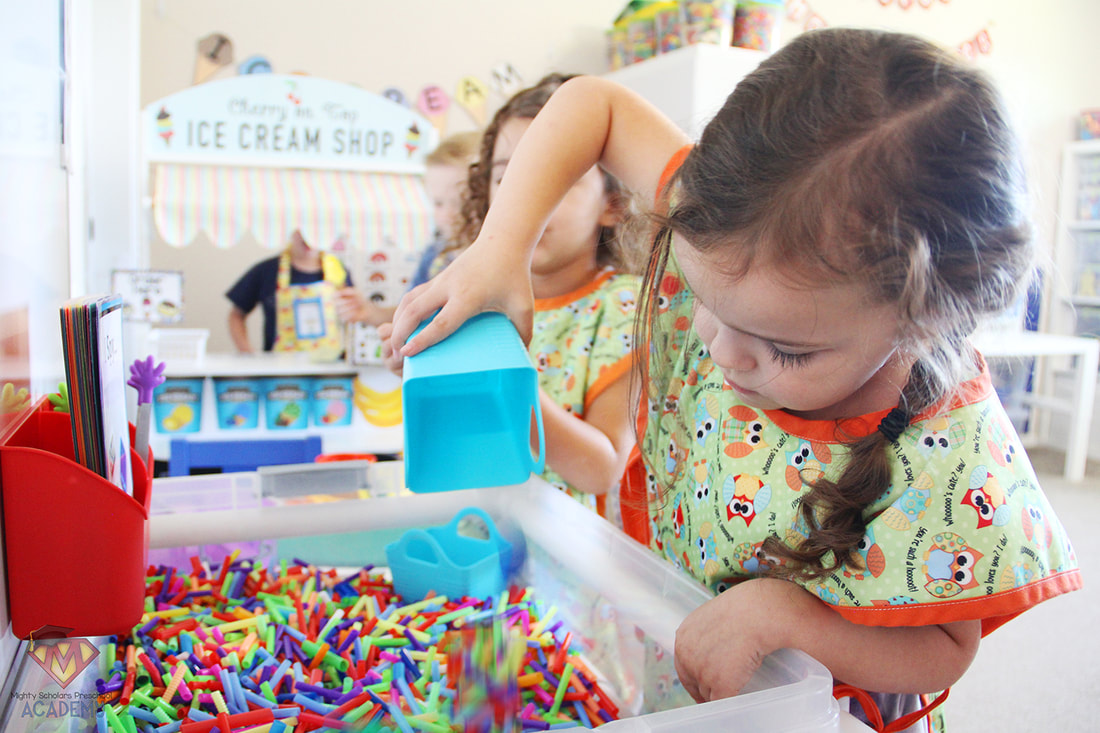
As mentioned in my post on The Magnetic Alphabet Sensory Table, I like to give my students very different sensory experiences for each table, through the use of varied table fillers. For the next two weeks my students are enjoying the texture, sound and movement of cut straws. I can tell you from experience that cut straws are very soothing to run hands through and sounds similar to falling rain - almost like a rain stick. The straws are all plastic, but some are jumbo sized. The smaller diameter straws can be easily slid into the larger ones. I cut straws in various lengths and left the accordion sections intact to add an additional sensory experience. 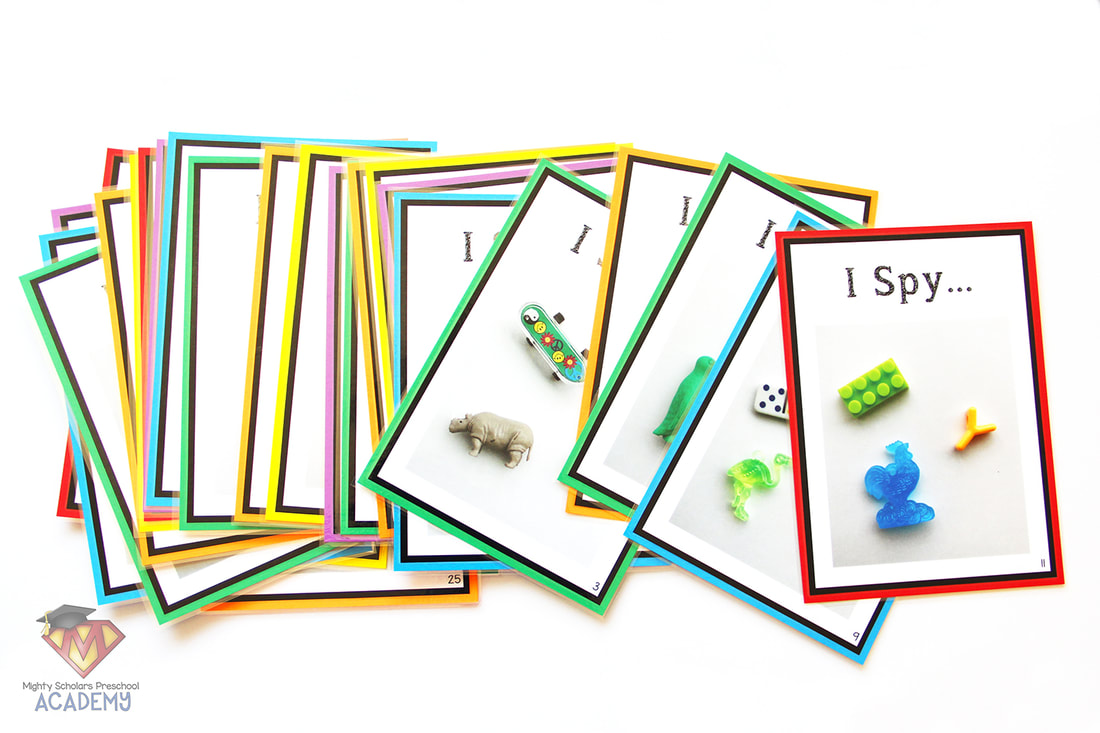
The hunt for brightly colored trinkets at this scale
is a great companion to I Spy bottles, or can be used in place of them.
I purchased a set of 50 large trinkets from a shop on Etsy. The sets are listed for educational use and for sensory tables or bottles. The seller made sure each of the items were different. I collected a few of my own trinkets to add, making a total of 90 for our sensory experience.
I separated the trinkets into groups of three and took pictures of each group for the cards. A group of three on a card is a nice amount for children ages 3-5 to search for, without frustrating or overwhelming them. After printing and gluing the individual cards to Astrobrights cardstock (utilizing BOTH sides of the cardstock card), I laminated each finished card for durability. 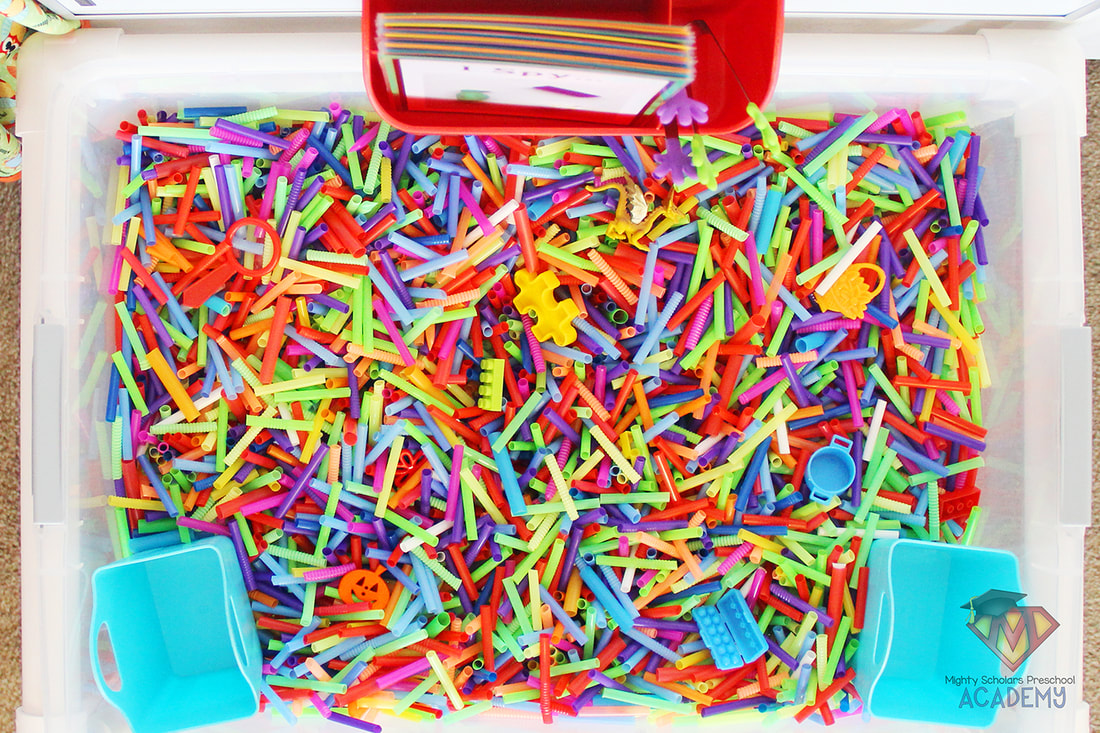
To include an optional fine motor approach to sensory play,
small tweezers and buckets were added.
I find it very important to add in fine motor where I can, throughout all of the centers. Scoops could also be added, but I like to wait until the second week into the sensory experience to supplement or switch out the tools.
A plus to this sensory experience is the ease of clean up. Everything in the sensory table is easy to disinfect and can be used many times over. 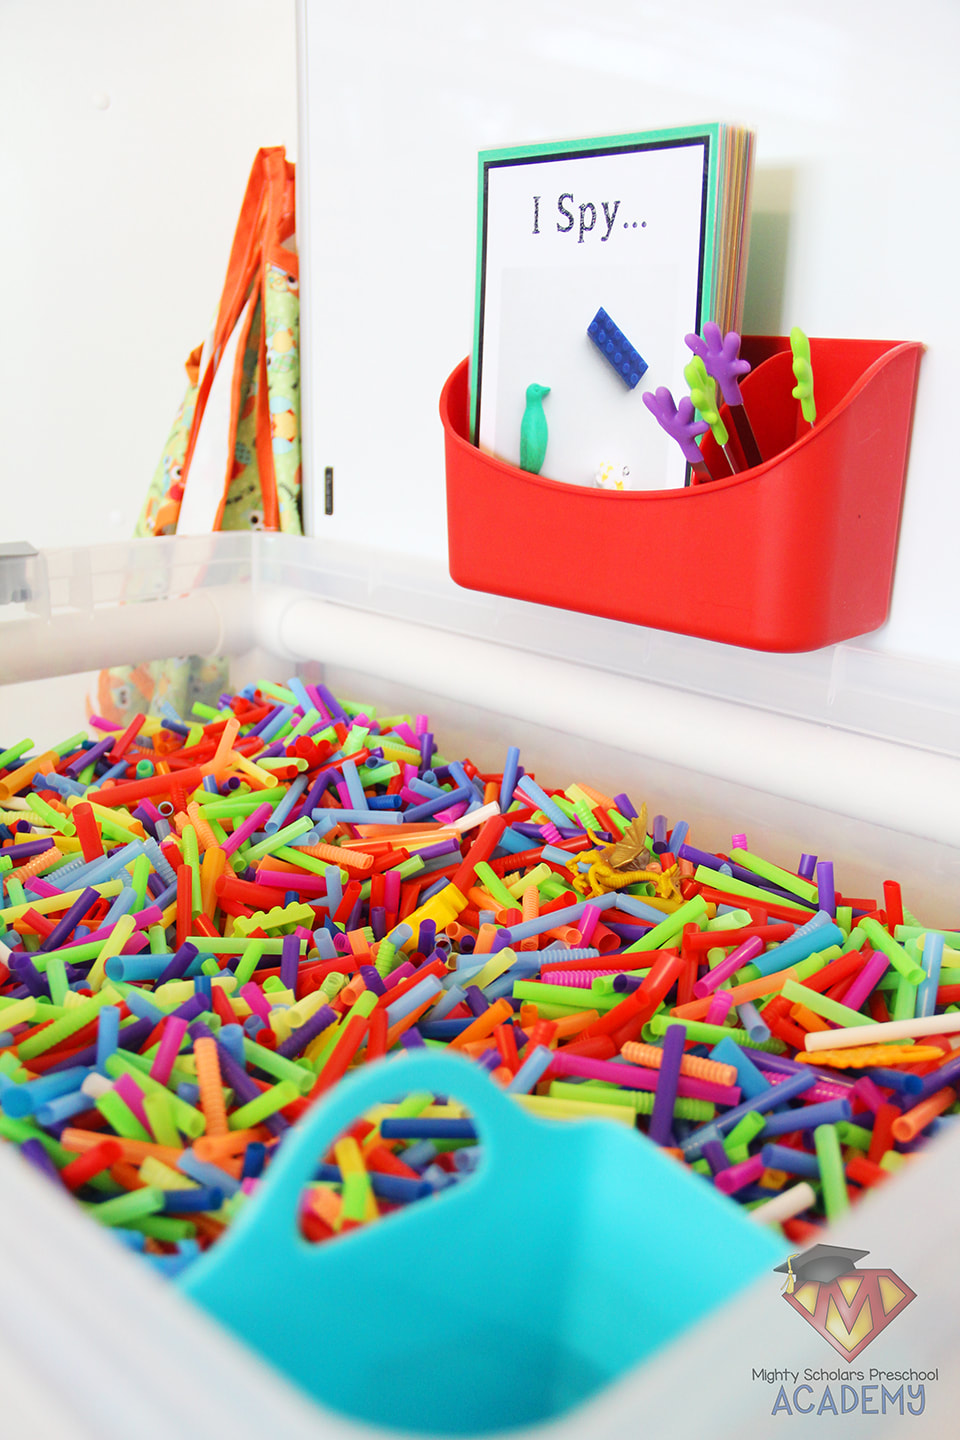
Its important to leave the sensory discovery experience open-ended, but provide students with optional ways to use the materials.
Students may or may not use the tools or the cards during their discovery. One student might find running their hands through the filler is the sensory experience they need, while another student could discover a trinket and use their incredible imagination to think up a whole new world among the straws. That is the powerful open-ended sensory experience that young children need. No matter which way each child may use the sensory table, they are still being engaged with their sense of sight - following the lesson.
Please note, as a participant in the Amazon Services LLC Associates Program, I may earn a small commission on qualified recommended links. The Amazon Services LLC Associates Program is an affiliate advertising program designed to provide a means for sites to earn advertising fees by advertising and linking to Amazon.com.
My Amazon Picks for The I Spy Sensory Table:
Button Counting Mats
Button Snake
Buttons aren't limited to use in practical life.
While they are an incredibly important practical life skill to master, my students have loved working with buttons to: sort, count, shape match, weigh, line up to make letters, decorate their fine motor Play-Doh creations, sew onto plastic canvas and practice fine motor skill work with buttoning and unbuttoning through button holes. The buttons we use in the classroom are all different colors, sizes and shapes, making them fun to work with. Two of our favorite button activities are the Button Counting Mats and the Button Snake. 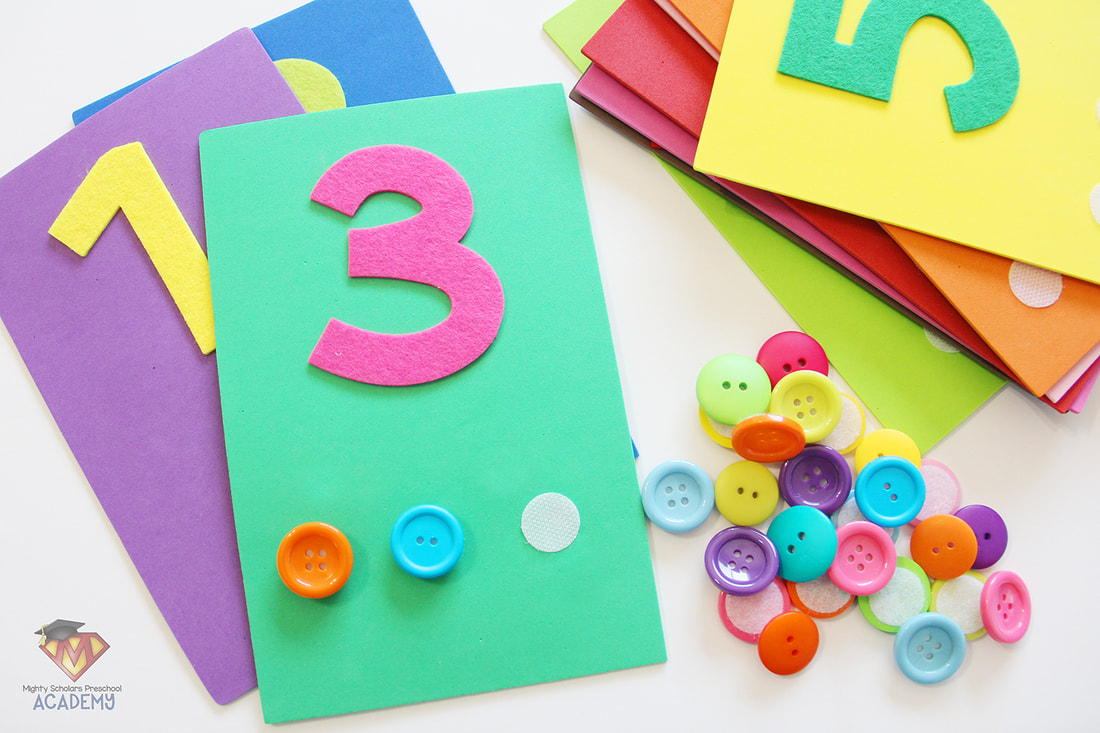
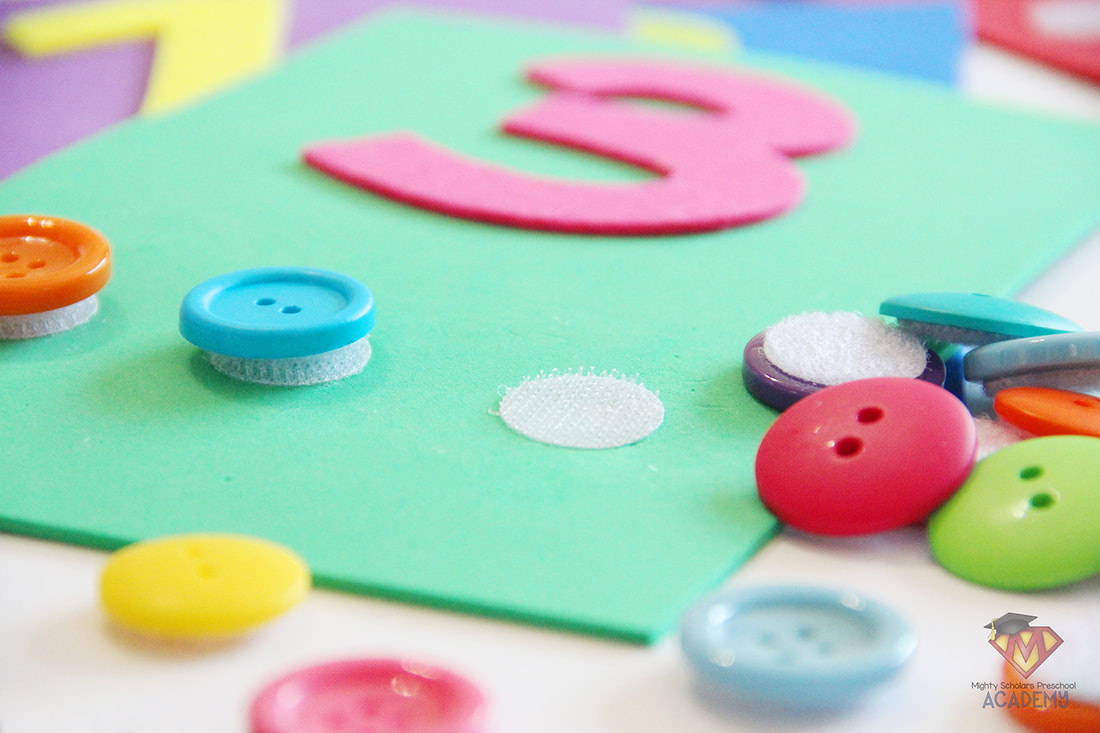
The Button Counting Mats we use in my classroom are made from craft foam rectangles, large felt number stickers, various buttons and self-stick hook and loop coins. My mats only go up to number 20, since I found the space for the corresponding amount of buttons on the foam very limited at that point. The reason felt number stickers were used was to add an extra tactile/sensory component to the activity, similar to sandpaper letters and numbers in Montessori. Children learn and remember best by also using their sense of touch and the raised felt numbers provide that developmental need, helping my students comprehend how the numbers are formed by feeling with their fingertips. I found the felt number stickers in the Target dollar section. If you aren't able to find large felt number stickers, large number stickers or large glitter number stickers would also work just fine. When my students are working with the Button Counting Mats, I have them first trace the number with their finger tips and say its name. Then, I have my students count out the buttons as they add them to the mat and once as again after they have all been added. The hook and loop coins not only attach the buttons to the foam sheet, they also provide a fine motor component in addition to the regular grasp and placement of the buttons. Removing the buttons requires stronger pincer grip strength. 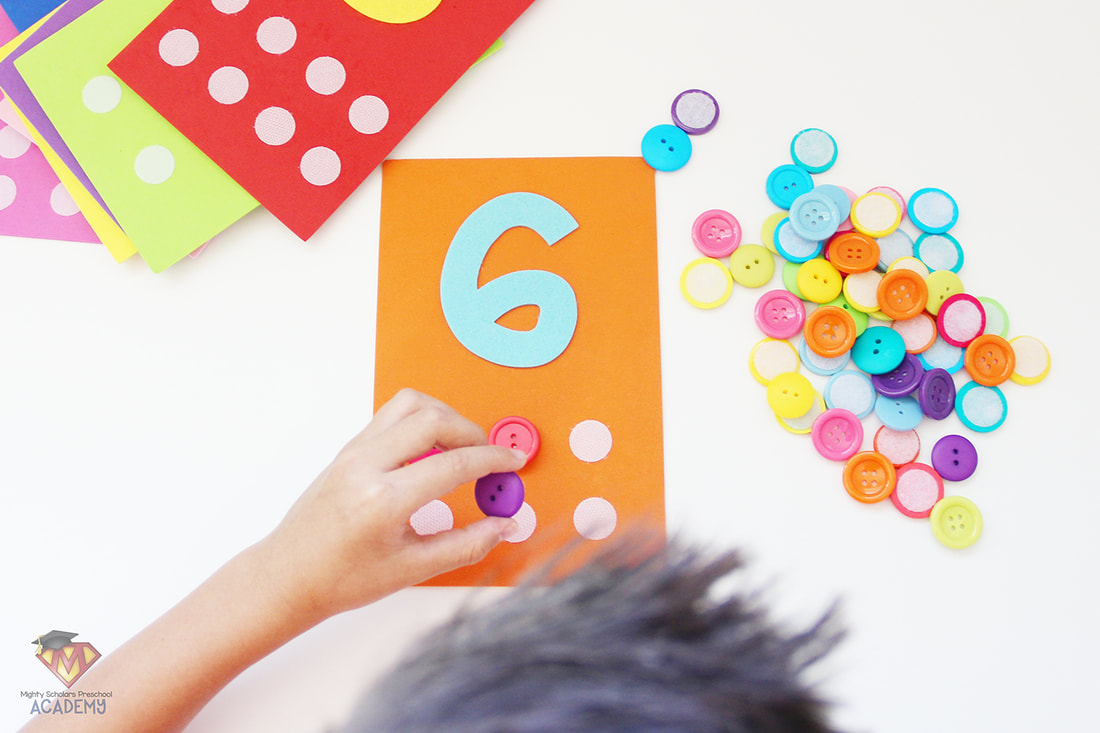
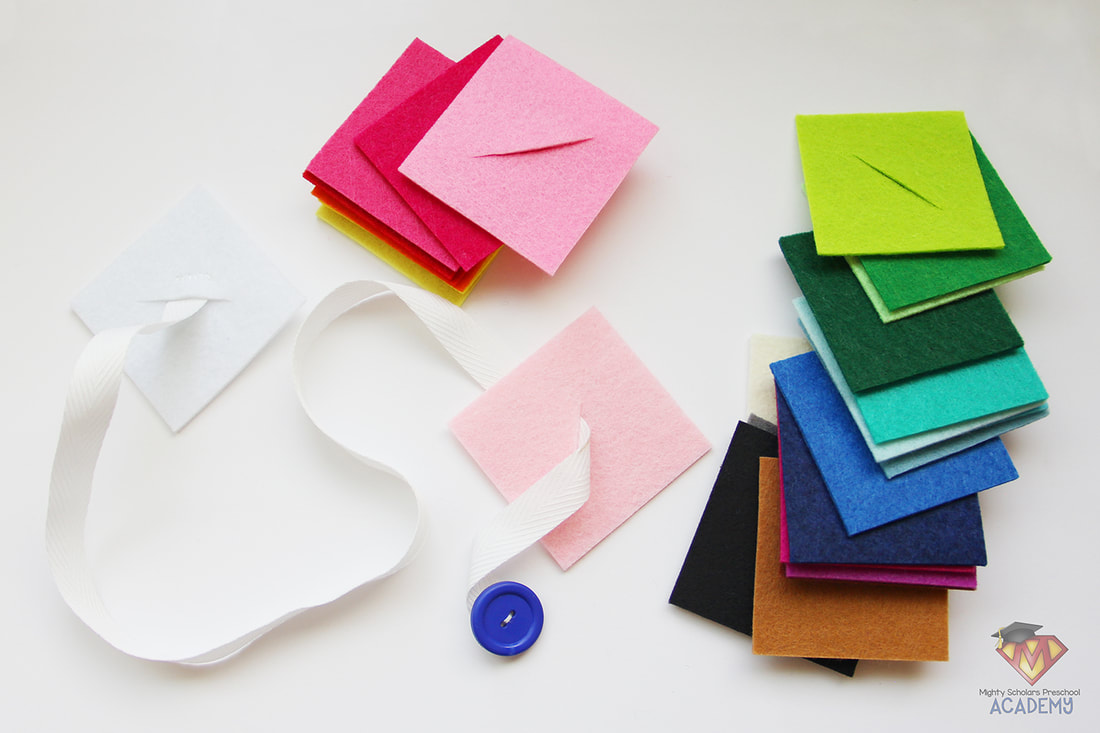
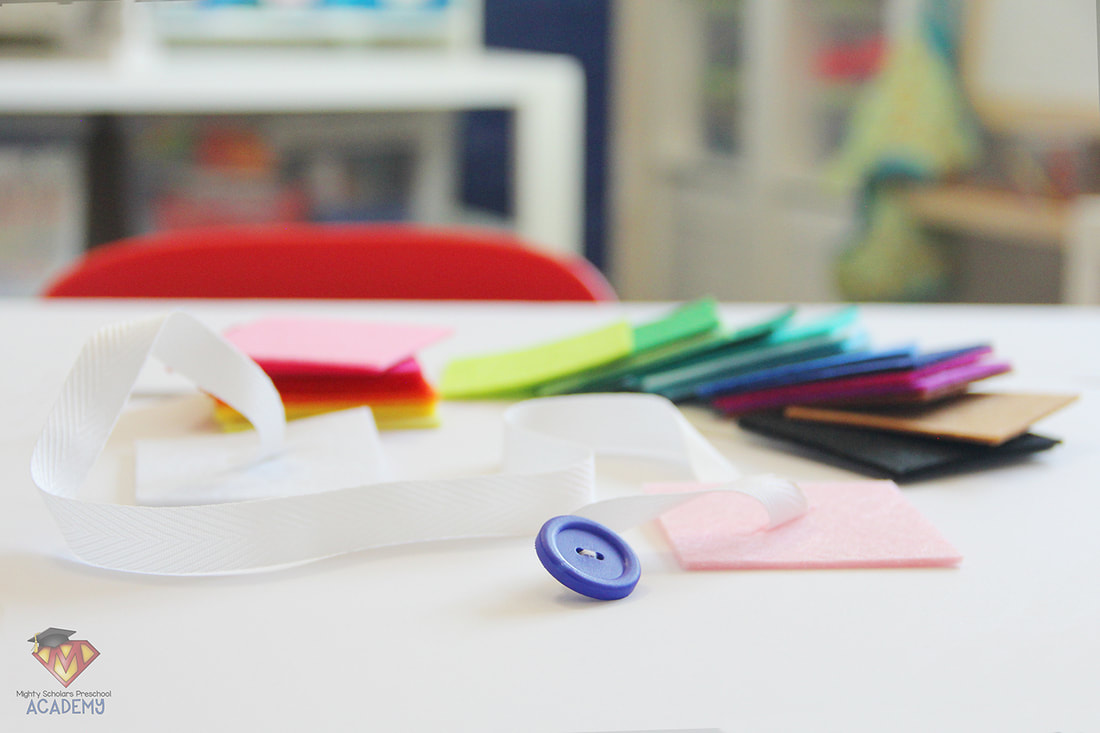
The Buttons Snakes are made from woven ribbon, felt squares and a large button. To make The Button Snakes, its important to use a button large enough for very young children to grasp and manipulate through the button holes easily. The buttons I use are approximately the size of a quarter. The ribbon width is smaller than that of the button, and the ribbon is cut approximately 20" long. The button needs to be secured by stitching to one end. I found that flat rolling the end of the woven ribbon, two or three times, and stitching through the flat roll made a stronger, longer lasting snake and kept the ribbon from fraying. I used the stiffer craft felt, since its much easier to manipulate and will hold its structure better in the long run with how much use they will get. The regular weight felt can be too flimsy for some children to use and the button hole can stretch out of shape or tear. My Button Snakes have withstood multiple uses and are still going strong. Its important to cut the squares of felt larger than the button, usually between two and three inches square. Once all the felt squares have been cut, fold them in half and cut a diagonal button hole slit that is larger than the button. Hand stitch one of the felt squares to the other end of the woven ribbon. Again, I found that making a tight, flat roll (roll two or three times) on the end of the ribbon before stitching the ribbon end to the felt, provided a more secure tail/stopping point for the buttoning squares and kept the ribbon from fraying. Button Snakes are a simple and colorful activity that can keep children engaged for extended periods of time, especially in a group setting. I introduce button snakes in small group or for our morning table time activity. My students talk with each other about the colors and patterns they are forming. You can differentiate for different ages and skill levels by the amount of buttoning squares you set out for them to use. If a student seems to be engaged and isn't frustrated, you may want to add more buttoning squares to their tray as they go along. Once all the felt buttoning squares have been added to the snake, I have my students remove them. The unbuttoning skill is just as important as the buttoning. 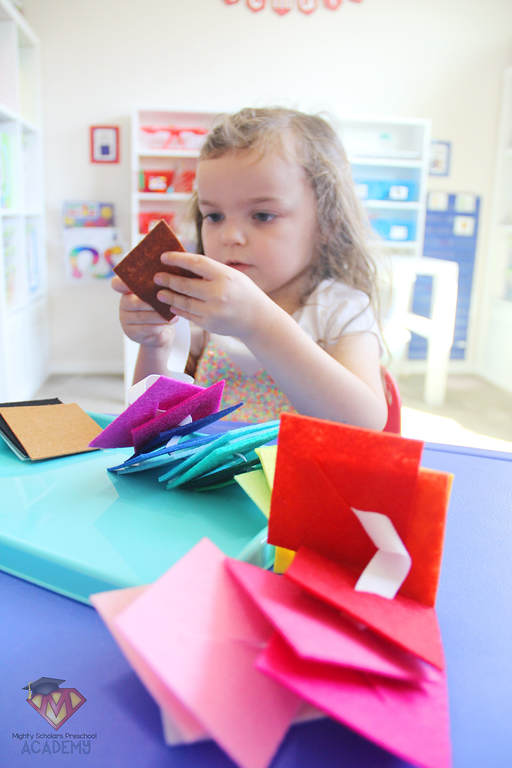
Please note, as a participant in the Amazon Services LLC Associates Program, I may earn a small commission on qualified recommended links. The Amazon Services LLC Associates Program is an affiliate advertising program designed to provide a means for sites to earn advertising fees by advertising and linking to Amazon.com.
My Amazon Picks used for these activities are:
|
|||||||||||||||||||||||||||||||||||||||||||||||||||||||||||||||||||||||||